


1.0 Accuracy Audit Workflow
FootfallCam will perform an accuracy audit to verify the integrity of the data generated by each FootfallCam device when tuning is requested upon device installation. There are 2 main parts in accuracy audit, tuning and certification. The accuracy audit for each device is expected to be completed within 3 working days under ideal circumstances.
Tuning is settings adjustments based on the device's live view while certification is the cross-checking process on manual count with the system count based on short pre-recorded video clip(s). This is to ensure that the accuracy is at least 90% with enough sample size to confirm on the accuracy. Once the accuracy audit is completed, an accuracy audit report will be generated and sent to the user.
1.1 Accuracy Audit
Accuracy Audit indicates the readiness of the device's data. Before user starts checking on the data of a device or a site, users shall check on the accuracy audit stage (1.1.1) first to make sure the data is ready to be used.
In the standard tuning request (normal in and out line at the site entrance), FootfallCam tuning team will be automatically alerted once the device is online and allocated to the store. And start the standard qualification and tuning process.
-
Qualification on device readiness: Required 1 working day to check the device location, device compatibility, any environment limitation, video scheduling
-
Tuning for the device: standard SLA is within 3 working days provided the device network is stable, doesn't have any bandwidth limitation or environment constraint. Any environment constraint will raise a ticket to the customer to sure it has been fixed before the team can continue to tune the device.
-
QC the tuned setting: Provided all the devices in the site has been tuned, this will trigger the QC process where FootfallCam team will be monitoring the data after the site devices tuned in the 3rd, 14th days. Any discrepancies causing the QC failed will required a retuning process.
1.1.1 Special Tuning Request
Customer will need to raise a support ticket after the device has been installed and allocated to the site if there is any Special Tuning Request as below:
| Counting Module (Functions) | Hardware Requirement | Context | Reference |
| Re-location of the device position | All | Device has relocate from store A to store B, or Device is relocated to the same store but different location, or the store has recently refit and the doorway has been changed, etc | |
| Special Tuning Instruction or Requirements | All | e.g. Smaller tracking zone as there's special path for staff/ any delivery man | |
| Entrance In/Out Line (Multiple ROIs) Tuning Request |
People Counter Model: Centroid Model:
|
Device required to track the multiple areas or multiple directions | - |
| Exclusion Line |
People Counter Model: |
Required to add a exclusion line for staff path. Please indicate the line location on top of the live view. Please note that all the people walking through the drawn exclusion line will not been counted. Entrance needs to have sufficient walk path for normal visitor after the exclusion line is applied |
- |
| Patterned Staff TagTM |
People Counter Model: FootfallCam 5D ProTM Accessory: FootfallCam Pattern Staff Tag™ |
Customer has purchased AI staff tag to exclude the staff at the tracking area. Please note there's a minimum requirements need to fulfill if you would like to activate this counting feature. Always schedule a walk test video with the staff wearing the tag to facilitate the tuning process. |
FootfallCam Patterned Staff Tag.pdf |
| Fabric Staff TagTM |
People Counter Model: FootfallCam 5D ProTM Accessory: FootfallCam Fabric Staff Tag™ |
Customer has purchased ToF discreet fabric tag to exclude the staff count at the tracking area. Please note there's minimum requirements need to fulfill if you would like to activate this counting feature. |
FootfallCam Fabric Staff Tag Datasheet.pdf |
| Exclusion Zone with Button |
People Counter Model: FootfallCam 3D PlusTM SE FootfallCam 3D PlusTM GPIO FootfallCam 3D MaxTM GPIO Accessory: FootfallCam Exclusion Wall Button |
It must activated with the hardware installation together with the staff exclusion button. Please ensure the button must be installed in the live view and the button is coverable by the tracking zone and able to view the staff's head clearly *Only For Single IN/OUT |
FootfallCam Exclusion Wall Button.pdf |
| Children Counting Request |
People Counter Model: |
Standard counting module did not include the human height <1.3m. If the use case need to include the children count >1.1m and <1.3m. Supported human height from 1.1 m to 2.3 m |
- |
| Group Counting |
People Counter Model: |
Enabling this will store the group count as group In and group Out counts. |
- |
| Queue Counting |
People Counter Model: |
To enable the queueing mode for the specific device. Track how many people is in the queue, and queueing duration Only for Single /Multiple Queue Counting |
- |
| Area Counting |
People Counter Model: |
Tracks the duration a person enters the ROI zone. It will be counted as In if exceeds the threshold of duration, and counted as Out, if the person leaves the zone | - |
| Visitor Engagement |
People Counter Model: Centroid Model: |
Tracks the duration (adjustable) a person enters the ROI zone and categorising into Engaged Customer or Passerby depending on the threshold of duration. |
- |
| Heatmap Counting |
People Counter Model: FootfallCam 3D ProWaveTM FootfallCam CentroidTM |
Human detection by pixel on the floorplan coordination. | - |
| Occupancy Counting |
People Counter Model: FootfallCam CentroidTM |
Number of human currently in the zone. | FootfallCam 3D ProWave Datasheet.pdf |
| Demographic Analysis |
Centroid Model: |
Detect the human demographic profiling e.g. gender, age group, mood. **Centroid support up to 8 ROI only (sum of all cameras).
|
FootfallCam Centroid Datasheet.pdf |
1.1.2 Accuracy Audit Stages
Users can view the stage of the accuracy audit for each devices from the Device Management & Health Check page by following the steps below:
STEP 1 - Access to FootfallCam Analytic Manager V9™
STEP 2 - Click on Setting > Devices to access the Device Management & Health Check page.
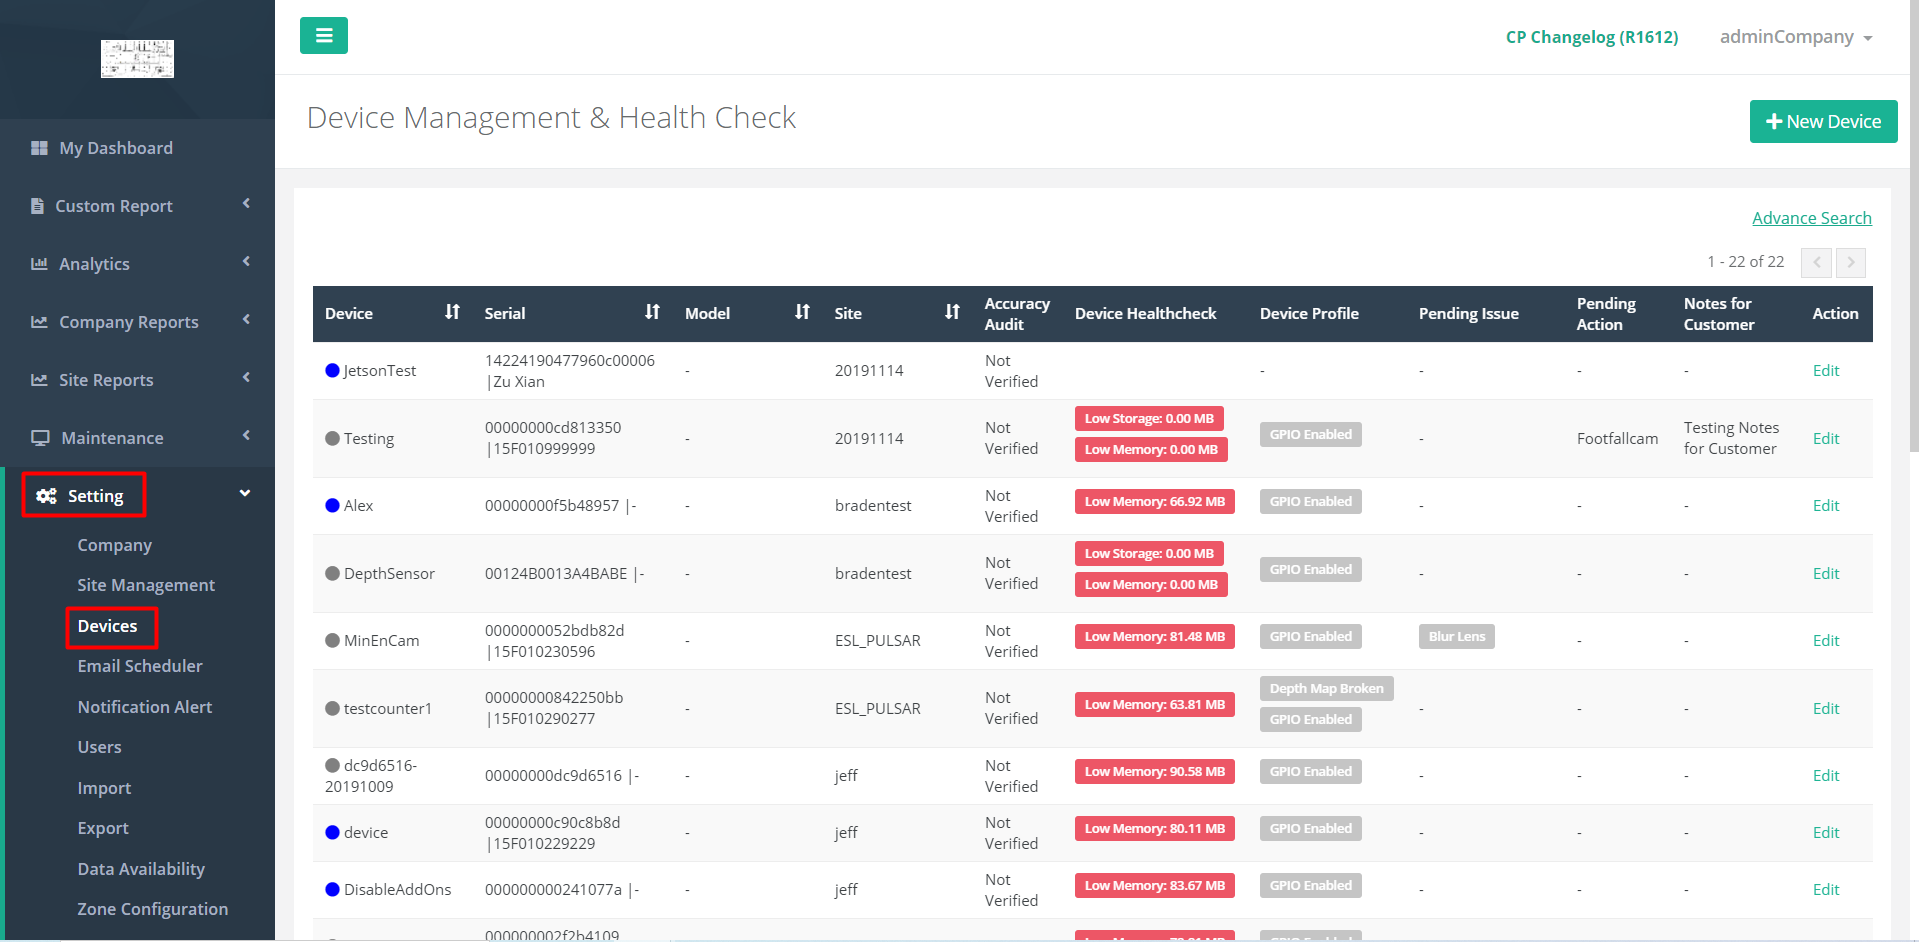
STEP 3 - Check on the 'Accuracy Audit' column.
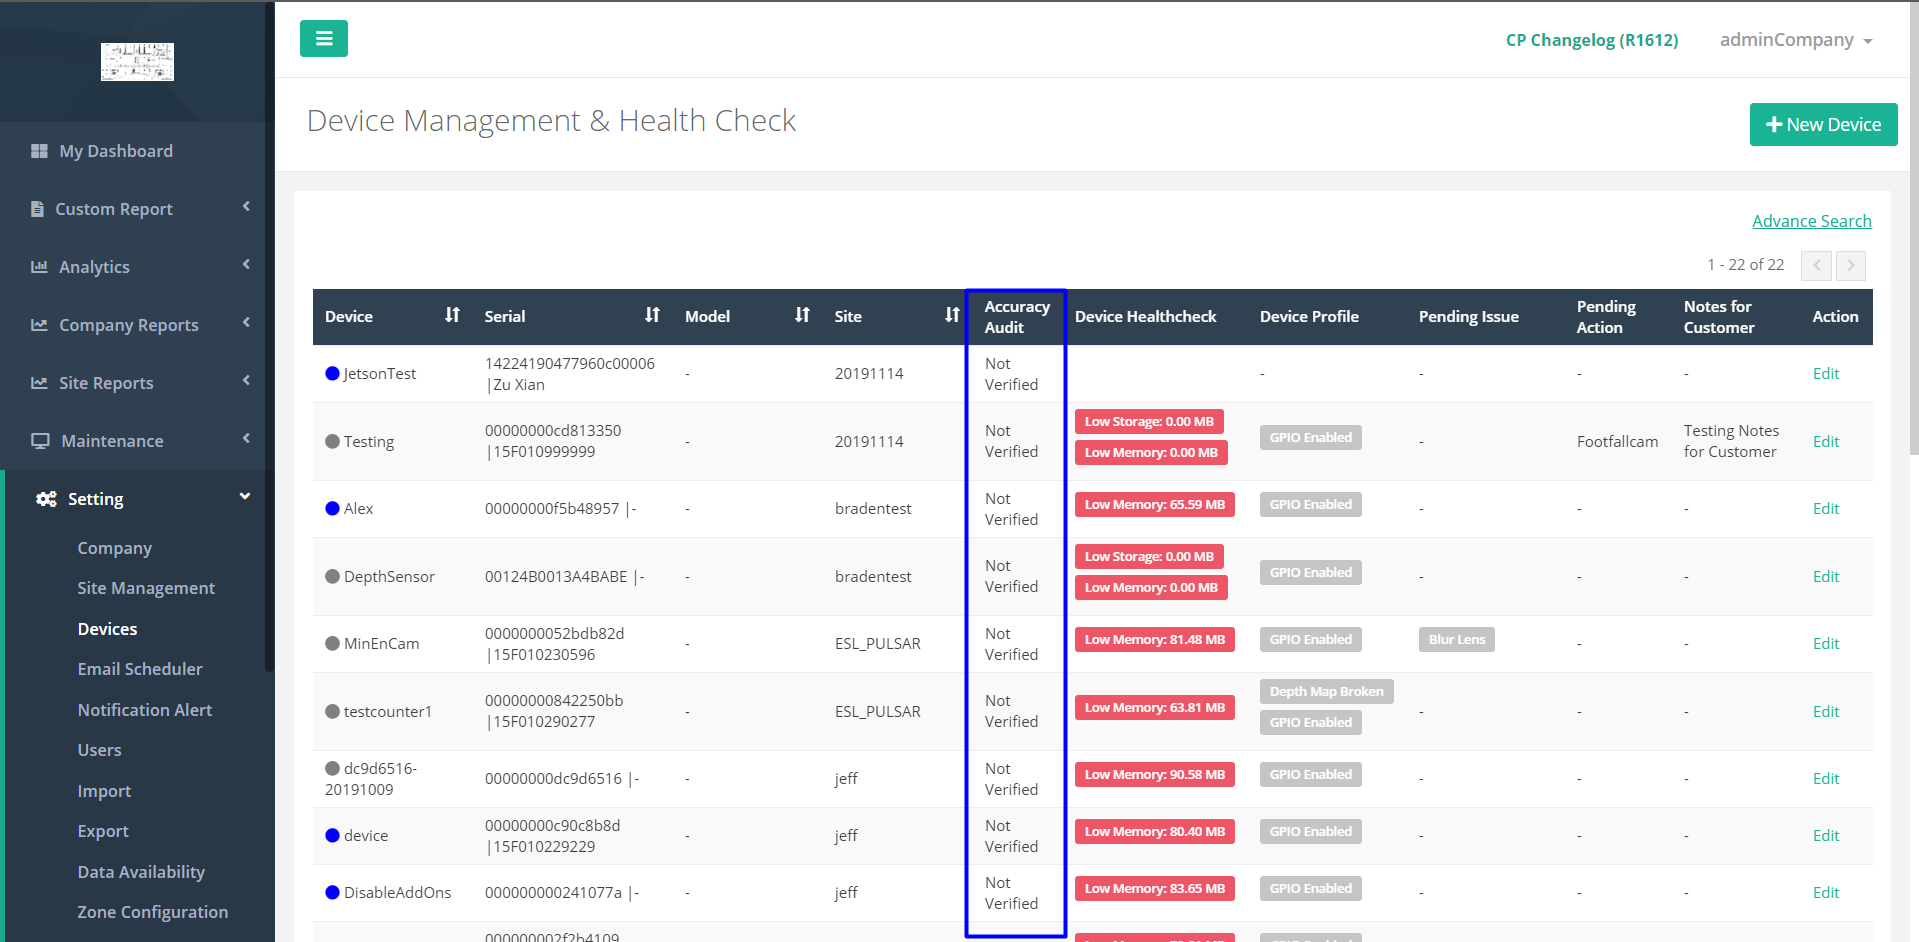
The stage of accuracy audit can be also be viewed in Device Page after clicking on the Edit of the device of interest:
The following are the accuracy audit stages for devices:
| Accuracy Audit Stage | Descriptions |
| #1 New | The device is newly allocated which requires usage and configuration confirmation. |
| #1 Ready to Tune | The device has been configured and is ready for tuning by FootfallCam. |
| #2 First Line Tuning | The tuning process of the device has been started and is expected to be completed within 3 working days under normal circumstances. |
| #2 Second Line Tuning | There is minor difficulty in tuning the device which requires FootfallCam tuning specialist to look further into the issue. Please expect a minor delay in the accuracy audit completion date. (optional stage) |
| #2 Ticket Raised |
There is environmental constraint which restrain the accuracy audit process of the device from being able to be proceeded which requires action from client. Please refer to the relative support tickets for more info. (optional stage) |
| #3 Tuned | The device's settings have been refined and the data is ready to be used. In the meanwhile, FootfallCam will continue to collect sufficient sample size in order to prove the counting accuracy with video evidence. |
| #4 Completed | The device has successfully completed the accuracy audit with statistically significant sample size. Devices are expected to be completing accuracy audit within 7 working days under normal circumstances. Please click into the link to view the accuracy audit report. |
| No Need to Tune | Device's accuracy audit is put on hold due to testing purpose or constraints not being able to resolved, which would result in inaccurate counting for the device. |
| Reseller to Tune | The accuracy audit of the device will be carried out by FootfallCam Partner. |
The data of a device is ready to be used only when its accuracy audit stage is either '#3 Tuned' or '#4 Completed'.
As for the site data to be ready, all the active devices at the site must either be '#3 Tuned' or '#4 Completed'.
1.1.2 Accuracy Audit Detail Process
| Accuracy Audit | |
| Completed By | FootfallCam tuning personnel |
| Process Duration |
Within fourteen (14) working days
(Info: Process duration might be increased due to lack of sample size or environment constraints.) |
| Scope of Work |
|
| Result |
|
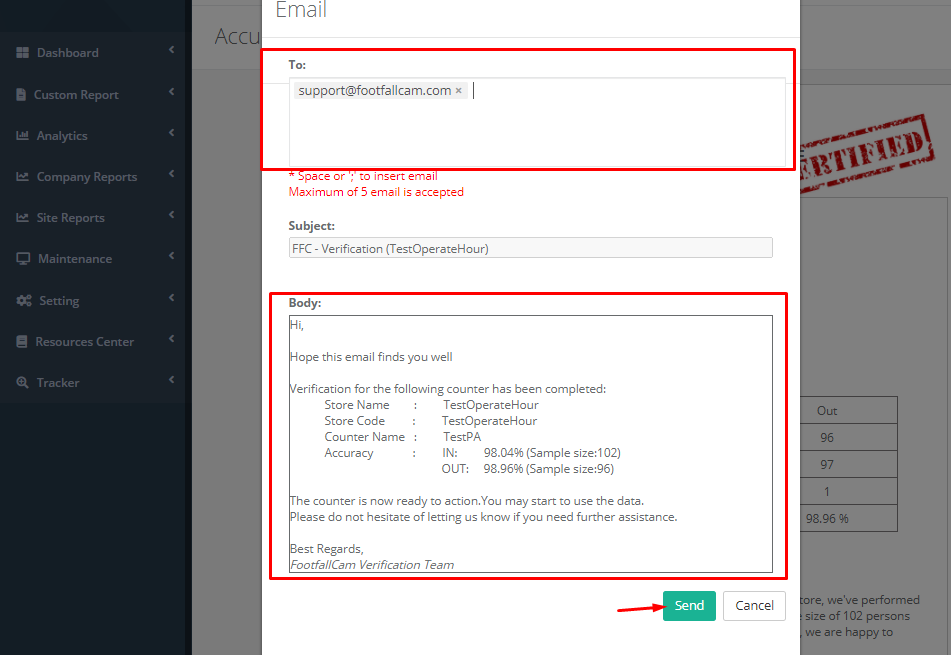
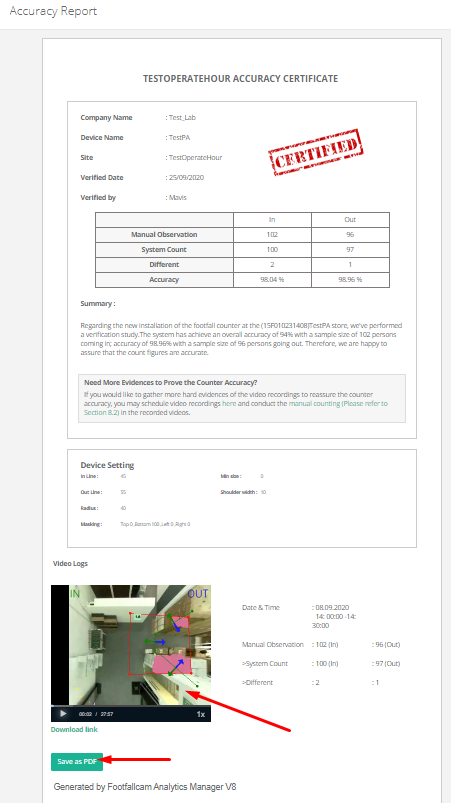
1.1.3 Download Accuracy Audit Report
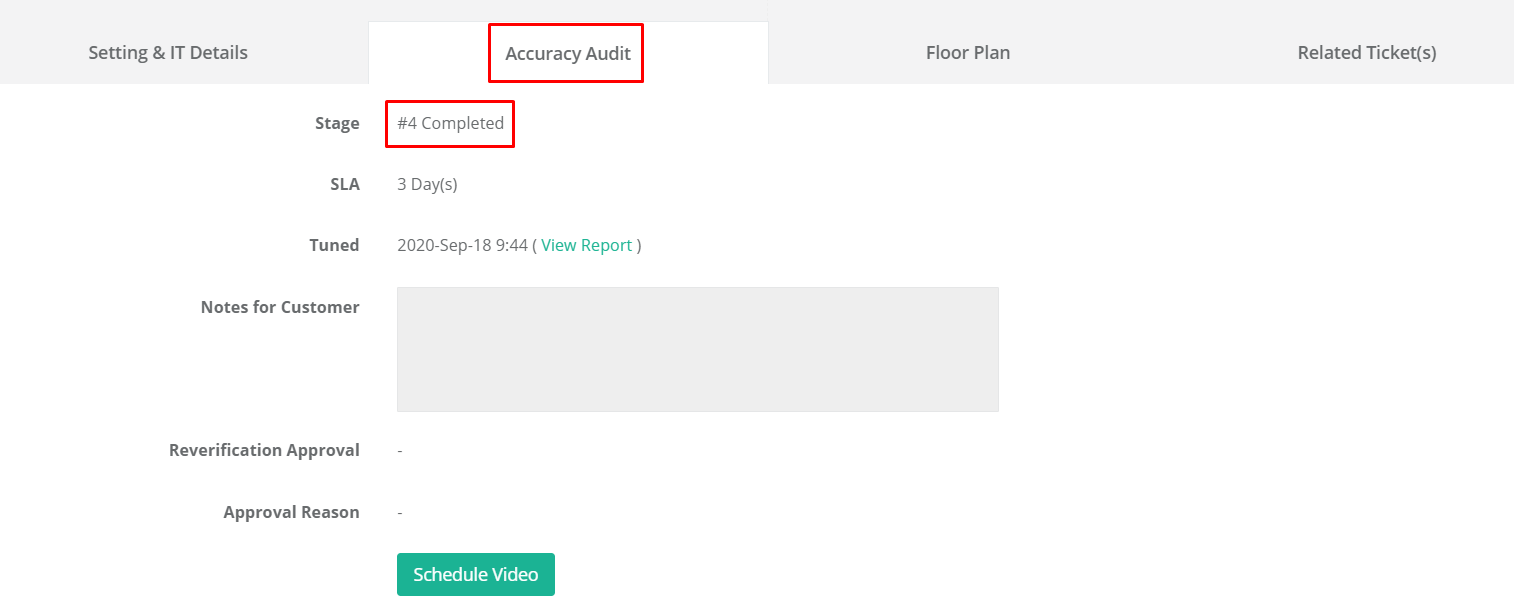
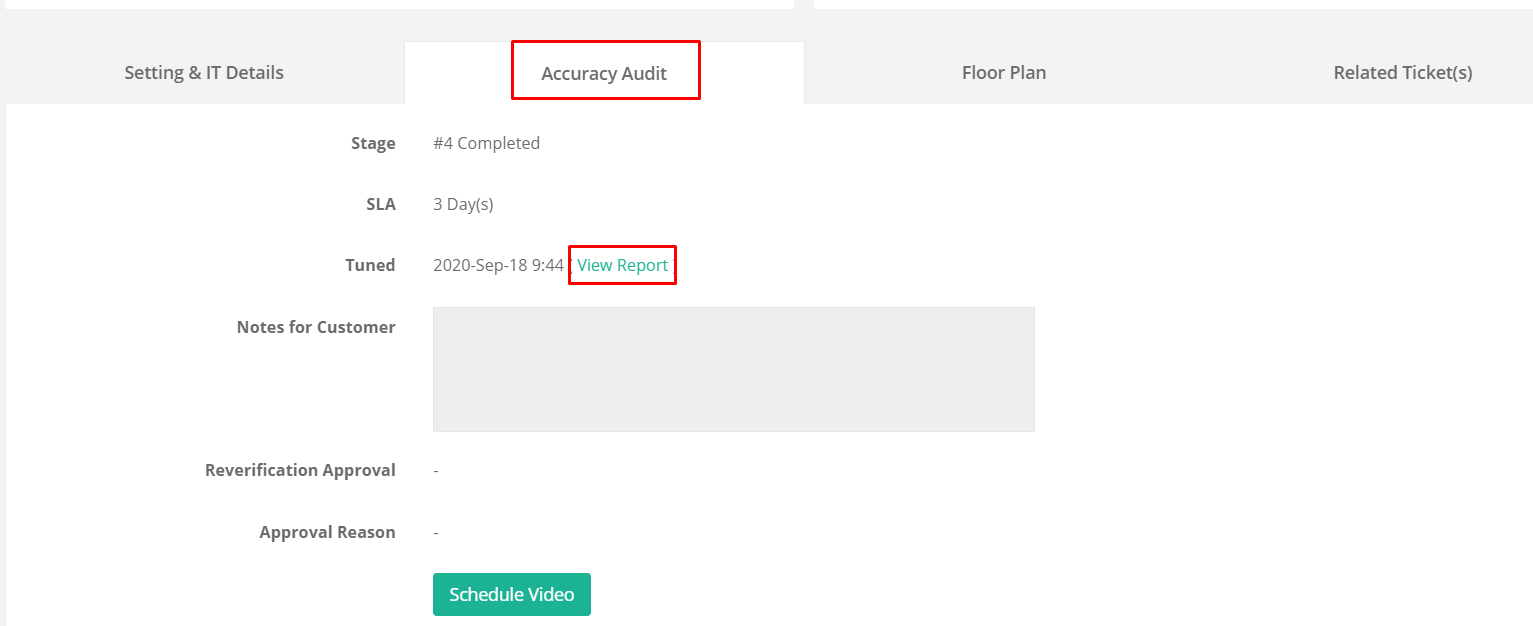
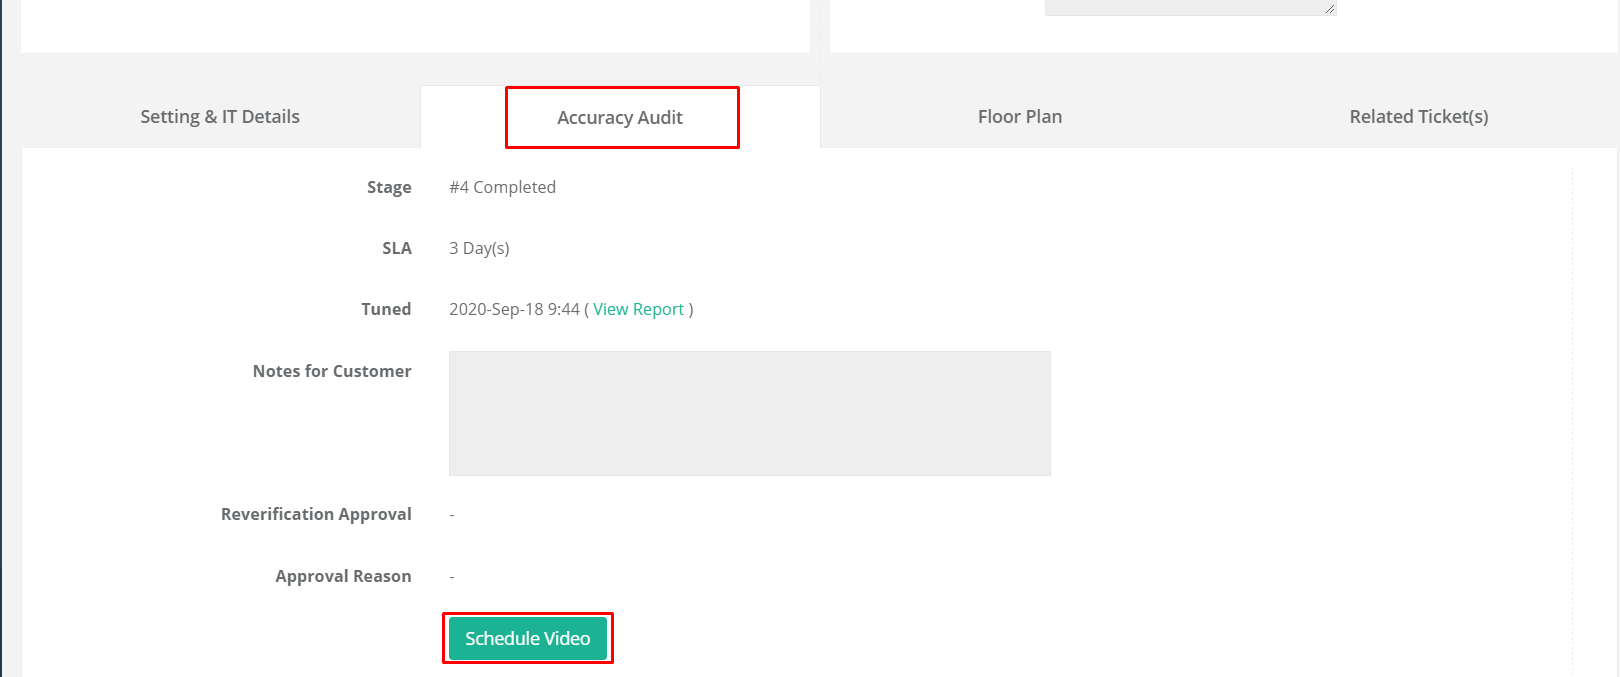
Accuracy Audit Report for devices can be obtained from the Accuracy Audit section in the Device Page (refer 1.1.1 to be redirected to Device Page). Click on View Report to be redirected to the corresponding accuracy report.
1.2 Self Accuracy Auditing
Users can perform self accuracy auditing whenever the counting accuracy is in doubt. This can be done in a few steps:
-
Create new recording (refer to 1.2.1 for more details)
-
Play video when the file is available
-
Cross-check manual counting (refer 1.2.2 more more details) with system counting
1.2.1 Create New Recording
In order to schedule videos, follow the steps below:
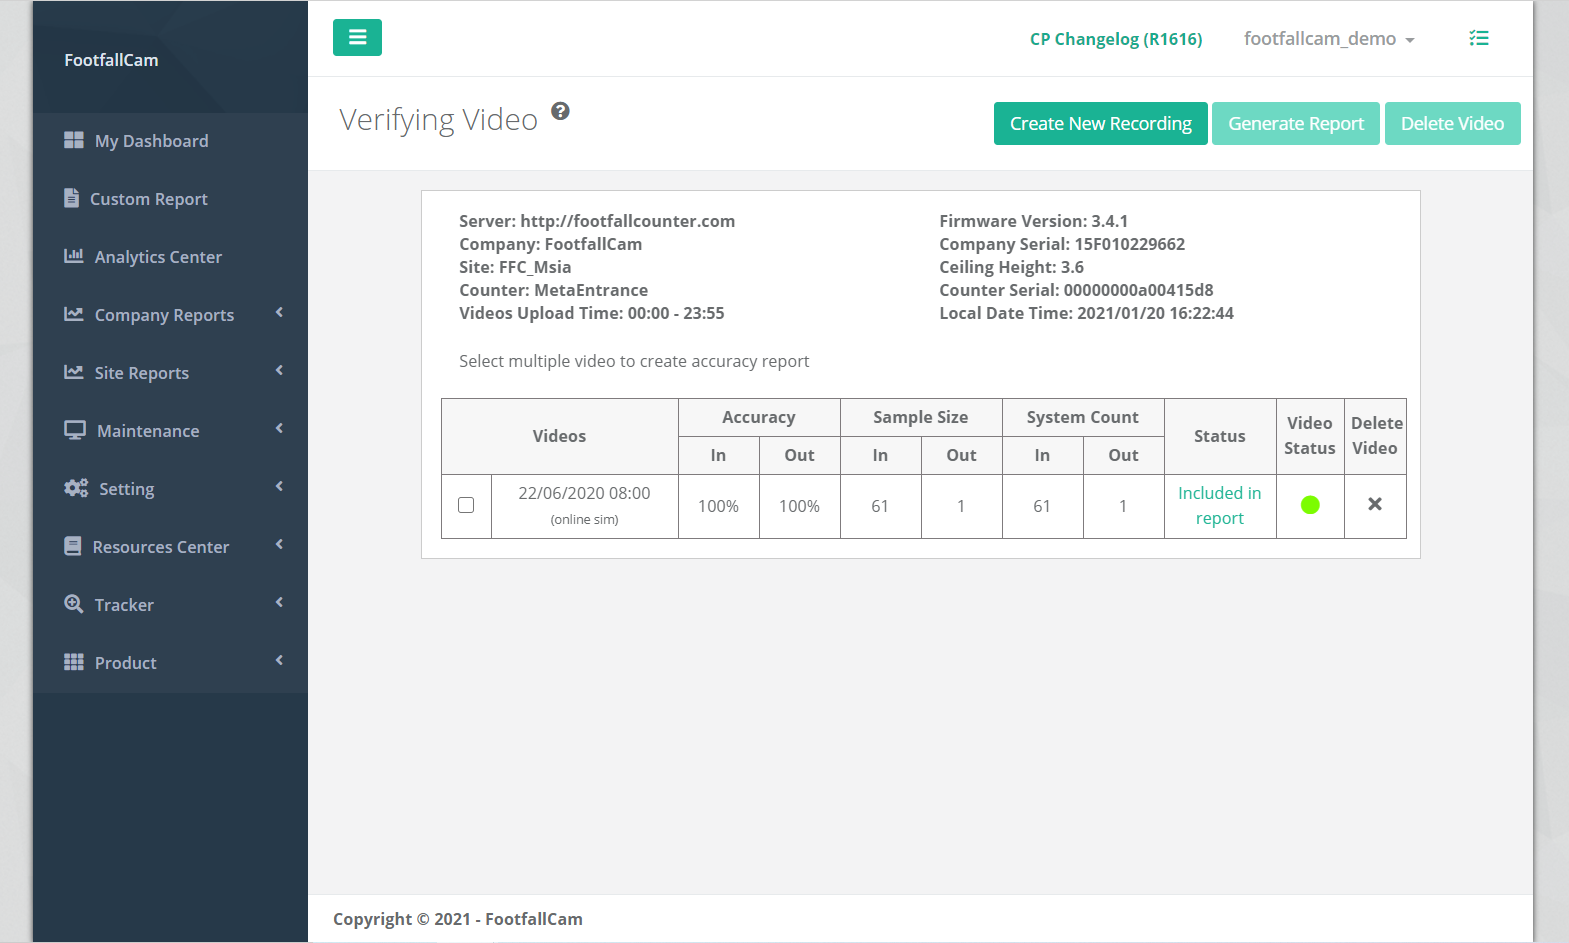
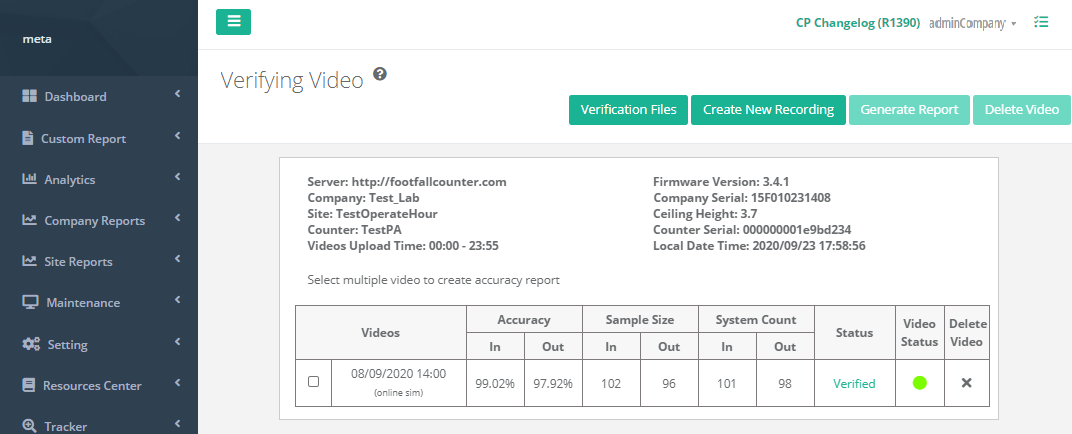
STEP 1 - In the Device Page (refer 1.1.1 to be redirected to Device Page), scroll to the bottom and navigate to Accuracy Audit tab, click on the Schedule Video button to be redirected to the Verifying Video page.
STEP 2 - Click on Create New Recording and a Schedule Recording pop-up will be shown.
STEP 3 - Complete the process by entering all the required fields and click on Set Schedule button.
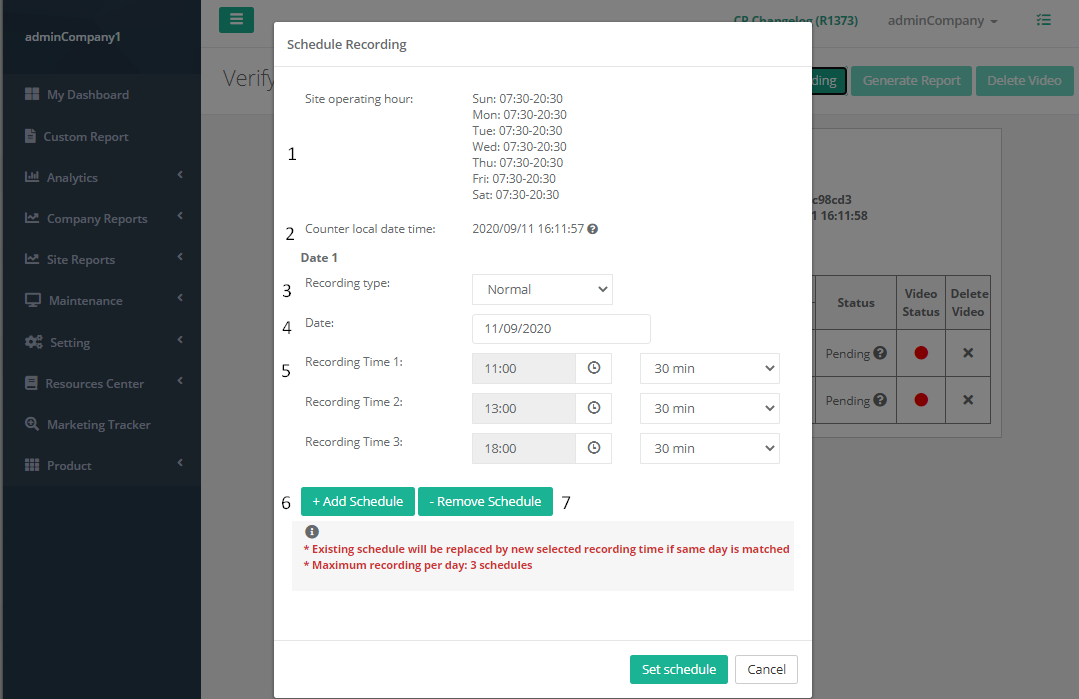
| Field | Description |
| 1. Site Operating Hour | Operating hour for the branch. (Info: For more information on Site Operating Hour, please refer to Section 4.5 Manage Site Detail.) |
| 2. Counter Local Date Time | Current date time for the device. |
| 3. Recording Type | Select the type of recording. (Choose 'Normal' for self auditing purpose.) |
| 4. Recording Date | Select the date to record. |
| 5. Recording Time | Select the time and duration to record. |
| 6. Add Schedule | Add another date to record |
| 7. Remove Schedule | Remove schedule date. |
1.2.2 Perform Manual Counting
STEP 1 - Go to Verifying Video page (may refer to the steps in 1.2.1 Create New Recording).
STEP 2 - Select any available video and click on Verify to perform manual count by referring the guideline as below:
|
|
|
|
|
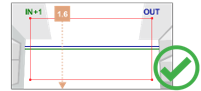
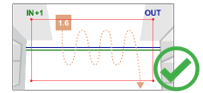
Visitor must go through the start-end of tracking zone (Red) and pass-by the In line (Green) then only will be counted as IN +1. |
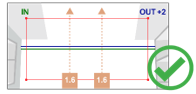
If two visitors go through the start-end of tracking zone (Red) at the same time and pass-by the Out line (Blue), both will be counted and OUT will be showing +2. |
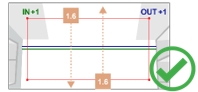
If two visitors go through the start-end of tracking zone (Red) at the same time and pass-by the In line (Green) or Out line (Blue), both will be counted as IN +1 and OUT +1 respectively. |
|
|
|
|
|
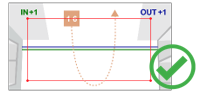
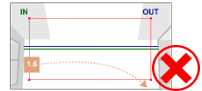
Children (height < 1.3m) and inanimate objects will NOT be counted. |
Visitor that make multiple U-turn within start-end of tracking zone (Red) and pass-by the In line (Green) will be counted as IN +1 only when he exits the tracking zone. |
Visitor who go through the start-end of tracking zone (Red) and pass-by the In line (Green) but make a U-turn after exiting the tracking zone and pass-by the Out line (Blue) again will be counted as IN +1 and OUT +1. |
|
|
|
|
|
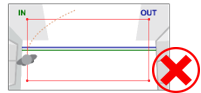
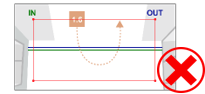
Visitor (Head) that walk outside of start-end of tracking zone (Red) will NOT be counted. |
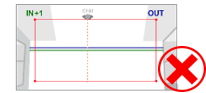
Visitor that go through the start-end of tracking zone (Red) only without passing-by the In line (Green) or Out line (Blue) will NOT be counted. |
Visitor that make U-turn within start-end of tracking zone (Red) will NOT be counted. |
STEP 3 - Perform manual count with Keyboard Shortcut.
STEP 4 - Complete the process and click on Complete Verification Study button.
| Item | Description |
| 1. Video Recorded | The footage recorded to perform verification study. Red Line (Mandatory): Tracking zone. Blue Line (Mandatory): OUT line. Green Line (Mandatory): IN line. Yellow Line (Optional): Staff exclusion zone. |
| 2. Playback Speed | To adjust the playback speed of the video. |
| 3. Total System Count | To show the total visitor IN and visitor OUT counted in the video recorded. |
| 4. System Count | To show the live counting when playback through the video recorded. |
| 5. Manual Count | UP ARROW: Manual Count as OUT. DOWN ARROW: Manual Count as IN. |
| 6. Add Schedule | To show the accuracy of counting based on System Count vs. Manual Count. |
| 7. Remove Schedule | To show the manual count triggered with timestamp of the video recorded. |
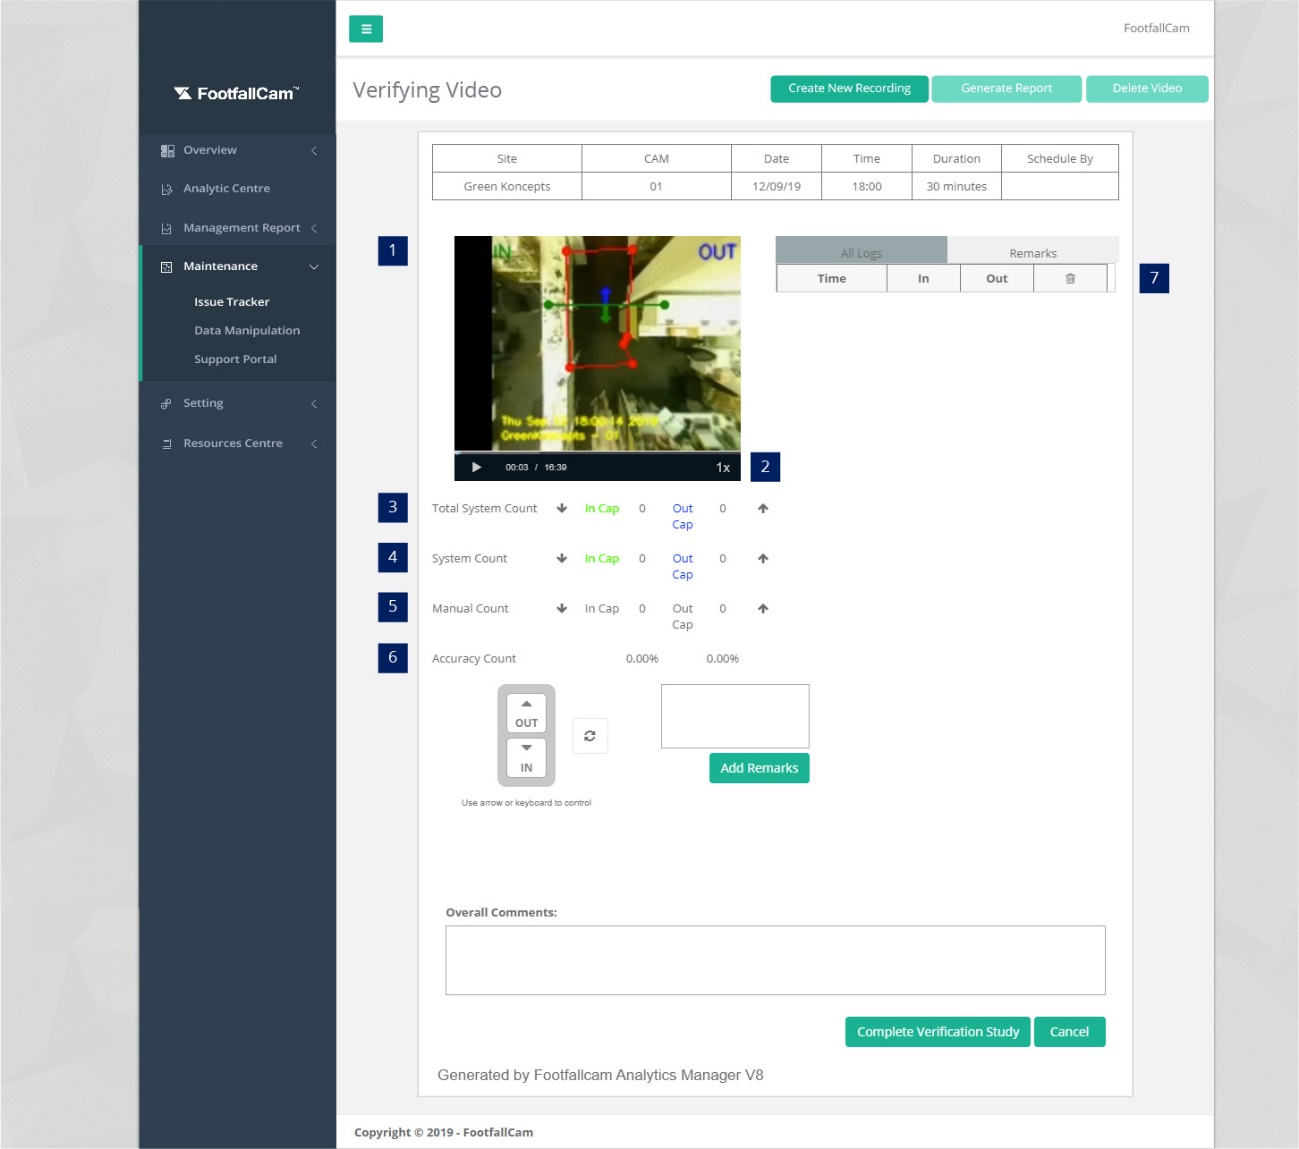
1.2.3 Delete Recording
STEP 1 - Go to Verifying Video page (may refer to the Step 1 to 4 in 1.2.1 Create New Recording).
STEP 2 - Check the box on the left for the video you wish to delete and click on Delete Video.
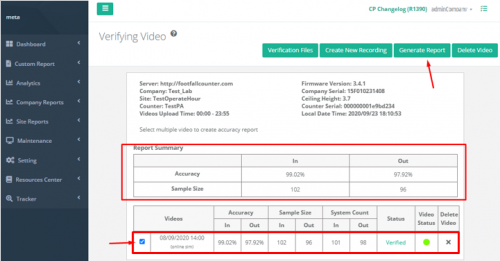
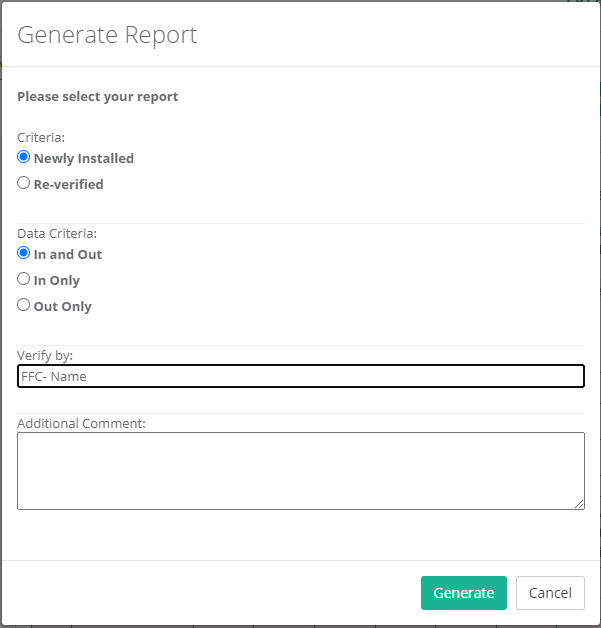
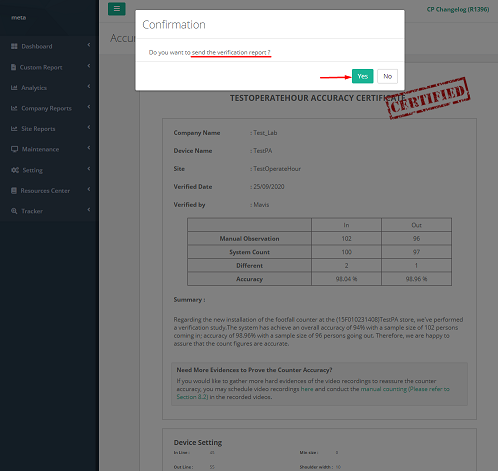
1.2.4 Generate Accuracy Audit Report
| Generate report in server |
|
1.3 Site & Device Profile
From Site Management & Health Check page, user should be able to view a column for 'Site Profile'.
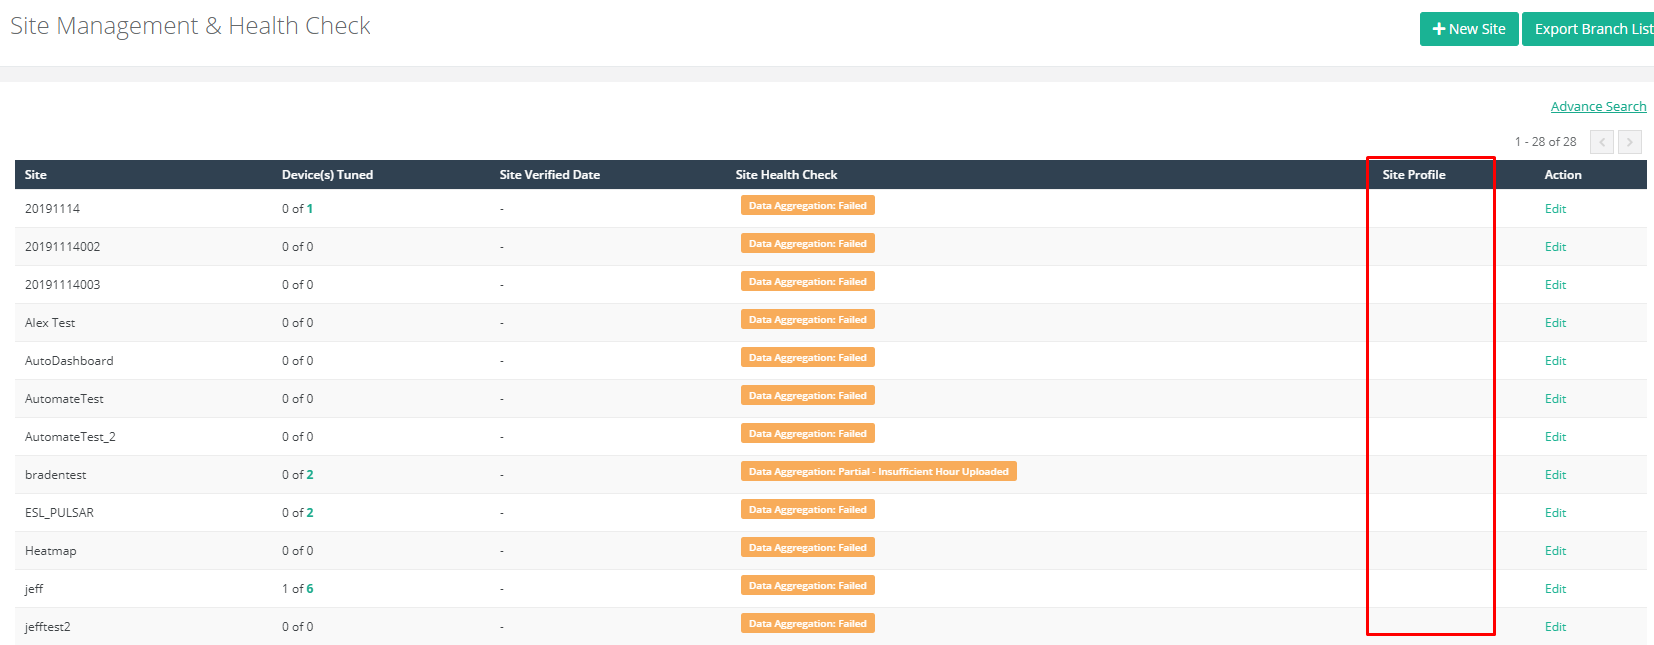
The tags here indicates the site readiness, site usage, and known but unsolved constraint issues for the respective sites. Known issues will first be informed to users through support tickets by FootfallCam, if there is no reply from users or the issues are not solved, then those tags will be added to the respective sites.
From Device Management & Health Check page, user should also notice there is a column for 'Device Profile'.
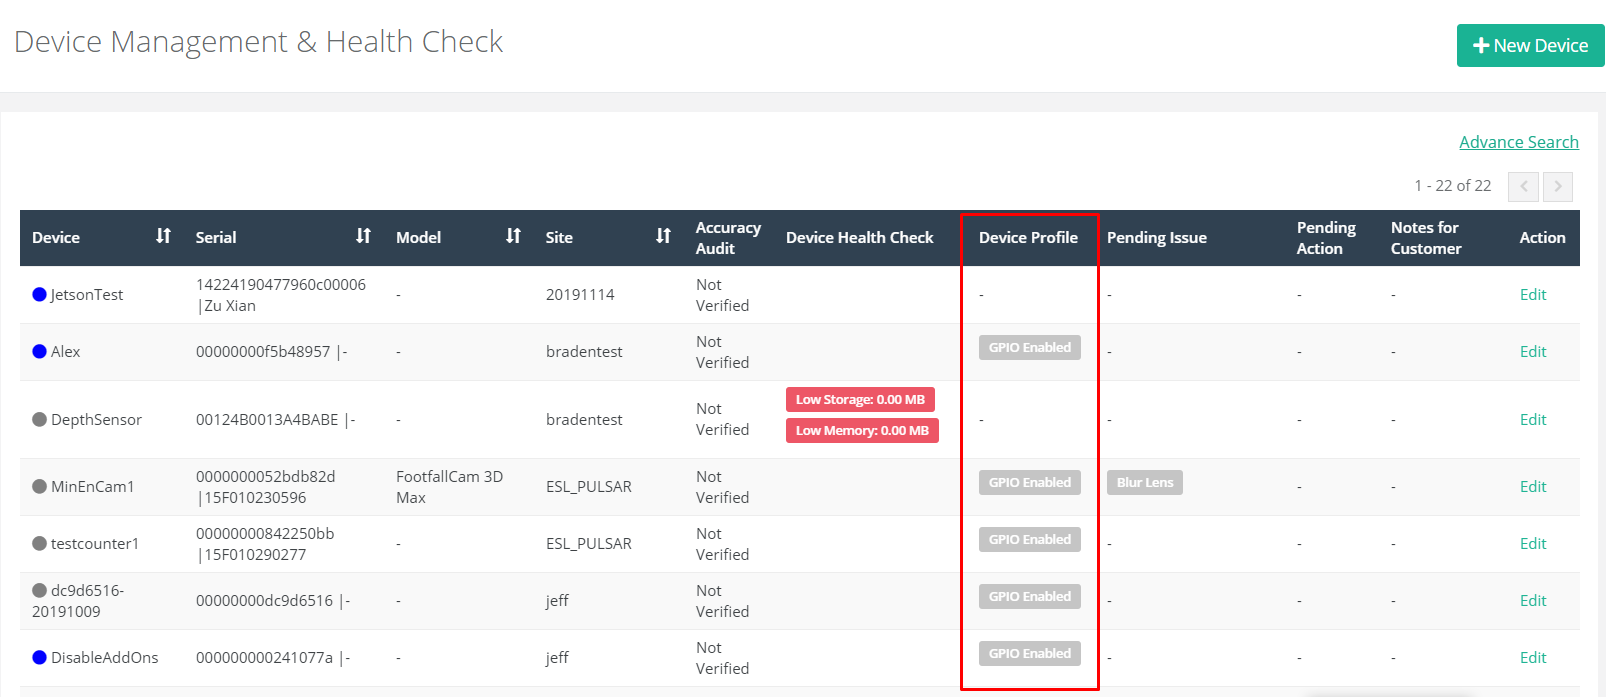
The tags here indicates some nature of the device itself either on the device readiness, other usages or some known but unsolved constraint issues for each device. These tags can only be added by FootfallCam personnel.
Those tags requiring action by users will then be explained in more details in section 1.3.2.
1.3.1 Ideal Environment
When a device is installed under an ideal environment for counting, it will not be tagged with constraint issues and will be achieve an accuracy of at least 90%.
An ideal device environment consists of the following criteria:
-
internet connection available
-
correct device model according to the mounted height
-
sufficient lightning condition
-
installed at a flat ceiling with flat walking area
-
live view is free of all sorts of blockage
-
no queuing within tracking zone
-
sufficient tracking zone within live view (refer to 1.3.1.1 Live View Checking for more checking details)
-
store staff is not hovering within tracking zone
1.3.1.1 Live View Checking
Where to Check
A device's latest live view can be checked by 2 methods:
-
Checking current live view (recommended): Accessing the device based on the steps in 3.0 Accessing the Device under installation guide.
-
Check yesterday's live view (will not know if there is any change in live view today): Check from Data Integrity Report of the corresponding site. In order to check Data Integrity Report, follow the steps below:
STEP 1 - Login to FootfallCam Analytic Manager V8™.
STEP 2 - Click on Setting > Site Management to access the page.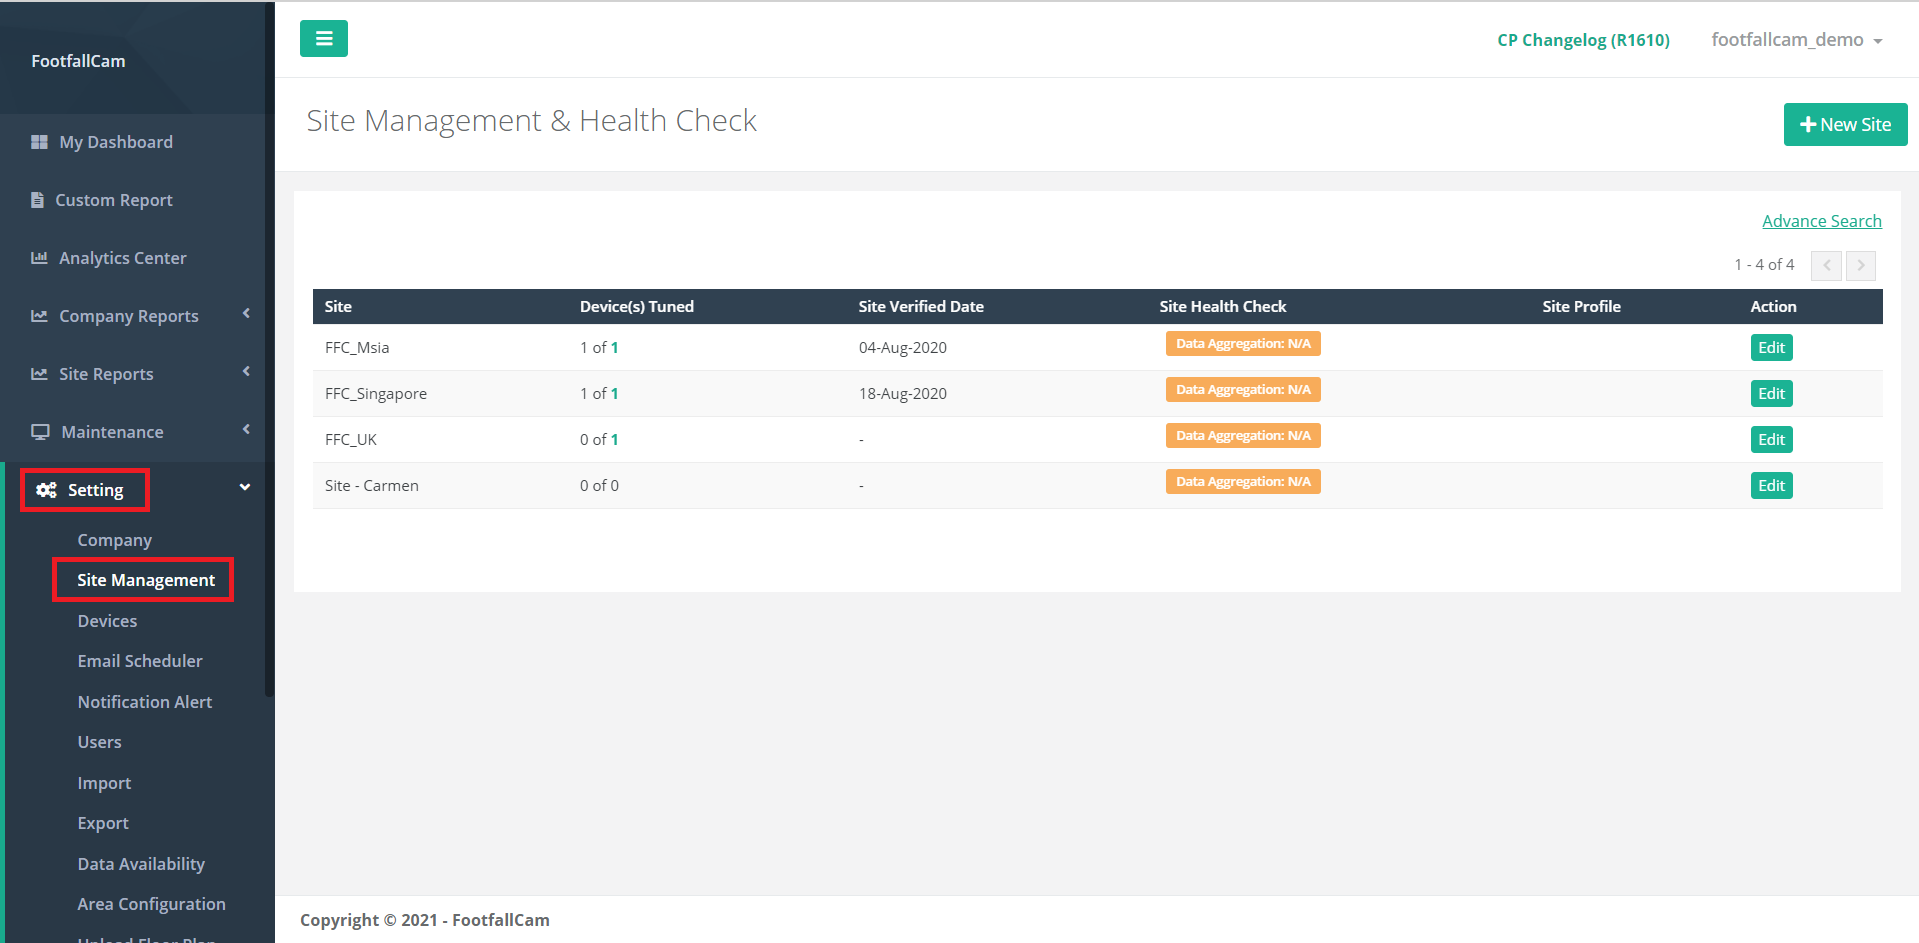
STEP 3 - Click 'Edit' of the site of interest to enter the Site Page.
STEP 4 - From site page, click 'View' at the Data Integrity Report section to open the report.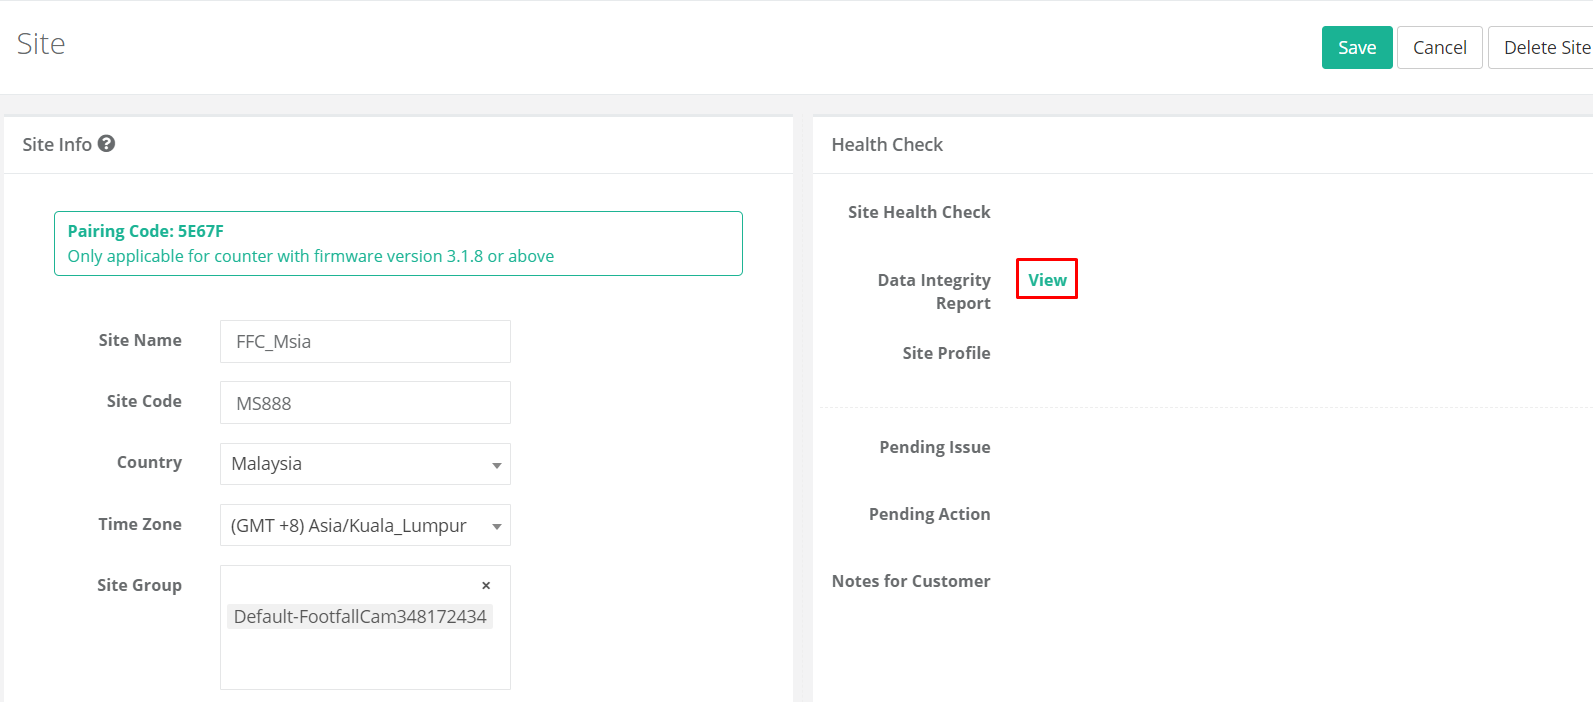
STEP 5 - In the data integrity report, search for the device and there will be a live view section for the device at the last part for the device.
Last Verified Live View is showing the live view being referred during accuracy audit process while the rest are the live view on the last day for each month.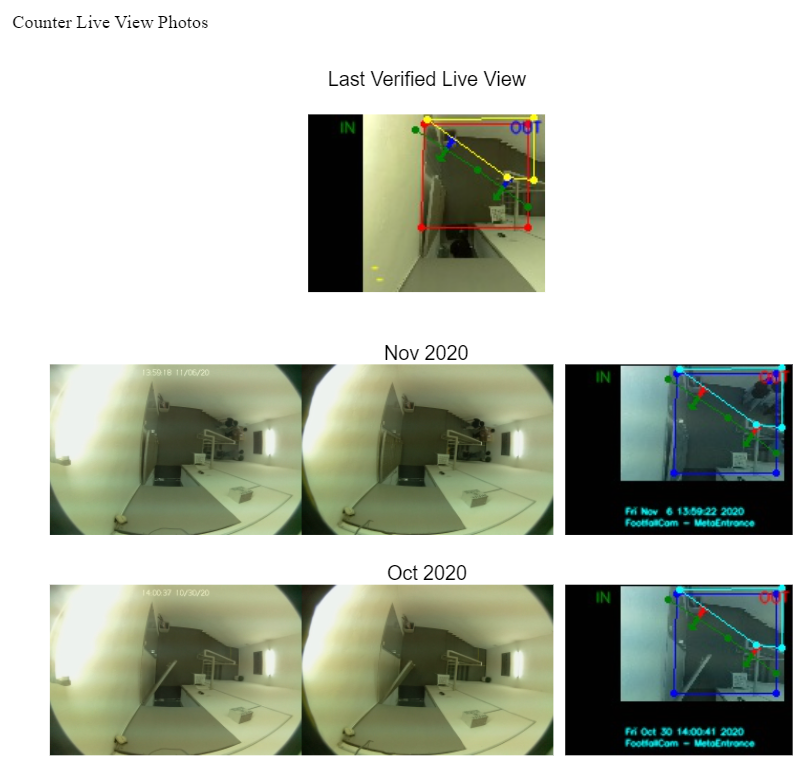
What to Check
-
Ensure no objects/ decorations is blocking the walking paths of visitors
-
Lightning condition is good enough for the walking path to be seen clearly from the live view
-
Both lens of the device is clear
-
Swinging door is only seen less than 30% in the live view when it is swinging inward (best if it is not in live view at all)
-
If the device is for entrance counting, ensure the whole entrance is covered based on the recommended device count by using FootfallCam calculator
1.3.2 Constraints Affecting Counting Accuracy
The following are the constraints where the counting accuracy of a device might be affected when the issues are not solved and their corresponding action plans:
| Constraints | Descriptions | Effect | Action Plan |
| Incorrect Degree Lens Device Used | Lens type of the device used is not recommended by FootfallCam | Device will not be able to track and count visitors properly, leading to miscount | Check the ceiling height of the location where the device is installed is requiring which lens type by referring to FootfallCam calculator |
| Low Ceiling | Mounting height is lower than 2.5m | The head of the visitors will be way too large being viewed in the live view and tracking distance is not sufficient for counting purpose, leading to miscount | Reposition the device to a higher position |
| High Ceiling | Mounting height is higher than 7m | The device will not be able to track the visitors, leading to miscount and thus missing data | Use a wall bracket or a drop pole to position the device to a lower position |
| Live View Changed | Latest live view is different from the one during accuracy audit | Counting is probably not accurate anymore due to new store layout or device position | Raise a support ticket to FootfallCam requesting for reverification due to new store layout or new position |
| Live View Blocked | Walking path in live view is blocked by object/ decoration | Visitor cannot be tracked with a complete and sufficient walking distance to be counted, leading to miscounts | Remove the blocking object/ decoration from the live view |
| Blur Lens | Lens of the device is blurred usually with dirt or fingerprints | Device will not be able to track visitors over the blurred area, leading to miscount if the blurred area is covering the walking path |
Gently wipe the device's lens with a dry cloth and check the live view again to make sure it is now clean |
| Dark Environment | Live view is too dark and visitors are barely visible | Device can hardly track visitors, leading to miscount and might be triggering false counting when the device is forced to be counting in the dark | Enhance the lightning condition of the environment where the device is being installed |
| Limited Coverage | Entrance is not fully being covered by all the devices at the site | Parts of the entrance is not being covered by the devices at the site, leading to miscount and often to high site discrepancy | Install the suggested number of devices according to the entrance width by referring to FootfallCam calculator |
| Swinging Door | When the door is being swing inwards, it is covering more than 30% of the live view | The door will be triggering false counting and might lead to miscount of visitors at the same time | Reposition the device to be further away from the door so that the door is not covering more than 30% of the live view when it swings inward |
| Staircase/ Slope Path/ Installed at a Tilted Angle | The tracking area in the live view is not a flat surface | When visitors walk across the live view, their heights will not be consistent, leading to miscount | Reposition the device to an area with sufficient flat walking area (can consult FootfallCam though support ticket prior to the repositioning) |
| Faulty Device | Device has been confirmed faulty by FootfallCam | Device is not able to count accurately anymore | Proceed with the steps stated as in the relative RMA ticket (device within warranty) or replace the device with a new one |
| Limited Sample Size | Device does not have sufficient sample size for accuracy audit | The counting accuracy might be lower as there are no enough sample size to validate the counting accuracy during accuracy audit | Arrange a walk test with FootfallCam by raising a support ticket to FootfallCam informing the desired date and time for the walk test 2 working days prior to the desired date |
| Limited Tracking Area | The walking area within live view is not sufficient | There is insufficient tracking distance for the device, leading to miscount | Reposition the device to an area with sufficient tracking area |
| Staff / Shopper Activity Triggered Counts |
Device is installed at a position where staff/ visitors are constantly hovering around | Staff/ visitors might be counted multiple times when they constantly passing across the tracking lines and out of the tracking zone | Advice staff to stay out from the tracking zone |
| Unclear Entrance | Multiple entrances/ no entrance can be viewed from the live view |
Wrong tracking zone might be configured, leading to false counting |
Inform FootfallCam through support ticket upon the device installation on either the device is for hallway counting or on which entrance should be covered |
Raise a support ticket to inform FootfallCam after the recommended action plan has been taken, either solving the issue or not, to let FootfallCam knows the next step to proceed.
(Info: For more information on Raising a Support Ticket, please refer to 24.3 Raising an Issue.)
1.4 Other Minor Configurations
The standard accuracy audit of a FootfallCam device is based on the purpose of IN OUT counting of visitors with the height of 1.3m and above. However, there are some other additional configurations which can be applied upon request from users. Among those there are some minor configurations which can be requested through support tickets, as listed in the following sections:
As for those with separate reports or other types of counting, their details will be in other chapters:
- Chapter 16: Heat Map Configuration
- Chapter 17: Live Occupancy Configuration
- Chapter 18: Sales Conversion Configuration
- Chapter 19: Queue Counting Configuration
- Chapter 20: Zone Counting Configuration
- Chapter 21: Area Counting Configuration
- Chapter 22: Bus Solution Configuration
- Chapter 23: Electronic Shelf Label (ESL) Configuration
(Info: For more information on Raising a Support Ticket, please refer to 24.3 Raising an Issue.)
1.4.1 Only IN Count Required
-
Description: Only the IN count of a site/ device can be viewed from reports.
-
Usage: This can be used when users are only interested in the IN counting of a site or when a device is installed at the entrance of the site. Upon the request for this configuration, FootfallCam and users will not receive any false alarms on IN OUT discrepancy and it is not necessary for users to install devices at the exits as well.
-
Warning Message: OUT count will be automatically excluded from all reports.
-
Input from Users: The device serial of which the device is installed at the entrance or site name of which not all entrances of the site are installed with FootfallCam device.
1.4.2 Only OUT Count Required
-
Description: Only the OUT count of a device can be viewed from reports.
-
Usage: This can be used when users are only interested in the OUT counting of a device which is installed at the exit of the site.
-
Warning Message: IN count will be automatically excluded from all reports.
-
Input from Users: The device serial of which the device is installed at the exit of the site.
1.4.3 Kids Counting
-
Description: The minimum tracking height of all devices at a site will be adjusted to a minimum of 1.1m instead of 1.3m (standard).
-
Usage: It is used to include the counting of visitors with the height of 1.1m to 1.3m, especially kids.
-
Warning Messages:
-
FootfallCam would require more days to tune a device for this usage.
-
Once this is applied, other objects at the similar height might be wrongly counted as visitors (e.g. trolleys, baskets, strollers).
-
Kids walking closely to an adult might be miscounted.
-
Most probably miscount would happen. Therefore, FootfallCam will not monitor on the site discrepancy anymore after this configuration is applied to any device at a site.
-
-
Input from Users: The site name of which users wish to apply this configuration
1.4.4 Exclusion Line
-
Description: A line in cyan colour will be drawn across a specific area stated by users (usually drawn at a very small area at the right/ left most of an entrance with the least visitors passing through).
-
Usage: It is used to exclude the counting of visitors across the exclusion line, especially used to exclude staffs from being counted.
-
Warning Message: There is no guarantee that ordinary visitors will not enter/ exit across that line, so visitors might also be excluded from counting and FootfallCam will no longer monitor on the site's IN OUT discrepancy once any of the device at the site is applied with exclusion line.
-
Input from Users: The device serial of which users wish to have exclusion line and screenshot of device's live view indicating where the line should be drawn.
1.4.5 Staff Exclusion Tag
-
Description: Devices with this configuration will exclude the counting of whom wearing the specially designed tag by FootfallCam.
-
Usage: It is used to exclude staffs from being counted as ordinary visitors as staffs may enter/ exit the site multiple times per day.
-
Additional Kit: A specially designed tag by FootfallCam
-
Warning Messages:
-
Walk test of staffs wearing the tag is required.
-
Special accuracy audit is required which takes a longer time than usual devices.
-
Not applicable for devices installed at low ceiling (usually those lower than 2.5m).
-
-
Input from Users: Number of tags required and site name of which users wish to use staff exclusion tag.
1.4.6 Staff Exclusion Button
-
Description: A zone will be drawn at an area specified by the users with staff exclusion button installed.
-
Usage: It is used to exclude the counting of visitors in a specific zone who pass through the zone and clicked on the button (usually used to exclude staffs).
-
Additional Kit: Staff Exclusion Wired Button
-
Warning Message: Anyone who clicked on the button and passed through the zone will be excluded from counting and there is a possibility ordinary visitor may press on the button too, meaning that those will be excluded as well.
-
Input from Users: The device serial of which users which to have staff exclusion zone and the screenshot of the device's live view indicating the area which users which to cover.