


4.1 Adding New Device
4.1.1 Add Device During Installation
STEP 1 - Access to FootfallCam Analytic Manager V9™: http://v9.footfallcam.com via Google Chrome.
STEP 2 - Click on Setting > Sites to access the Sites page.
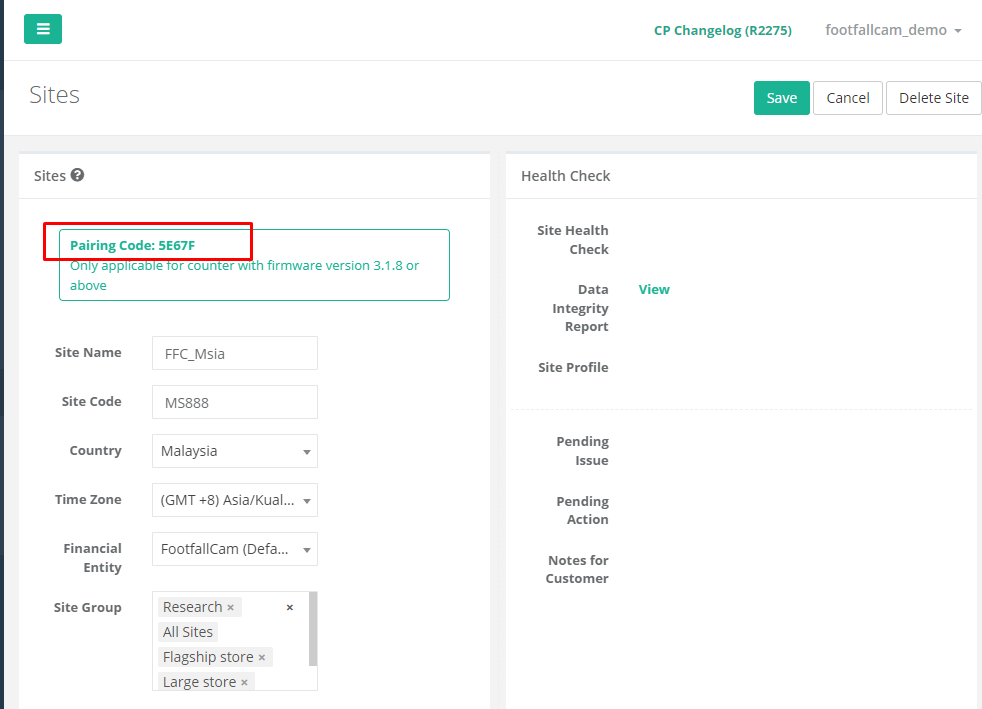
STEP 3 - Select the newly created site and click on Edit button in the Action column.
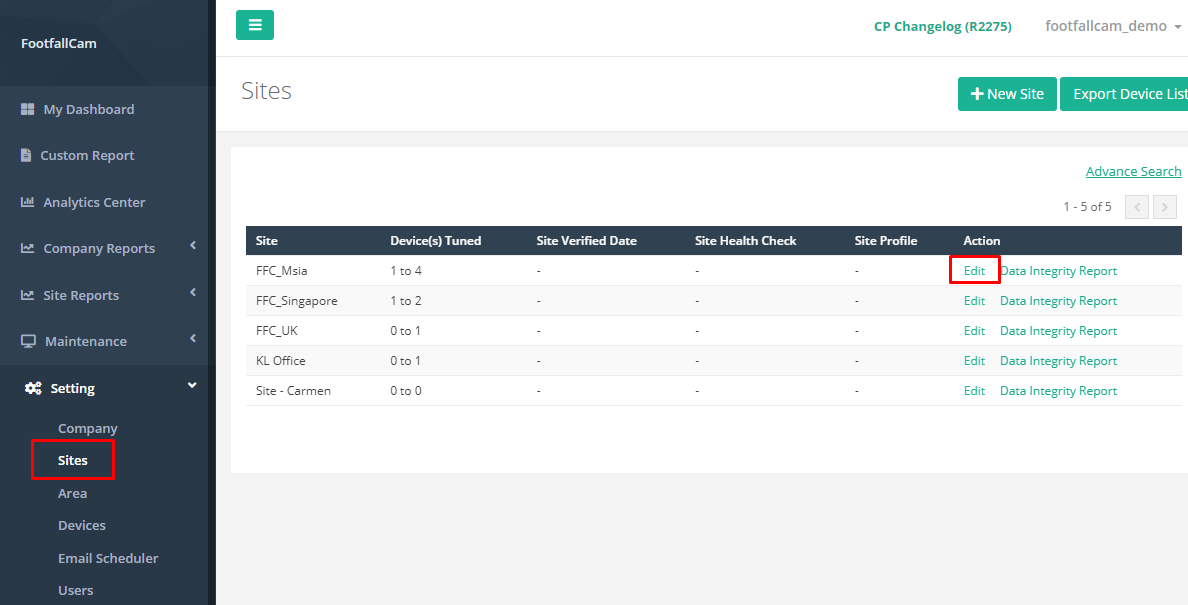
STEP 4 - Copy the pairing code to share with your installer during their installation. (Site detail must be pre-configure before the installation. For more information on how to create site, kindly refer to Chapter 3 Setting up Sites.).
4.1.2 Manually Add Device from Portal
STEP 1 - Access to FootfallCam Analytic Manager V9™: http://v9.footfallcam.com via Google Chrome.
STEP 2 - Click on Setting > Devices to access the Device Management & Health Check page.
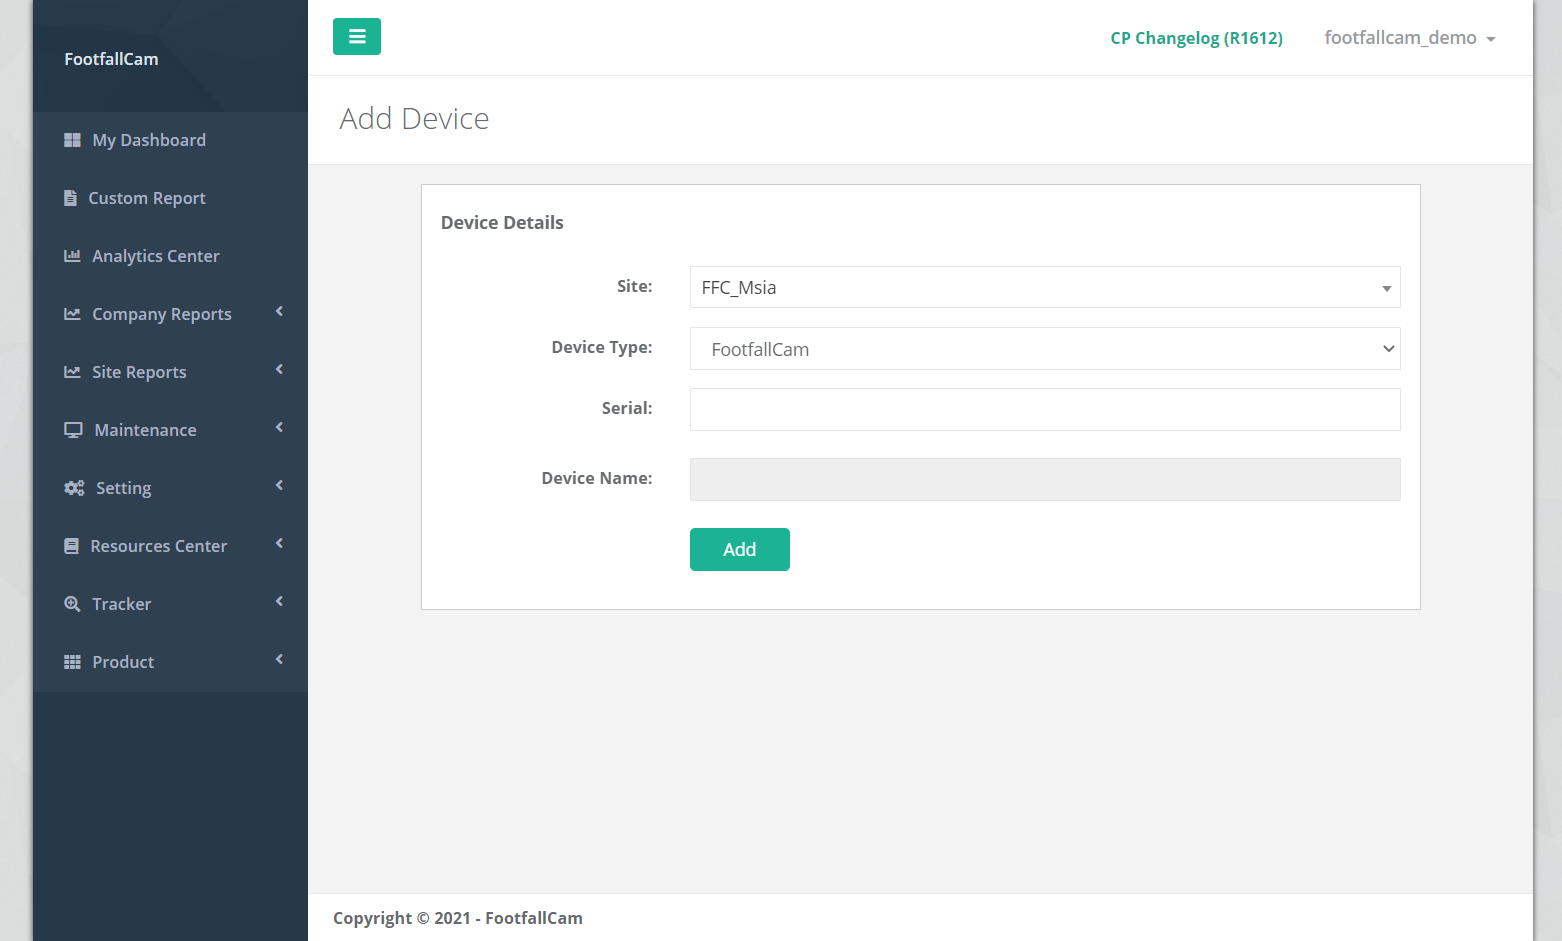
STEP 3 - Click on + New Device button to access Add Device page.
STEP 4 - Complete the process by entering all the required fields and click on Add button.
| Item | Description |
| 1. Site | Select the site name to add the device. |
| 2. Device Type | Select the the device type. |
| 3. Serial | Enter the device serial or company serial. |
| 4. Device Name | Enter a preferred device name. |
STEP 5 - After adding device, proceed to 4.2.2 Device Basic Settings then 4.2.3 Usage Identification to select the usage configuration for the device.
4.2 Device Setting Configurations
4.2.1 Device Management & Health Check
This section focuses on the information display on the Device Management & Health Check page.
STEP 1 - Access to FootfallCam Analytic Manager V9™: http://v9.footfallcam.com via Google Chrome.
STEP 2 - Click on Setting > Devices to access the Device Management & Health Check page.
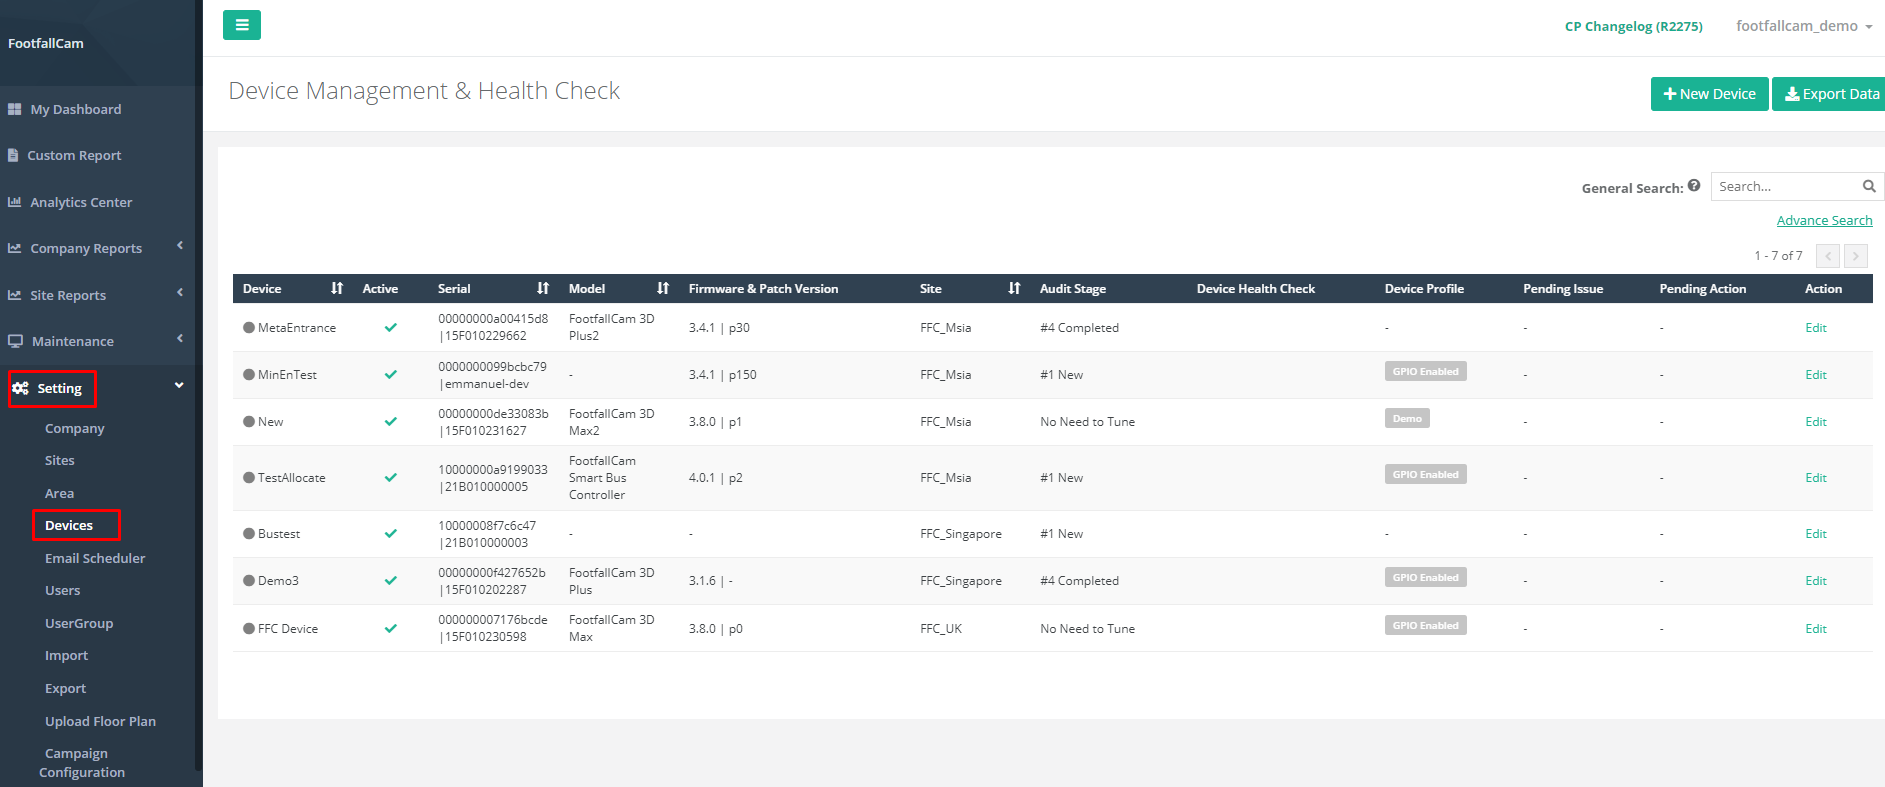
| Item | Description |
| 1. Device | Display the network status of the device and device name. |
| 2. Active | Display the active status of the device. |
| 3. Serial | Display the serial of the device. |
| 4. Model | Display the model of the device. |
| 5. Firmware & Patch Version | Display the current firmware and patch version of device |
| 6. Site | Display the site that paired to the device. |
| 7. Audit Stage | Display the accuracy audit status of the device. |
| 8. Device Health Check | Display the Device Health Check status of the device. |
| 9. Device Profile | Display the profile information of the device. |
| 10. Pending Issue | Display the accuracy issue detected if any. (Info: The field will be blank if the device is working well) |
| 11. Pending Action | Display the related party for next action. (Info: The field will be blank if the device is working well) |
| 12. Action | A link to trigger the Device page for the setting. |
4.2.2 Device Basic Setting
Users may configure the details of each individual device by navigating to the following:
STEP 1 - Click on Setting > Devices to access the Device Management & Health Check page.

STEP 2 - Select the device to manage and click on the Edit button in the Action column.
STEP 3 - Update the the field to be modified and click the Save button to save the changes.

| Item | Description |
| 1. Device Name | Enter a preferred device name. |
| 2. Serial | Display the serial of the device. |
| 3. Model | Display the model of the device. |
| 4. Mac Address | Display the Mac address of the device. |
| 5. Mounting Height (Lens) | Display the mounting height of the camera and the lens of the device. |
| 6. Firmware | Display the current firmware of the device. |
| 7. Last Allocation Date | Display the date and time of the device is being allocated. |
| 8. Warranty | Display the expiry date of the device warranty. |
| 9. Network Status | Display the current network status of the device. |
| 10. Device Health Check | A link direct to Device Health Check Logs. |
| 11. Data Integrity Report | A link direct to Data Integrity Report of device. |
| 12. Device Profile | Display the issue tag if any. (Info: The field will be blank if the device is working well) |
| 13. Pending Issue | Display the accuracy issue detected if any. (Info: The field will be blank if the device is working well) |
| 14. Pending Action | Display the related party for next action. (Info: The field will be blank if the device is working well) |
| 15. Notes for Customer | Display the notes for customer if any. (Info: The field will be blank if the device is working well) |
| 16. Setting & IT Details | Display the Network Configuration of the device includes:
|
| 17. Accuracy Audit | Display the Accuracy Report details of the device includes:
|
| 18. Related Ticket(s) | Display the related Tickets details includes:
|
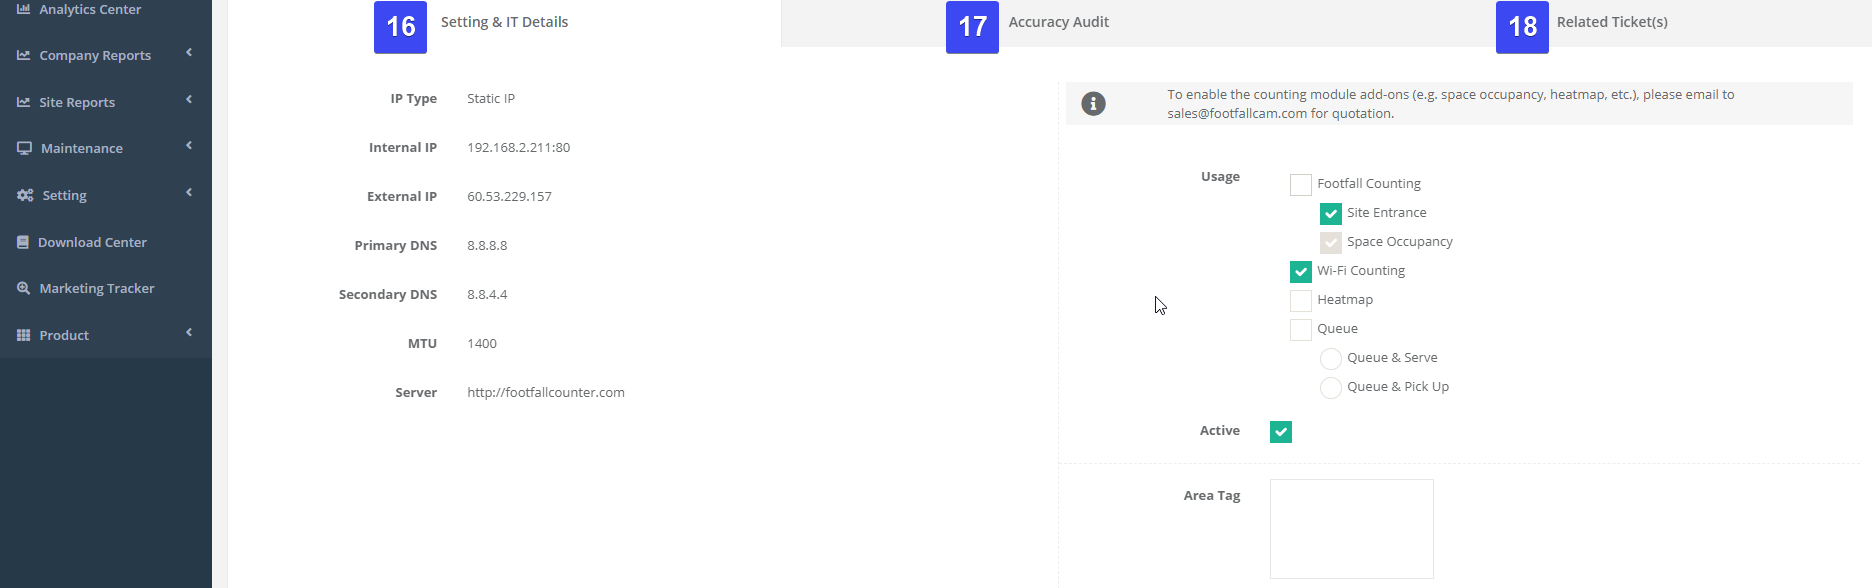
4.2.3 Usage Identification
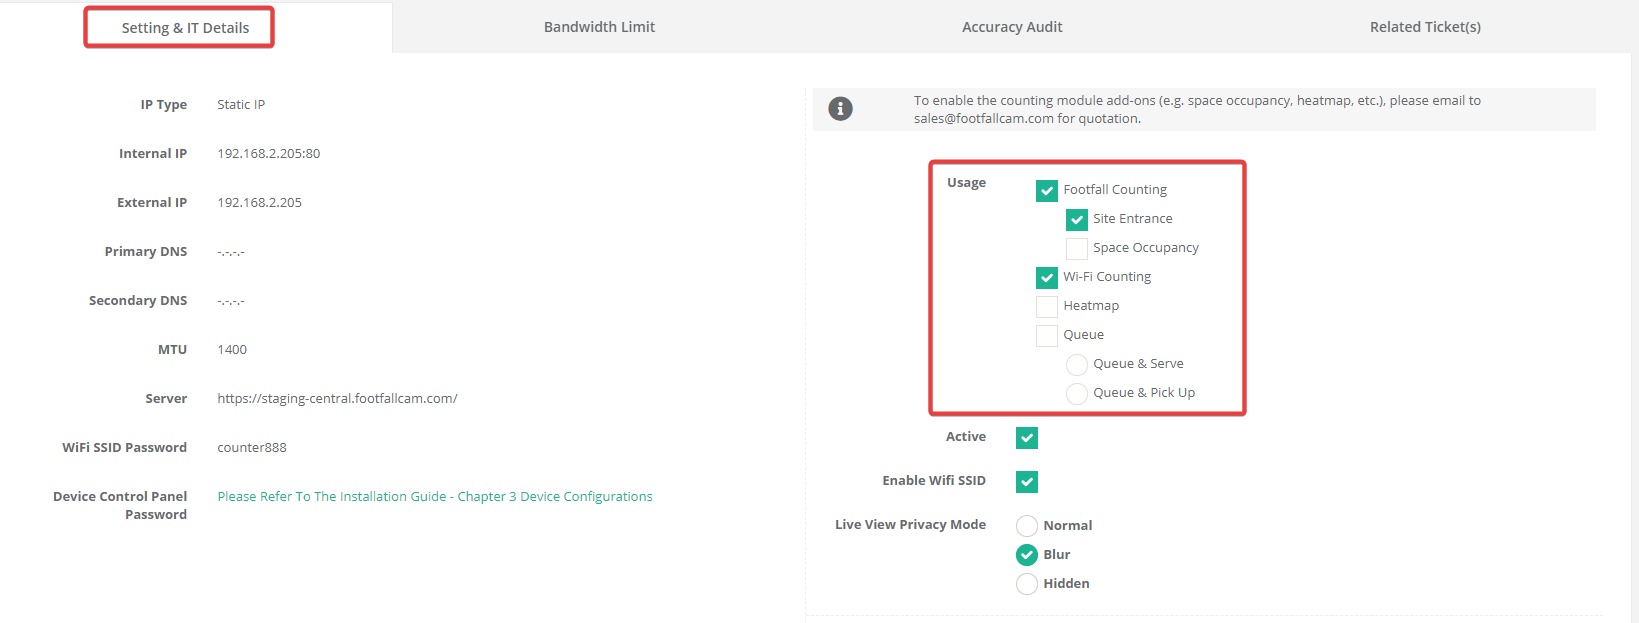
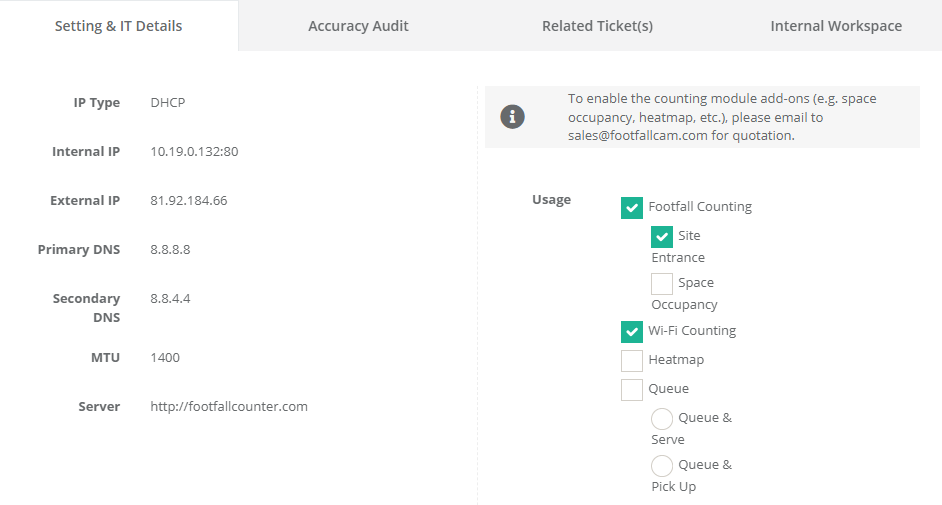
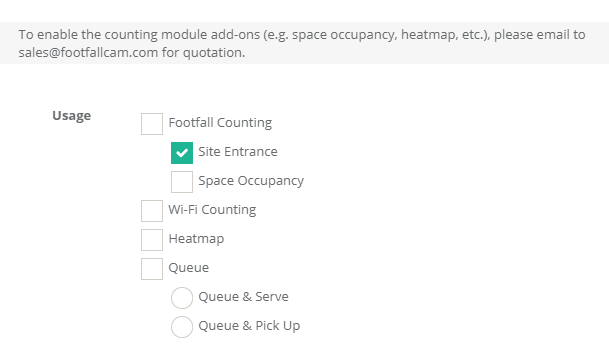
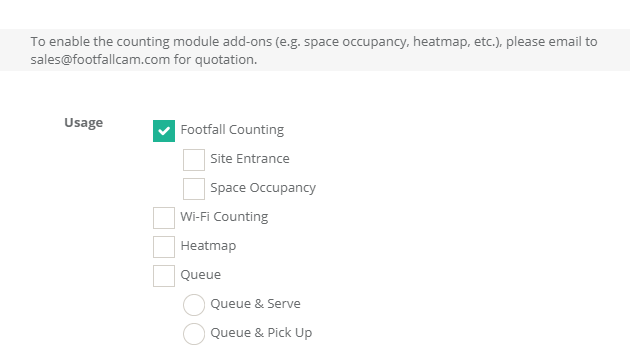
There are several usages which a FootfallCam device is capable of based on the model of the device. These usages are as shown in the Usage section in Device Page under the 'Settings & IT Details' tab and some requires special tuning from FootfallCam personnel.
 Users MUST choose one/ more of the basic usage upon installation from device's configuration page or from this Usage section from Device Page once the device has been allocated to the site.
The table below shows the available usage options, type of the usage, and the description for each usage:
| Usage | Type | Description |
| 1. Footfall Counting | Basic |
It is used for counting visitors IN & OUT where the data can be viewed in Data Integrity Report and Analytics Center. Warning: Tracking lines will not be drawn if this option is not chosen and IN OUT data will be empty. |
| 2. Site Entrance | Optional | It is used to indicate whether the counting data should be included into Site level data in Data Integrity Report and Analytics Center (and in Site Occupancy Dashboard if Space Occupancy is requested).
Warning: Site level data in both Data Integrity Report and Analytics Center will be empty if none of the device allocated to the site is chosen with this usage. |
| 3. Space Occupancy* | Optional | It is used to count the live occupancy of a site/ area and the data will be shown in Space Occupancy Dashboard/ Report.
Warning: Space Occupancy Dashboard/ Report will be empty even if the usage is requested when no device at the site is chosen with this usage. |
| 4. Wi-Fi Counting | Basic | It is used for counting Wi-Fi data (outside traffic, turn-in rate, visit duration, new customer and returning customer) based on MAC address detection and the data can be viewed in Analytics Center.
Warning: Wi-Fi data will be empty if none of the device at the site is chosen with this usage. |
| 5. Heatmap* | Optional | It is used for the counting of visitors in a specific area (region of interest) and the data can be viewed in Heatmap Weekly/ Daily Report.
Warning: Extra input from users is required upon request on the region of interest. Heatmap Weekly/ Daily Report will be empty if none of the device at the site is chosen with this usage. Extra fee is charged upon request as verification is needed. |
| 6. Queue - Queue & Serve* | Optional | It is used for queue counting where the area is the queuing area and the data can be viewed in Queue Daily Report.
Warning: Extra input from users is required upon request on the queuing area. Queue Daily Report will be empty if none of the device at the site is chosen with this or the 'Queue & Pick Up' usage. |
| 7. Queue - Queue & Pick Up* | Optional | It is used for queue counting where the area is the pick up area and the data can be viewed in Queue Daily Report.
Warning: Extra input from users is required upon request on the pick up area. Queue Daily Report will be empty if none of the device at the site is chosen with this or the 'Queue & Serve' usage. |
Default Usage Configuration:
-
Site Entrance/Exit Counters/ Wi-Fi Counting
-
These default usage configuration enable for the device to count as a site entrance counter, this enable IN/OUT count in the Total Site Visitor Count. This is a default configuration as most device is a site entrance counter.
-
Tick "Footfall Counting", "Site Entrance", "Wi-Fi Counting"
-
Wi-Fi counting enable the device to count outside traffic, which in turn enable for the device to calculate the "Turn In Rate", "Visit Duration", "Returning Rate"
-
Common Usage Configuration:
-
Site Entrance/Exit Counters
-
Tick "Site Entrance"
-
-
Area Entrance/Exit Counters
-
These are devices which do not contribute to the Total Site Visitor Count, instead it is installed to measure traffic flow for a particular area/floor within a site.
-
Tick "Footfall Counting"
-
DO NOT tick "Site Entrance" as system will recognise it as a Site Entrance counter, thereby including its IN/OUT count in the Total Site Visitor Count.
-
4.2.3.1 Other Extra Configurations
FootfallCam devices are also capable of other extra configurations which requires special tuning from FotfallCam personnel and users are able to request for them through support tickets (refer to 24.3 Raising an Issue to create a support ticket to FootfallCam). Those configurations are listed below:
4.3 Device Reallocation
Users that would like to reuse an existing FootfallCam may remove the device from the existing store and install it into the new location. As all data are stored on a server level and not within the device, this requires site details to be edited in the Devices page. There are 3 major steps need to be done, which are remove device from old store, remove site from old store and reallocate device in new store.
Step 1: Remove Device from Old Site
STEP 1 - Access to FootfallCam Analytic Manager V9™: http://v9.footfallcam.com via Google Chrome.
STEP 2 - Click on Setting > Devices to access the Device Management & Health Check page.

STEP 3 - Select the device you want to remove and click on the Edit button at Action column to access the Device page.
STEP 4 - Complete the process by click on the Delete Device button at the top right corner of the page.

STEP 5 - Repeat step 3 and step 4 as necessary for multiple devices.
Step 2: Remove Site (If you do not want to keep the data for old site)
STEP 1 - Click on Setting > Sites to access the Sites page.

STEP 2 - Select the site you want to remove and click on the Edit button at Action column to access the Site page.
STEP 3 - Complete the process by click on the Delete Site button at the top right corner of the page.
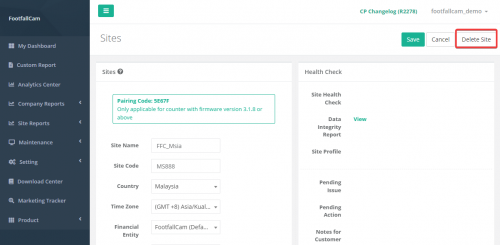
STEP 4 - Repeat step 2 and step 3 as necessary for multiple sites.
Step 3: Add device to New Site
Create new site and add the device to new branch by following the steps in Section 4.1.2 Adding New Device manually by serial in Analytic Manager
4.4 Swapping a Faulty Device
When an existing device needs to be replaced due to the failing hardware of an existing device, or if the existing device has been externally damaged.
STEP 1 - Access to FootfallCam Analytic Manager V9™: http://v9.footfallcam.com via Google Chrome.
STEP 2 - Click on Setting > Devices to access the Device Management & Health Check page.

STEP 3 - Select the device you want to remove and click on the Edit button at Action column to access the Device page.
STEP 4 - Remove the device by click on the Delete Device button at the top right corner of the page.
STEP 5 - Click on Setting > Sites to access the Sites page.
STEP 6 - Select the site which the device is removed and click on Edit button in the Action column.

STEP 7 - Copy the pairing code to share with your installer during their installation. When the installer is inputting the configuration details, the installer may use the pairing code shared. Please refer to section 4 Allocate via Installation Code for more details.

4.5 Device Status Configuration
During store renovation, user may not want the irrelevant data of footfall from the construction workers walking in and out of the store. Users may want to temporary disable the FootfallCam during renovation to maintain the accuracy of the data. Below are the steps to temporary disable the device and re-activate the device after the renovation is completed and stores are open to the public.
4.5.1 Temporarily Disabling A Device
STEP 1 - Access to FootfallCam Analytic Manager V9™: http://v9.footfallcam.com via Google Chrome.
STEP 2 - Click on Setting > Devices to access the Device Management & Health Check page.
STEP 3 - Select the device you want to temporary disable and click on the Edit button to access the Device page.
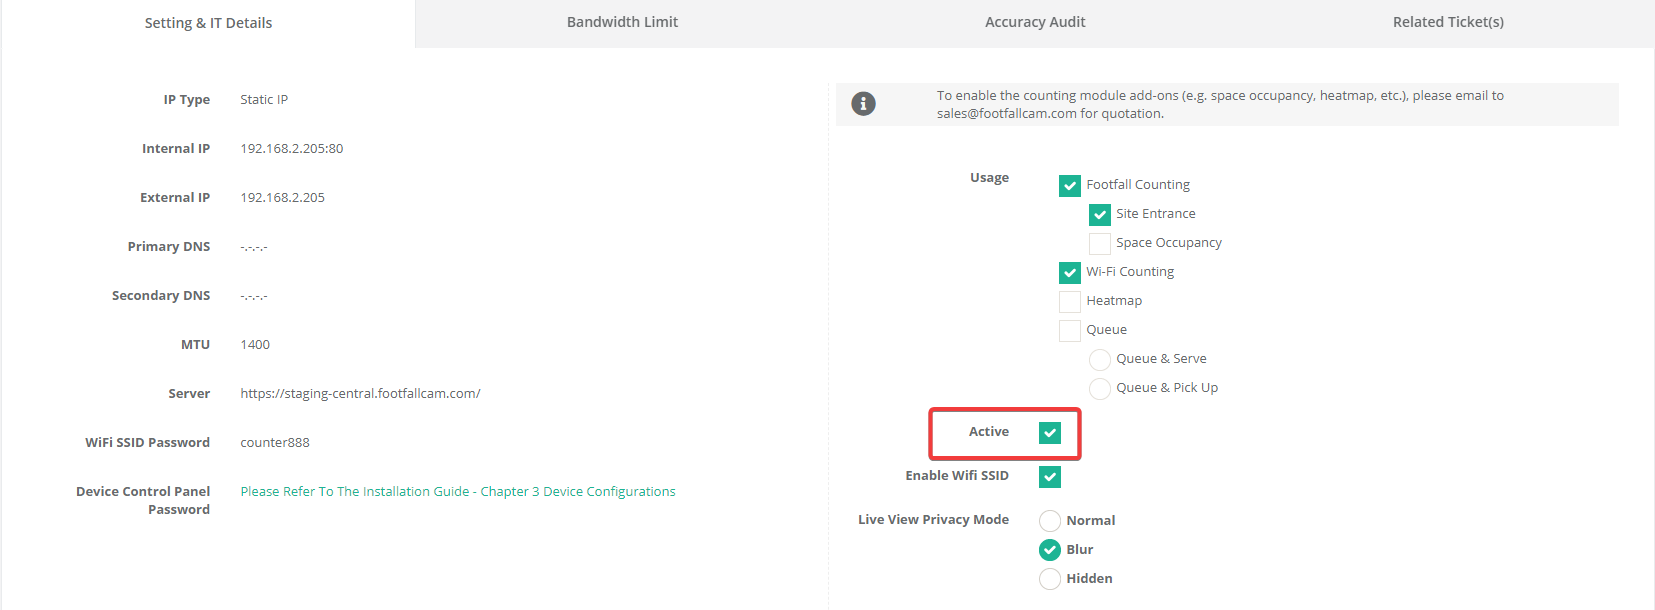
STEP 4 - Navigate to the Setting & IT Details panel at the bottom and untick the Active box to disable the device.
STEP 5 - Complete the process by click the Save button at top right of the Device page.
4.5.2 Device Re-activation
STEP 1 - Click on Setting > Devices to access the Device Management & Health Check page.
STEP 2 - Select the device you want to temporary disable and click on the Edit button to access the Device page.
STEP 3 - Navigate to Setting & IT Details panel at the bottom and tick the Active box to enable the device.
STEP 4 - Complete the process by click the Save button at top right of the Device page.
4.5.3 Enable/Disable Wifi SSID
STEP 1 - Access to FootfallCam Analytic Manager V9™: http://v9.footfallcam.com via Google Chrome.
STEP 2 - Click on Setting > Devices to access the Device Management & Health Check page.

STEP 3 - Select the device you want to remove and click on the Edit button at Action column to access the Device page.
STEP 4 - Tick the checkbox to enable Wi-Fi SSID and untick to disable Wi-Fi SSID.
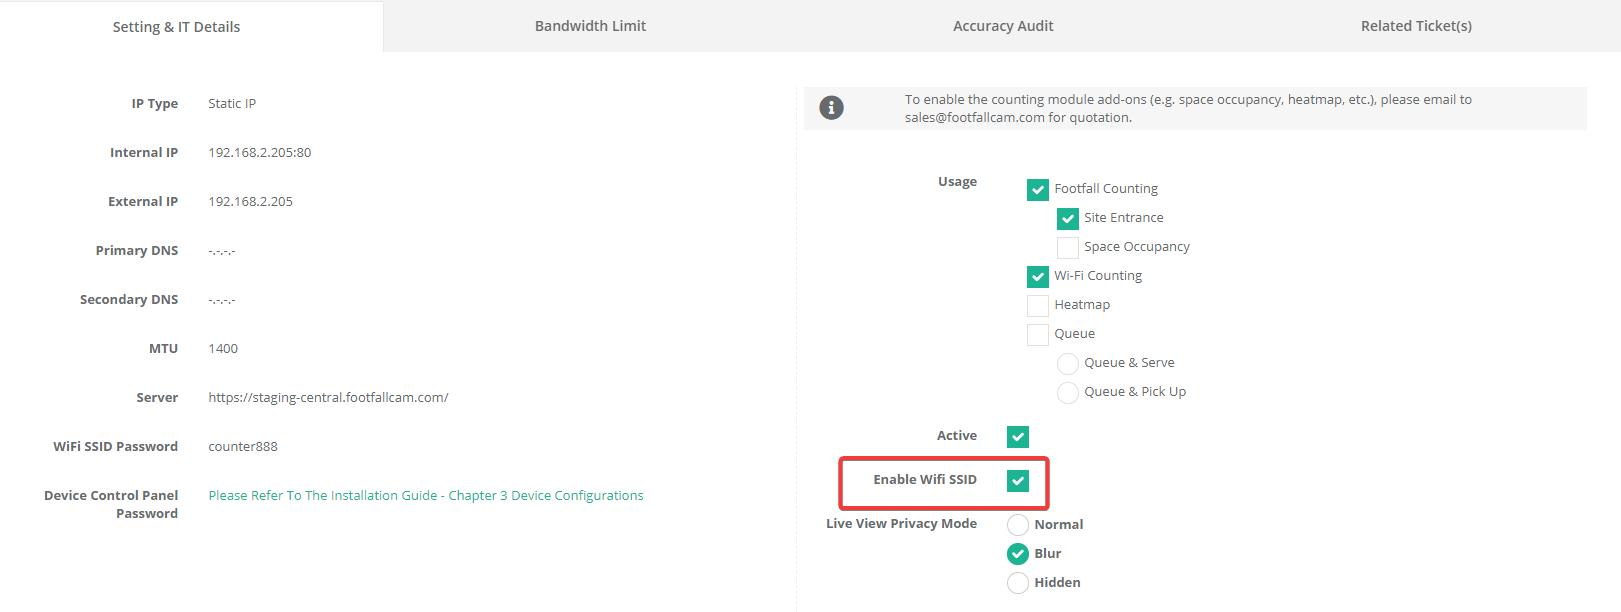 STEP 5 - Complete the process by click the Save button at top right of the Device page.
4.5.4 Change Live View Privacy Mode
STEP 1 - Access to FootfallCam Analytic Manager V9™: http://v9.footfallcam.com via Google Chrome.
STEP 2 - Click on Setting > Devices to access the Device Management & Health Check page.
STEP 3 - Select the device you want to remove and click on the Edit button at Action column to access the Device page.
STEP 4 - Select the Live View Privacy Mode for the device by clicking on the required radio button.
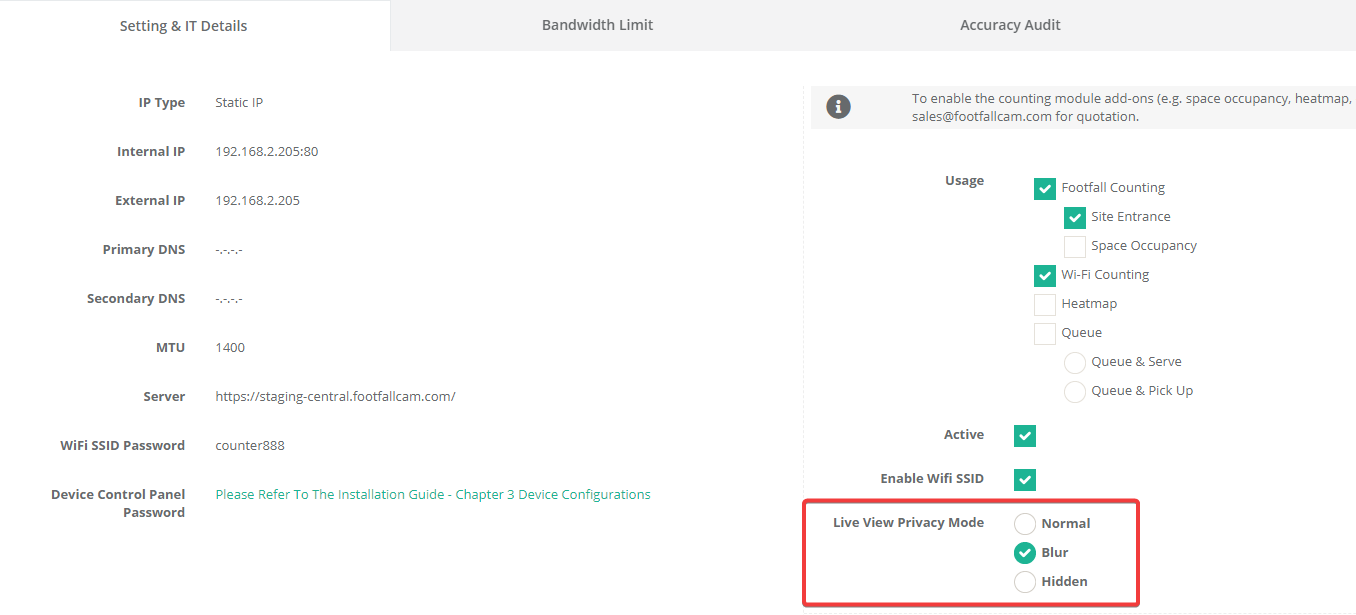 STEP 5 - Complete the process by click the Save button at top right of the Device page.
4.5.5 Remove Device
STEP 1 - Access to FootfallCam Analytic Manager V9™: http://v9.footfallcam.com via Google Chrome.
STEP 2 - Click on Setting > Devices to access the Device Management & Health Check page.
STEP 3 - Select the device you want to remove and click on the Edit button at Action column to access the Device page.
STEP 4 - Complete the process by click on the Delete Device button at the top right corner of the page.
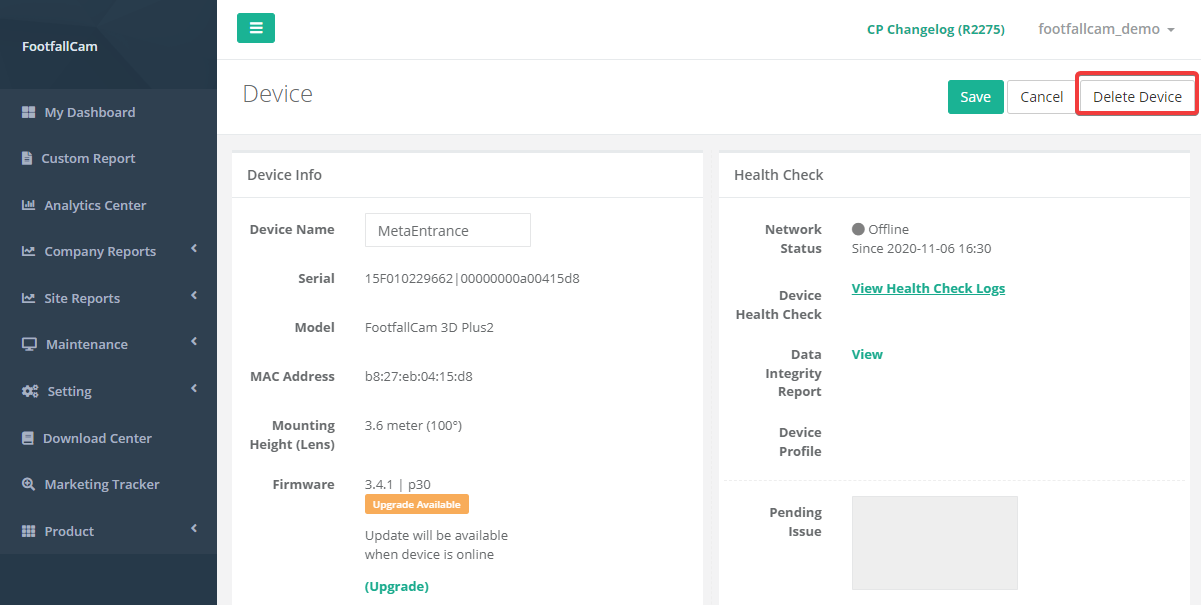
STEP 5 - Repeat step 3 and step 4 as necessary for multiple devices.