


4.1 Queue Counting
4.1.1 Overview
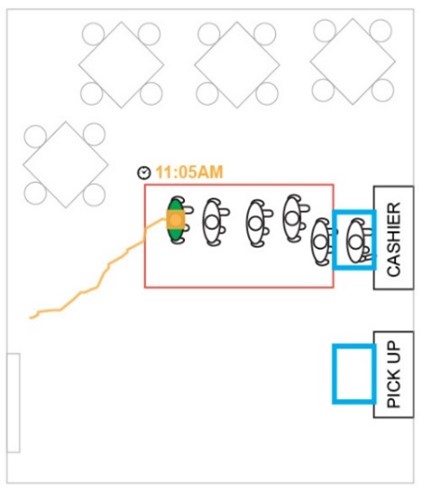
Queue counting enable users to identify the wait time of consumers, the duration consumers stay at the cashier, and the length of time it takes for a consumer to receive their order after placing it at the cashier. Queue data will help store managers to determine peak hours and whether more staff should be planned for deployment during peak times.
4.1.2 Function
The queue counting features uses three configurable zones:
-
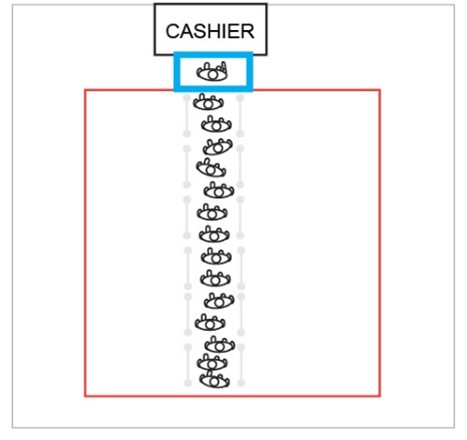
Head zone: This zone is used to define the area the consumer will be in when they are placing an order with the cashier. It Is used to calculate the duration consumers are detected while they are with the cashier and to determine the length of time it takes for a consumer to receive their order after placing it.
-
Tail zone: This zone is used to track all the individuals in the queue and is made up of the head zone and a tail zone. The head zone is the connection between the cashier polygon and the tracking zone, while the tail zone is the opposite end. If an individual stand in the zone for a period exceeding the configured time, the queue is considered open. If the zone does not detect an individual for a period exceeding the configured time, the queue is considered closed.
4.1.2.1 Head zone
This zone is used to allows the system to determine where the consumer will go when they are conversing with the cashier. When an individual stand inside the cashier polygon, they will be tracked for the duration they stay in the zone.
4.1.2.2 Tail Zone
This zone will be used to track the consumers that enter the queue. For an individual to be counted within a queue, an individual must pass through the following constraints:
-
They must enter the queue counting through the tail zone
-
Must pass counting constraints (minimum height)
-
Must be within the tracking zone for longer than the queue minimum time
Everyone in the queue area must be within a specified distance from the previous individual tracked
4.1.3 How does it work?
4.1.3.1 Dynamic queue counting
With dynamic queue counting zone configuration, FootfallCam can track individuals in a queue regardless of their queueing pattern.

Each queue counter must be configured with a tracking distance. The tracking distance is the maximum distance that an individual must be from another individual already in the queue to be tracked. If an individual who meets the tracking distance and meets the queue minimum time, the individual will be tracked and is considered as in queue. The tracking distance is a configurable threshold that can be adjusted based on each store's unique environment.
4.1.3.2 Excluding customers not in the queue
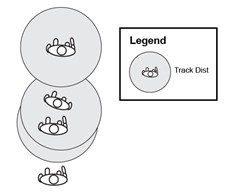 Consumers that are not within the configured tracking distance will be excluded from the queue. This is to ensure that outliers that are detected within the queue tracking zone are not mistakenly assumed as in queue by the device.
The tracking distance is calculated as a radius from the individual tracked.
4.1.3.3 Counting over a large area
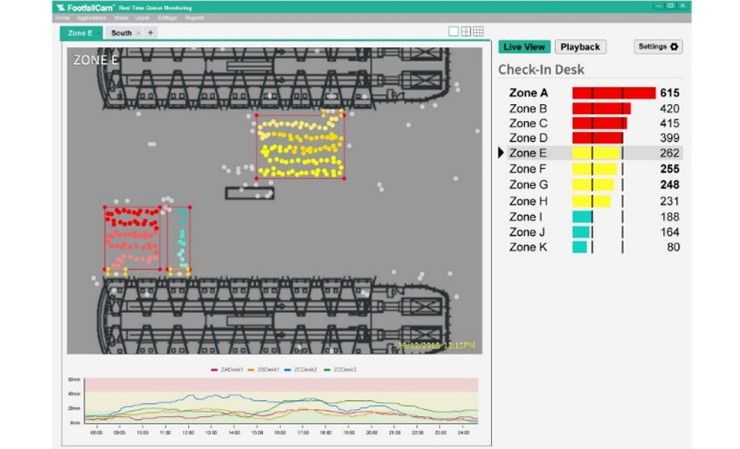
When one counter is unable to cover the entire entrance, multiple counters may be required. In this case, the live view of multiple counters will be combined to create one complete view to track the visitor through the entire queue.
4.1.4 Queue duration
4.1.4.1 Average queue waiting time
The queue wait time calculates the length of time a person enters the queue tracking zone and entering the cashier polygon. Though not all individual that enter the queue will have a queue wait time. For an individual to have a queue wait time, they must pass through the following constraints:
-
Must pass counting constraint (minimum height)
-
Be tracked continuously through the queue
-
Enter the cashier polygon from within the queue tracking zone
Once the individual leaves the tracking zone and enter the cashier polygon, there will be a timestamp and the waiting time will be calculated based on the difference. The wait time will be calculated as follow:
|
Wait time |
Time in (Logged into tail zone) - Time out (Logged into head zone) |
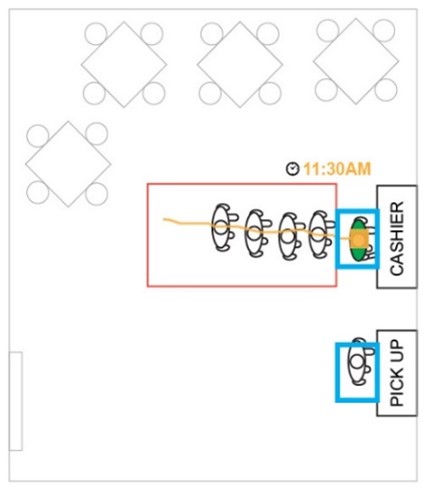
4.1.4.2 Average ordering time
The ordering time calculates the length of time a person enters the cashier polygon through the queue tracking zone and leaving the cashier polygon. For an individual to have an ordering time, they must pass through the following constraints:
-
Must pass counting constraint (minimum height)
-
Enter the cashier polygon from within the queue tracking zone
When an individual meets the constraint, their time of entering the cashier polygon will be recorded and calculated against the time they leave the polygon. Their ordering time will be calculated as follow:
|
Ordering time |
Time out (Leaving the tail zone) - Time in (Entering the head zone) |


4.1.4.3 Average order fulfillment time
The order fulfilment time is used to calculate the length of time a person places an order from the cashier and receives their order from the pick-up area (if there is one). For stores without a pickup area, the duration of the order fulfilment will be based on the duration they are in the cashier polygon.
For stores with a pickup area, signature profiling with stereoscopic vision will be used. This is done by recognising the colour of their clothes, gender, body size, and skin tone and girth of an individual. In addition to signature profiling. With the recognition of signature profiling of every individual, FootfallCam can uniquely identify everyone that will pick up their order after placing it at the cashier within a certain time frame.
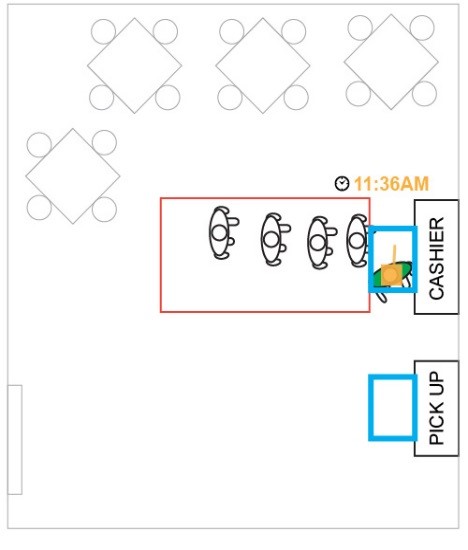
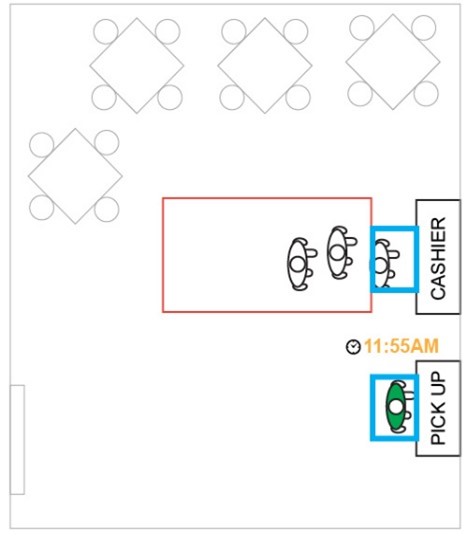
Through this, when a consumer enters the pick-up zone, it will be considered as their orders being fulfilled. However, the recognition of signature profiling will have a configured set time limit, all signature profile recognised from the cashier polygon that have not entered the pick-up zone will be automatically deleted.
|
Fulfilment time |
Time in (Appearing in pick-up's head zone) - Time out (Leaving cashier's head zone) |
4.2 Queue Management Report
The queue management report template is located in the Standard Template Folder entitled "[Template] Queue Management Report". To subscribe the queue counting feature, the counter is required to tick "Queue Management" as counter usage. You may refer to this link on how to set counter usage.
4.2.1 Report Creation
There are 2 methods to create this report.
Method 1
Create report by clicking "+ New Dashboard / Report"
Step 1: Configure the field on the report creation modal. You may refer to the image below for the configuration.
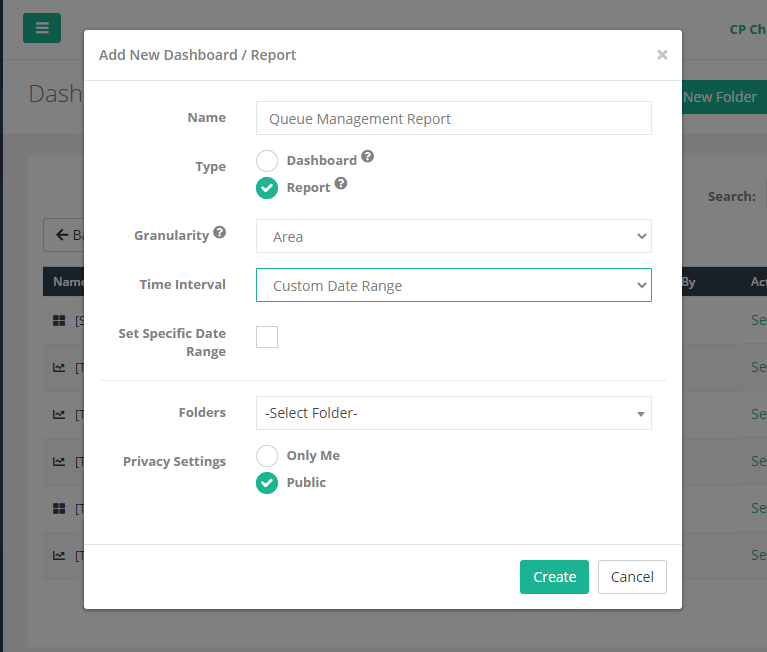
Name:
Users are required to enter a name for the report. (Maximum 40 characters)
Type:
Select Report.
Granularity:
Select Area to monitor each individual queue area.
Time Interval:
For Report, the dropdown option will exclude the "Live" option. If "Custom Date Range" is selected, Set Specific Date Range checkbox will be shown. If the checkbox is selected, users are required to choose Start Date and End Date for the report, else if the checkbox is unselected, the Start Date and End Date will be reset to null. If "Based on Marketing Campaign" is selected, the granularity will be reset to "Site" and set as readonly.
Folders:
Users are required to select the report's location. If no folder is selected, the location of the report will be on the main page. If a folder is selected from the dropdown list, the new report will be located at the selected folder.
Privacy Settings:
If a folder is selected, the privacy settings will be overwritten with the selected folder's privacy settings and set the field as readonly, else if no folder is selected, users are able to select the privacy settings of the new report.
If the role of the login user is User (not Admin), the user is not allowed to create a new report and the report creation button is hidden.
Method 2
Duplicate the report in Standard Template Report folder
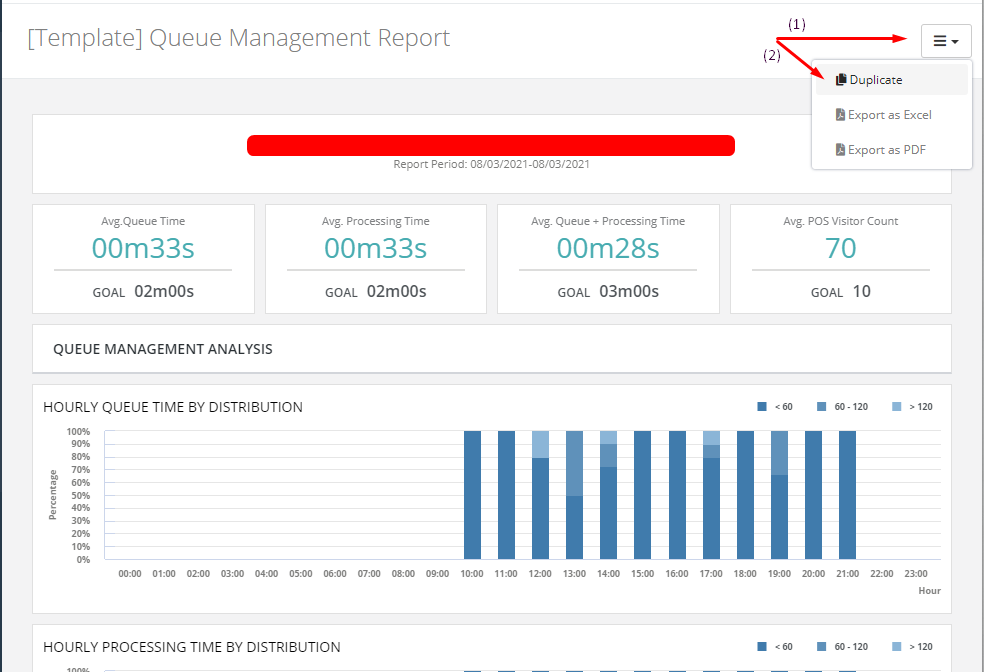
Step 1: Click the "View" button to access the Standard Template Folder.
Step 2: Click the "View" button to view the [Template] Queue Management Report. Click the Option button on the top right as shown in the image below. Then, click "Duplicate".
4.2.2 Area Configuration for Queue Management
To monitor each individual queueing area for each counter, you may configure each individual counter as an Area.
For more information on Area Configuration, please refer to Chapter 6.2 Area Configuration.