





Project 360 is an application to help teams manage projects for sites. It provides the necessary tools to monitor rollout procedures, handle quotation and engineer call-out requests and create arrangements for future store pre-openings.
Floor Plan List
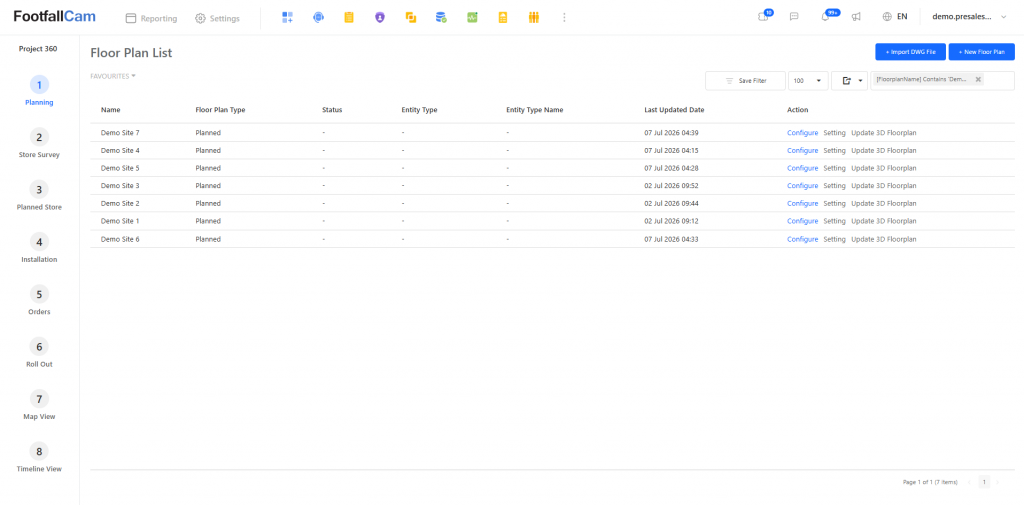
This page shows a list of virtual floor plans created and to allow users to add new virtual floor plans for their sites.
Add a New Floor Plan Manually
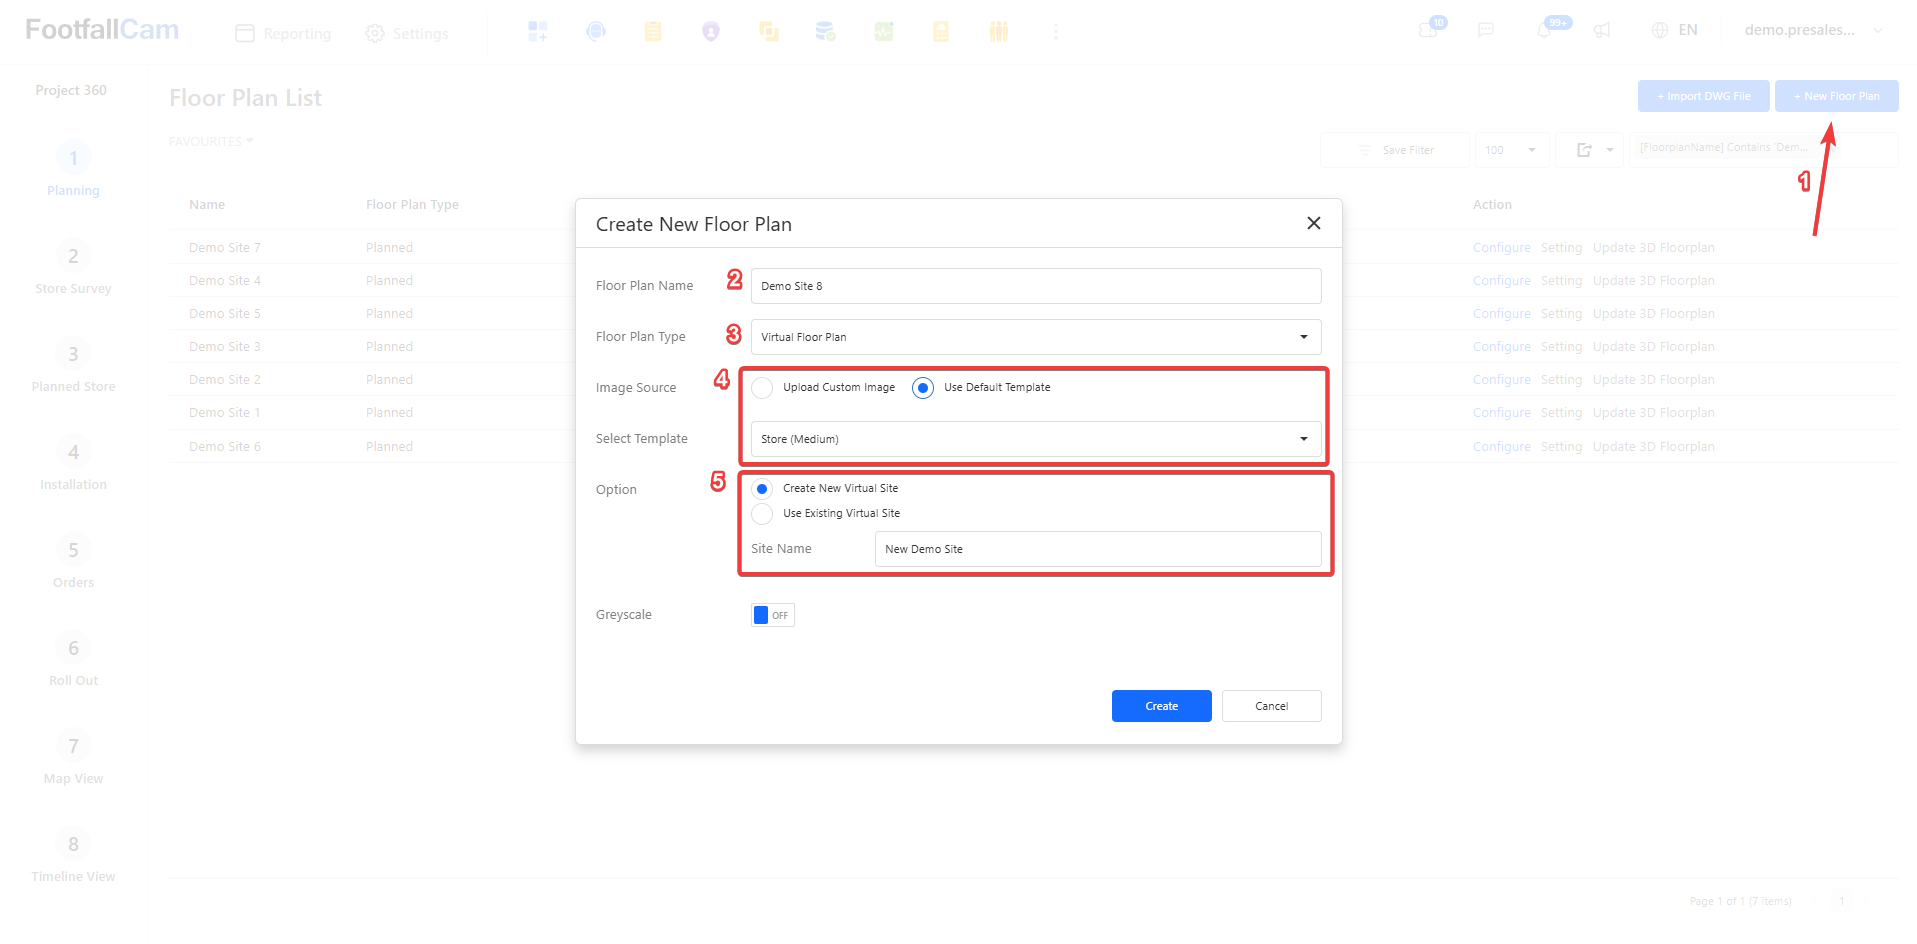
- Select the New Floor Plan button at the top right to open the Create New Floor pop-up.
- Enter the Floor Plan Name.
- Select 'Virtual Floor Plan' as the Floor Plan Type.
- Select 'Use Default Template' and select one of the pre-existing templates to use.
- Under Options, select 'Create New Virtual Site' and enter the site name.
- Once the information is filled, select the Create button to create the new virtual site.
Importing DWG File as New Floor Plan
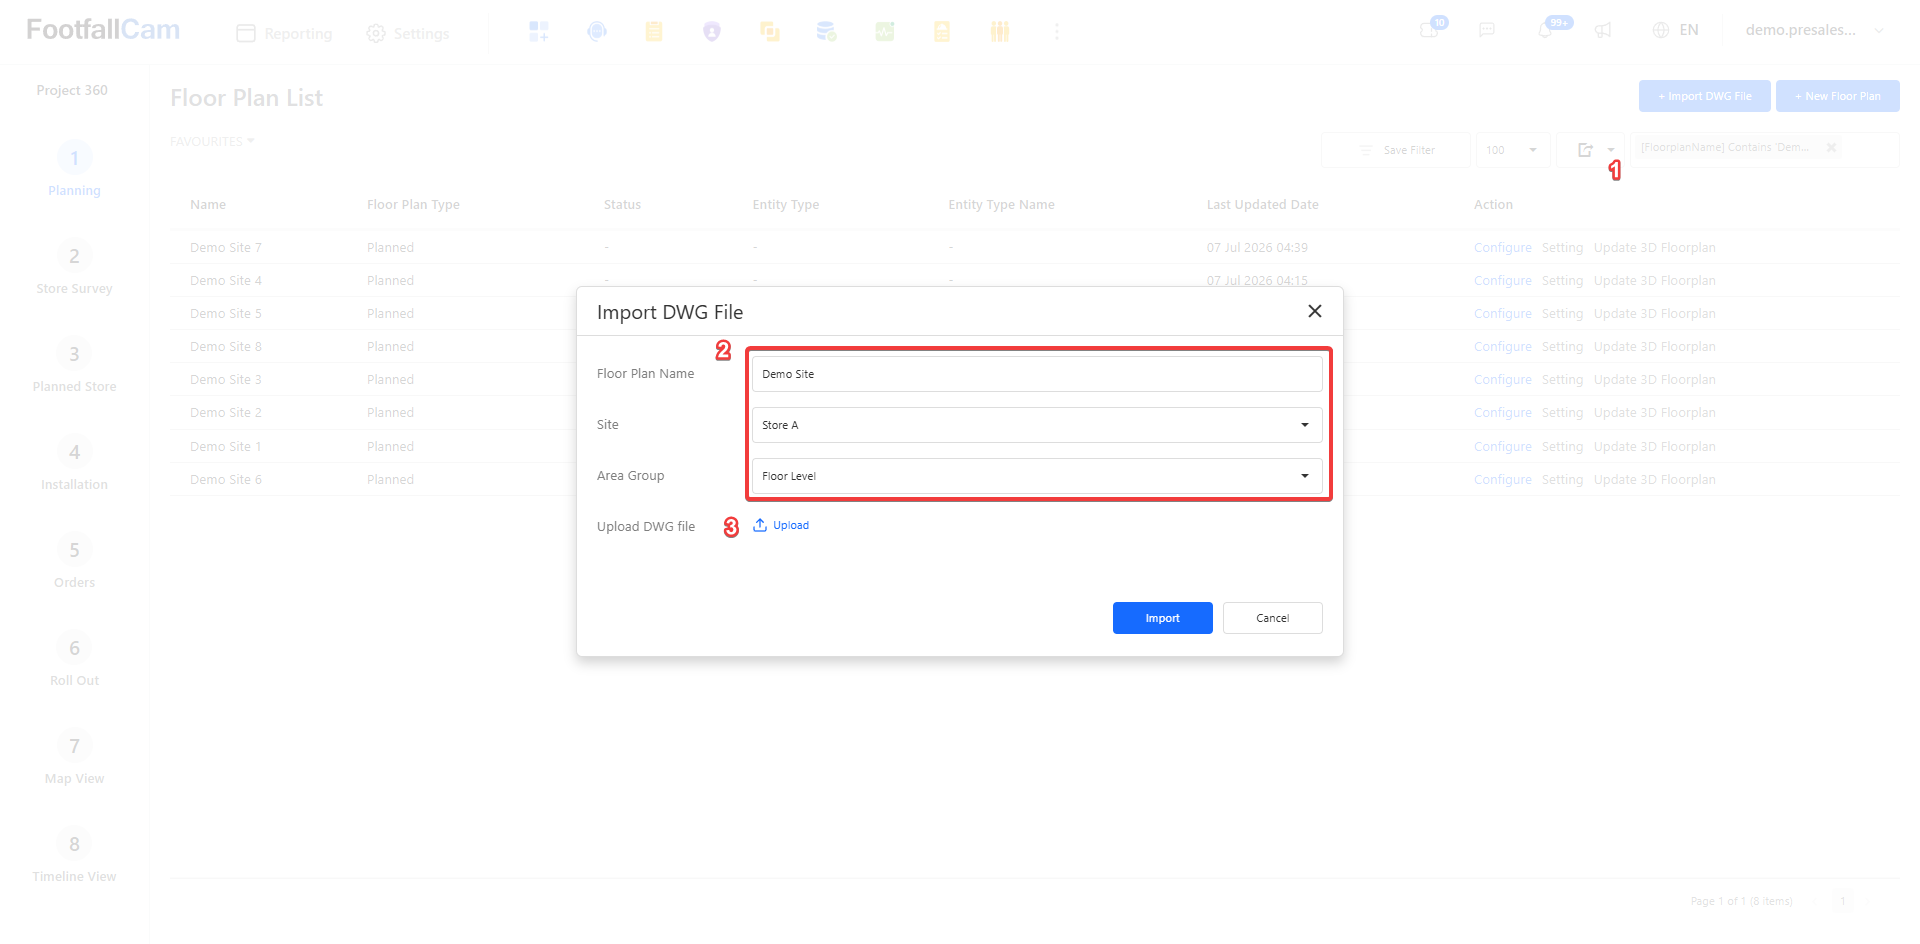
- Select the Import DWG File button at the top right of the page to open the import pop-up.
- Enter the Floor Plan Name, select an existing site and the area group for the floor plan.
- Upload the DWG file from your file explorer then select Import to import the floor plan.
Floor Plan Designer
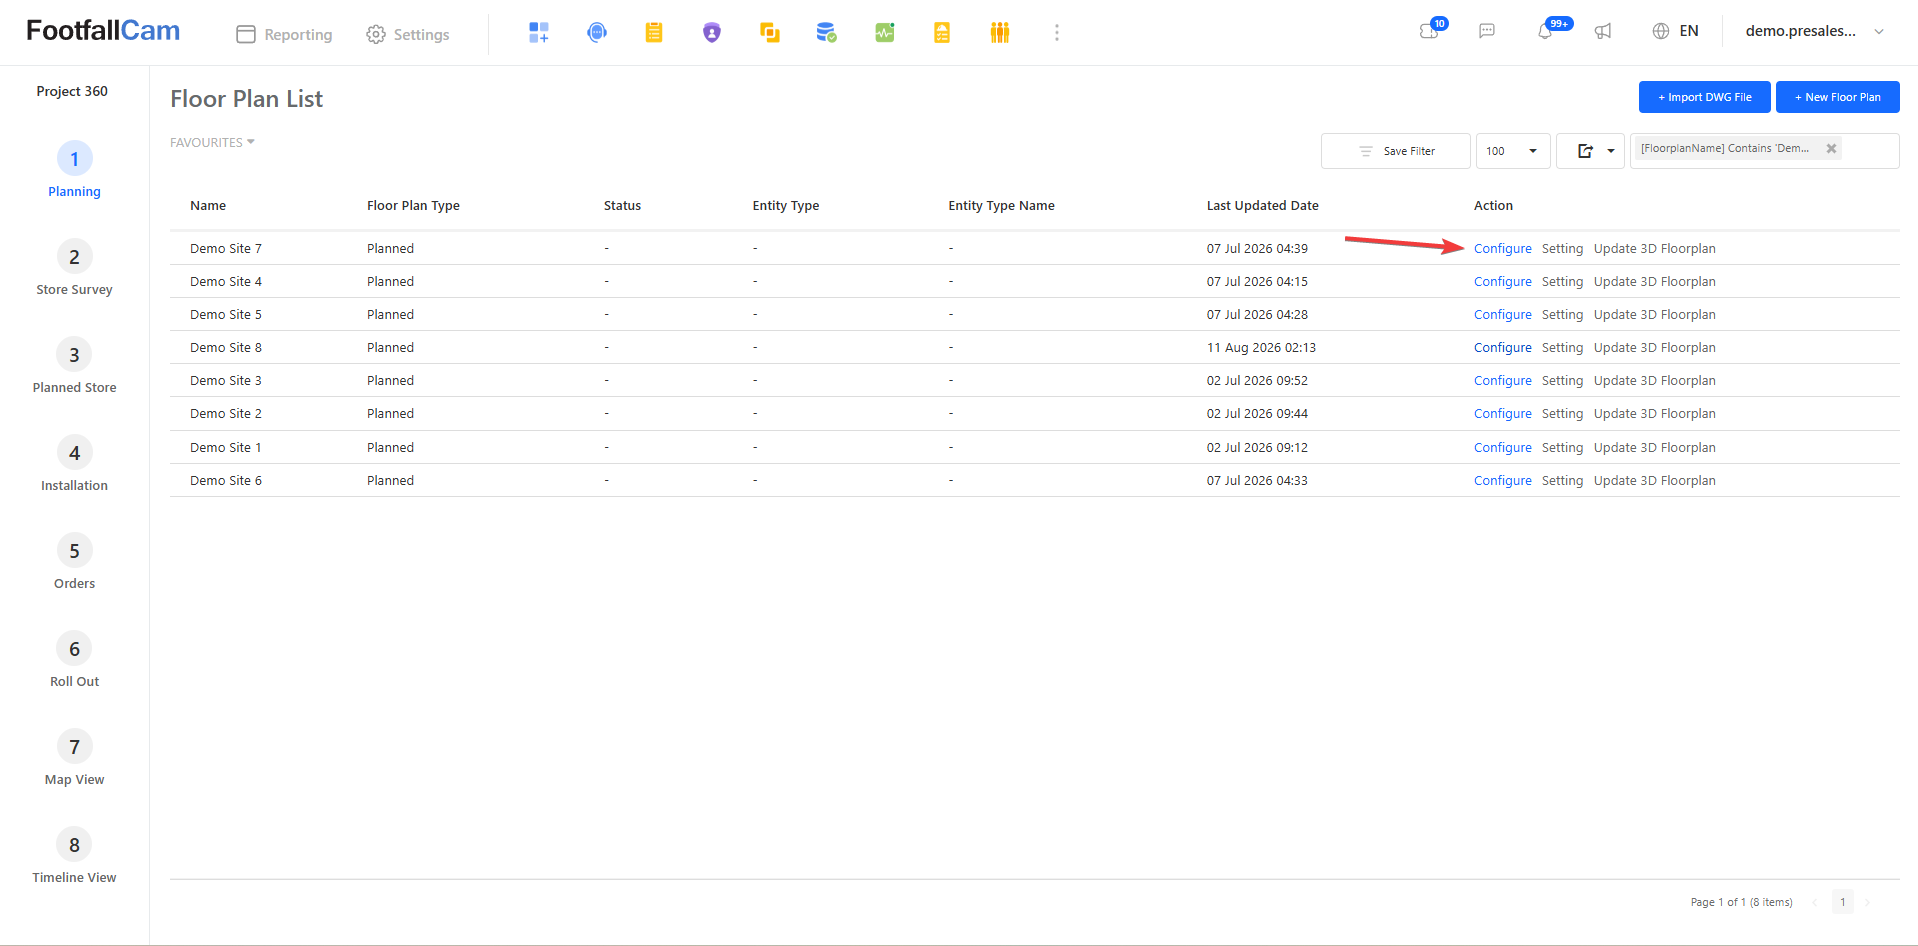
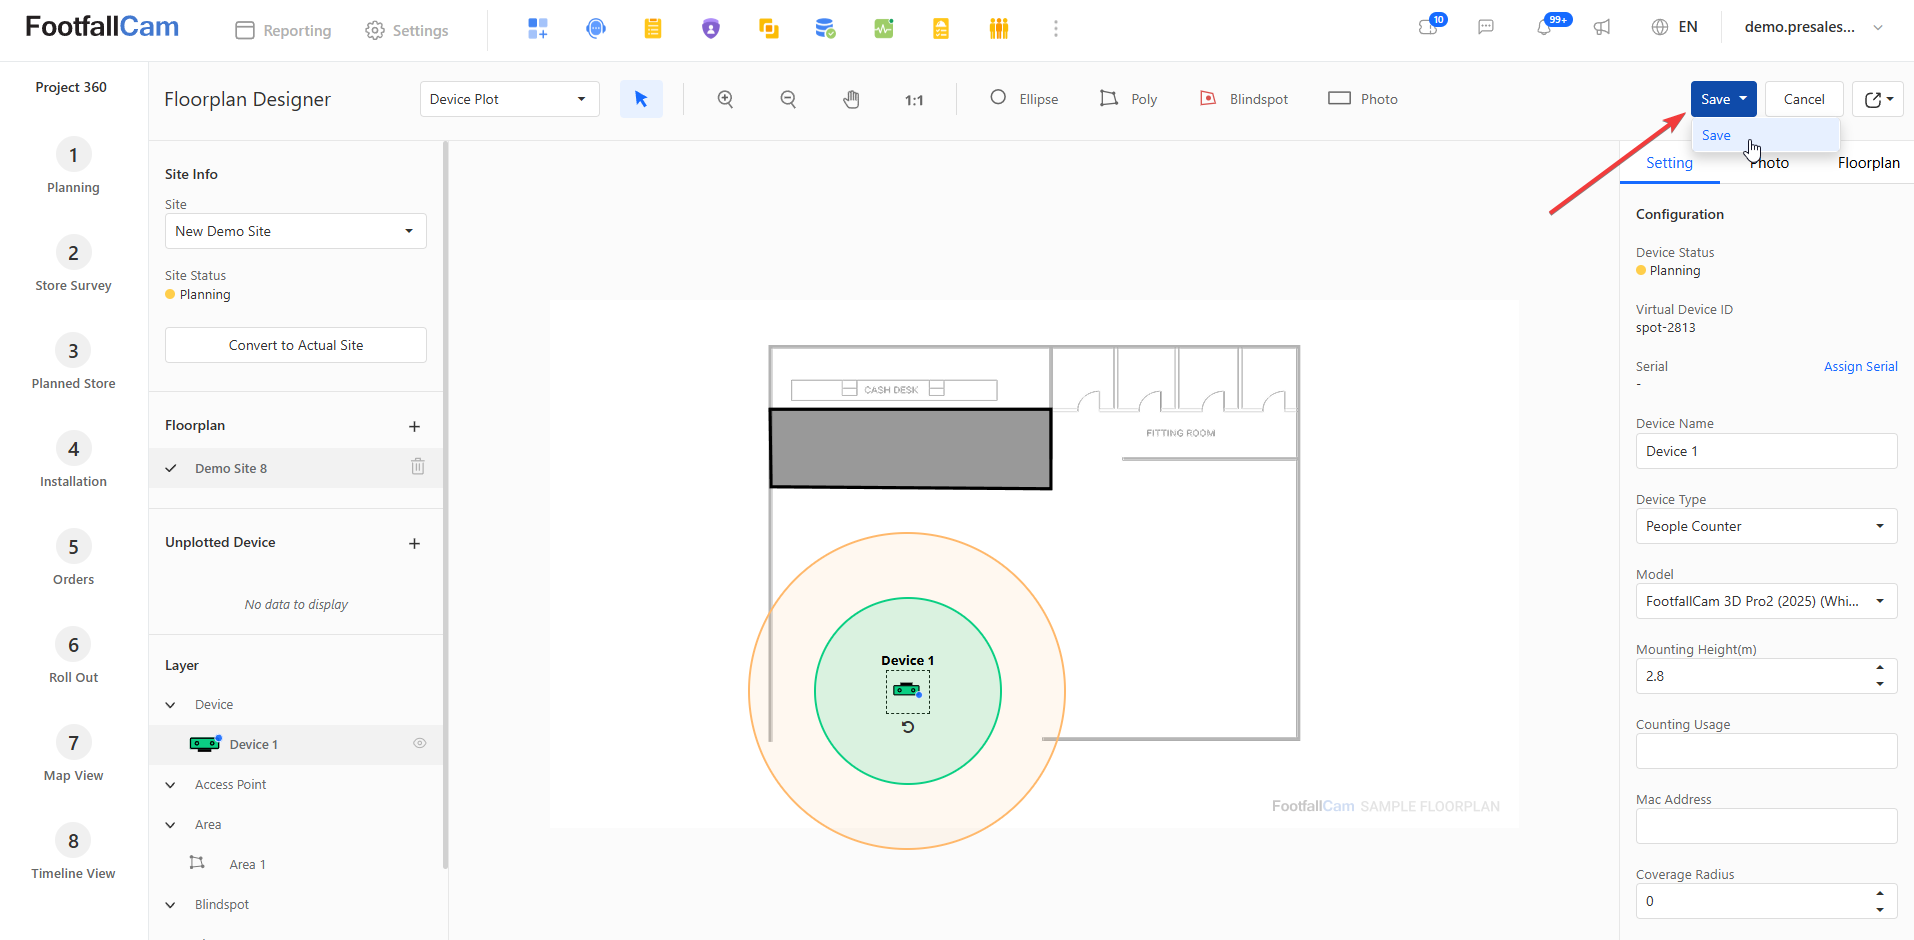
This page can be used to configure the floor plan, such as virtual devices and defining areas on the floor plan. To access the page, from the Floor Plan List page, select 'Configure' under the Action column to enter the Floor Plan Designer page.
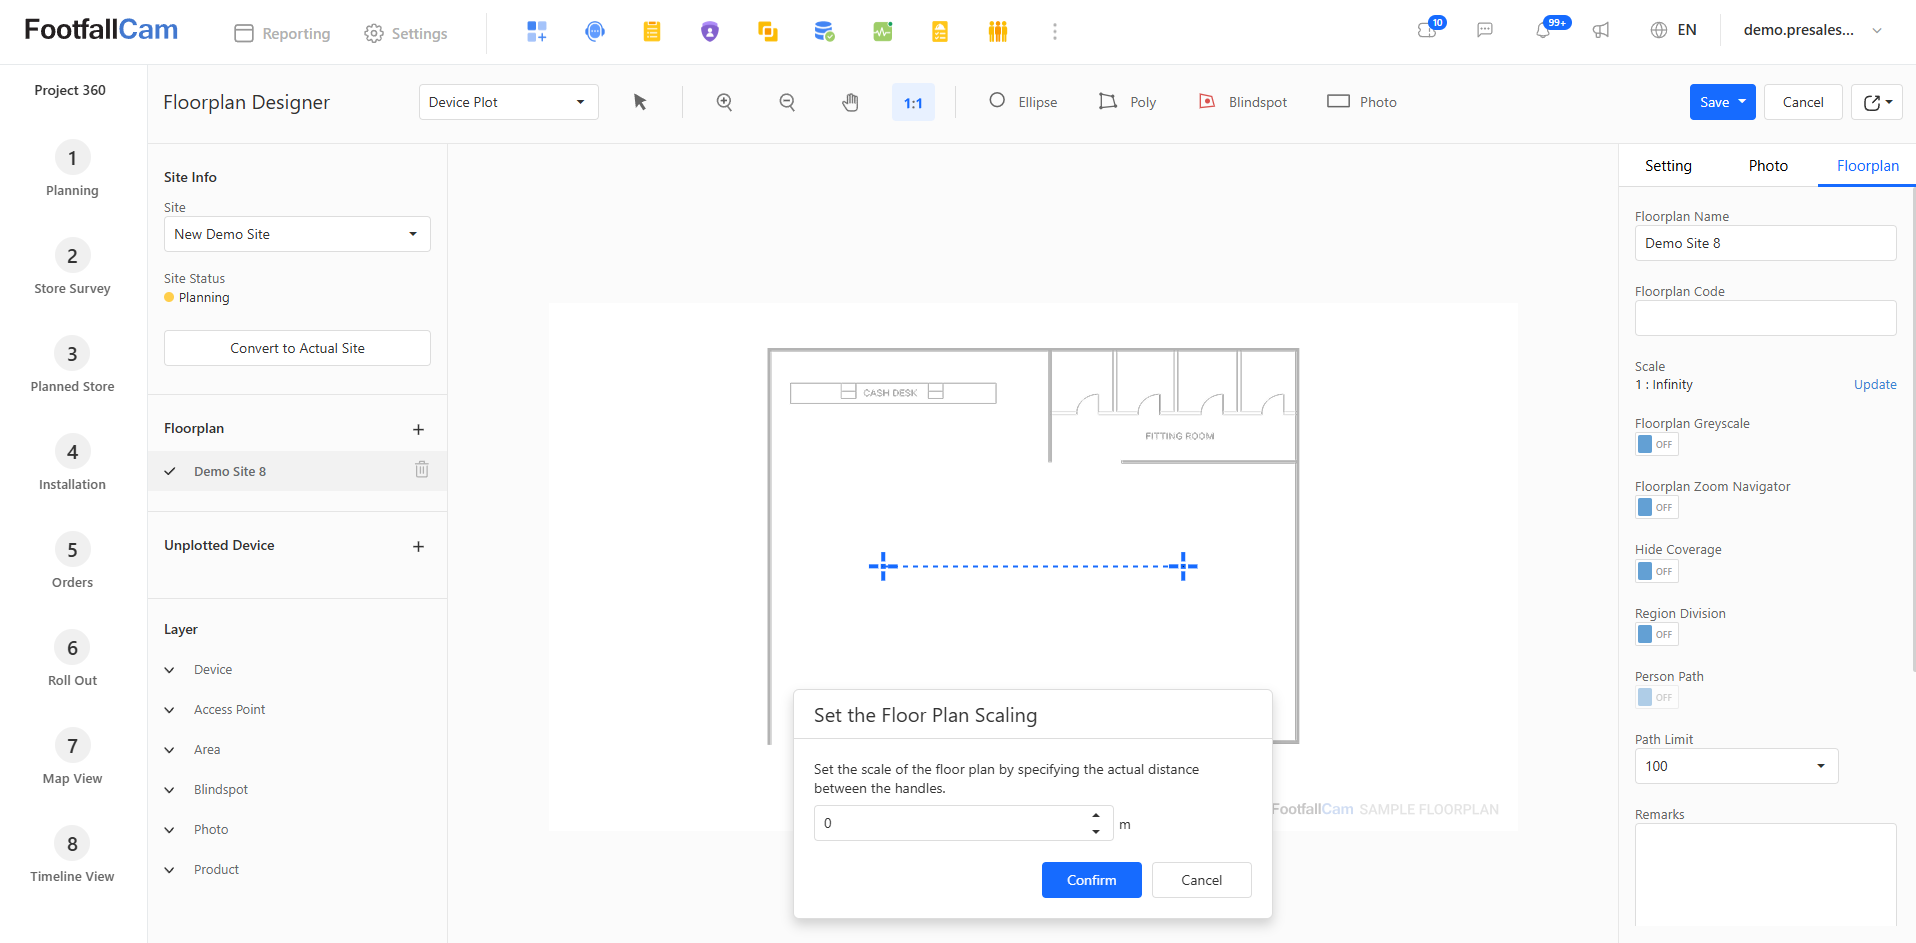
Upon opening the page, set the floor plan scaling. Move the ends of the dotted blue line to help define the scale of the floor plan more effectively if required. The scale can be updated under the Floorplan tab on the right sidebar and selecting Update under the Scale section.
Adding Virtual Device
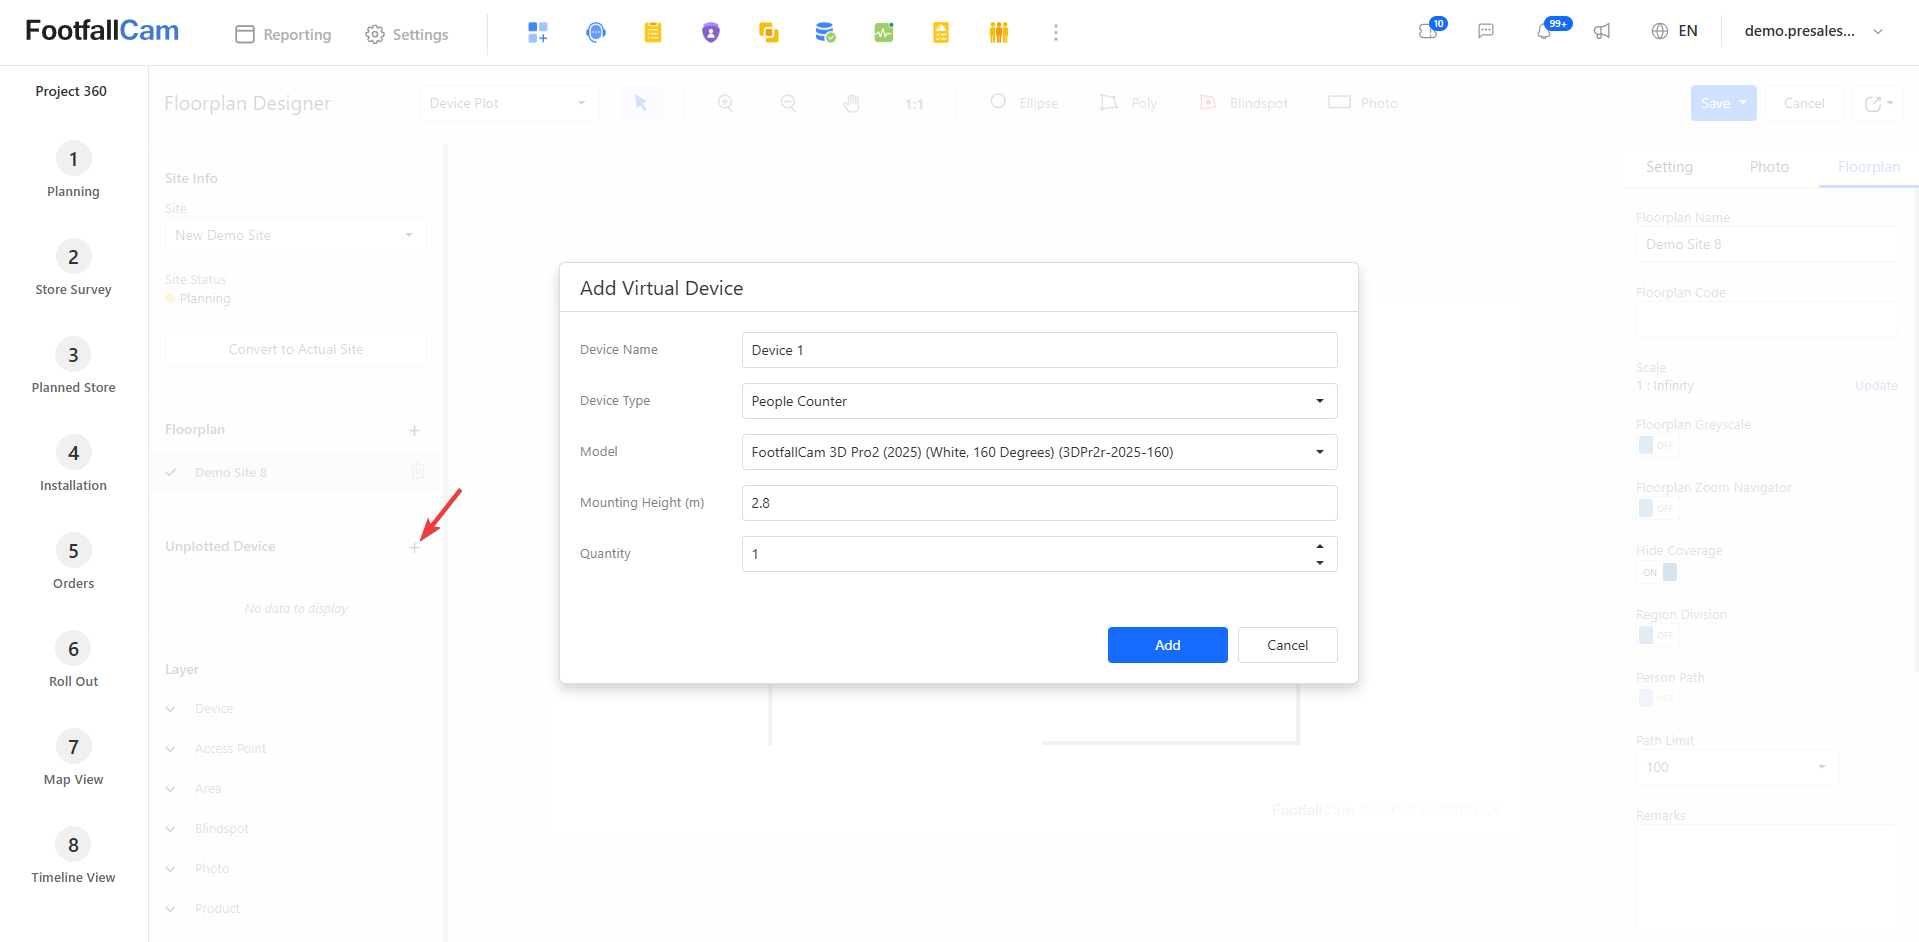
To add a virtual device to the floor plan:
- Select the + sign under the Unplotted Device section on the left sidebar.
- Fill in the information of the device that will be added to the floor plan, then select Add when done.
- Once the device is created, a device will appear under the Unplotted Device section. Drag and drop the device onto the floor plan to add it.
- To ensure the positioning of the device, navigate to the Floorplan tab on the right sidebar and disable Hide Coverage to see the device coverage. This will show the area of the device's live view.
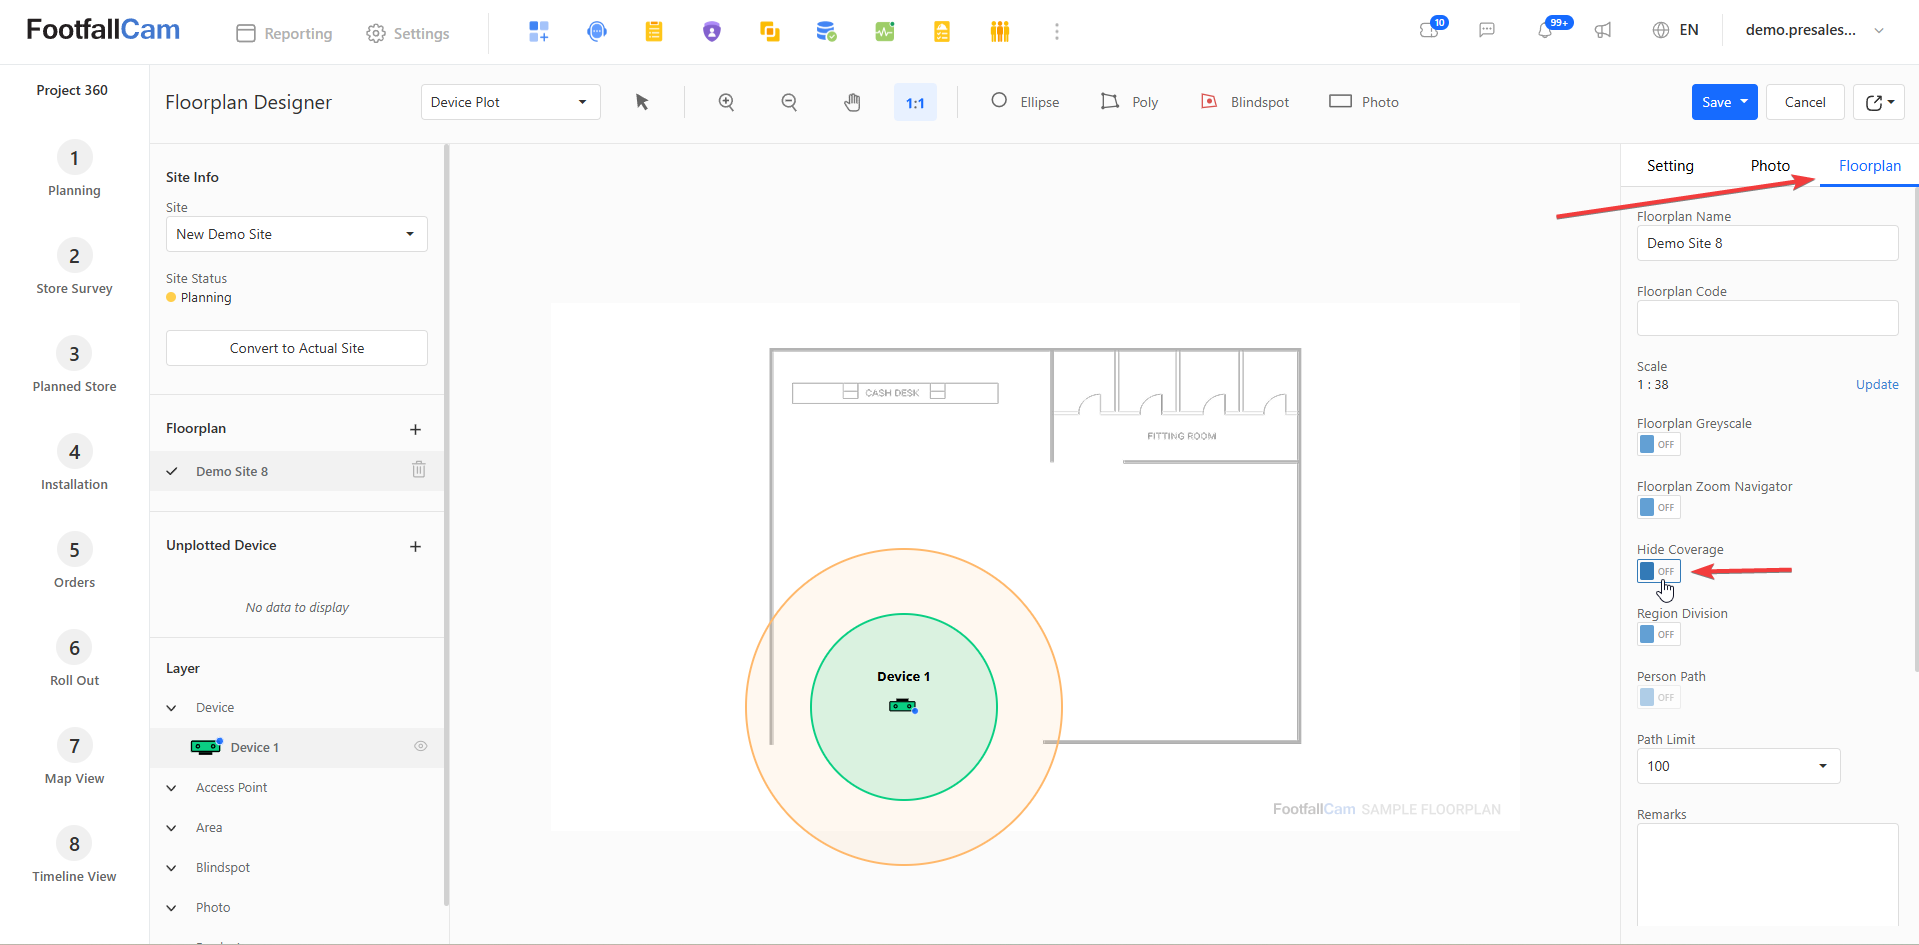
Defining Area on the Floor Plan
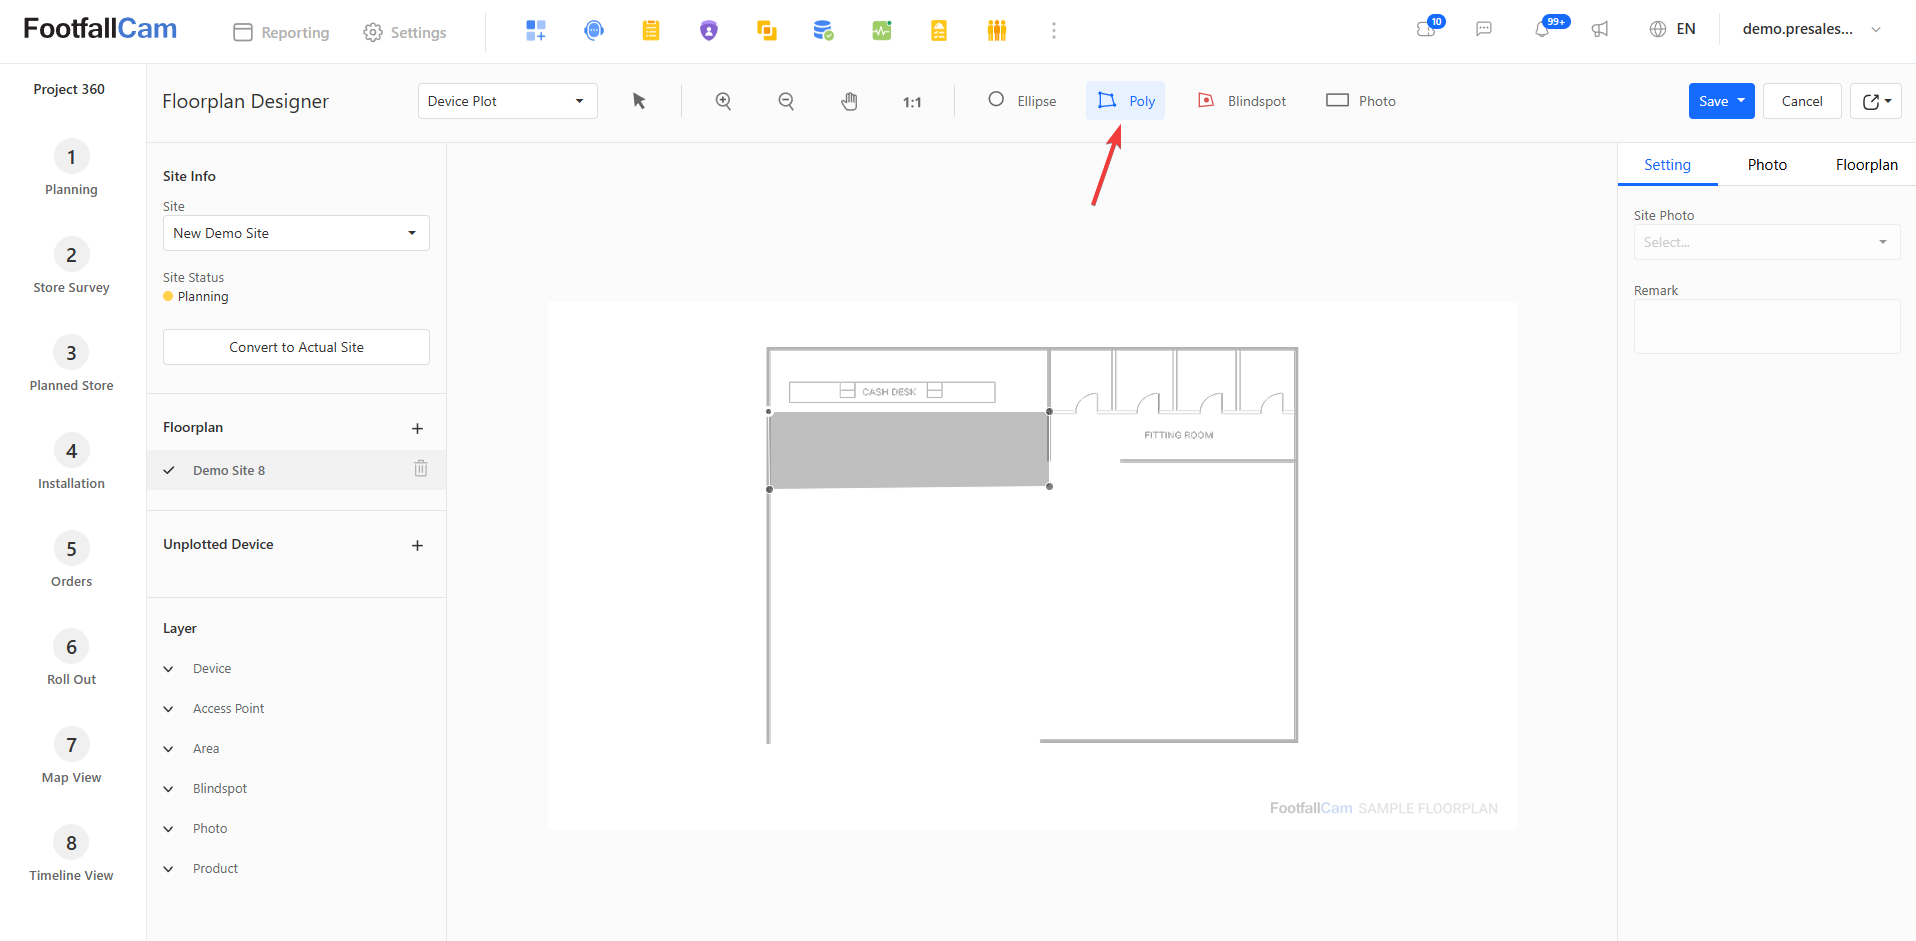
To define an area on the floor plan:
- Select the Poly tool at the top toolbar.
- Click on the floor plan to add a point. Click and hold to add and adjust the point. To finish drawing the area, either click on the first point of the drawing (indicated by the point with a white outline) or press Enter.
- Enter the details of the area in the pop-up and select Add once done.
- The points of the area can be adjusted once the details are added.
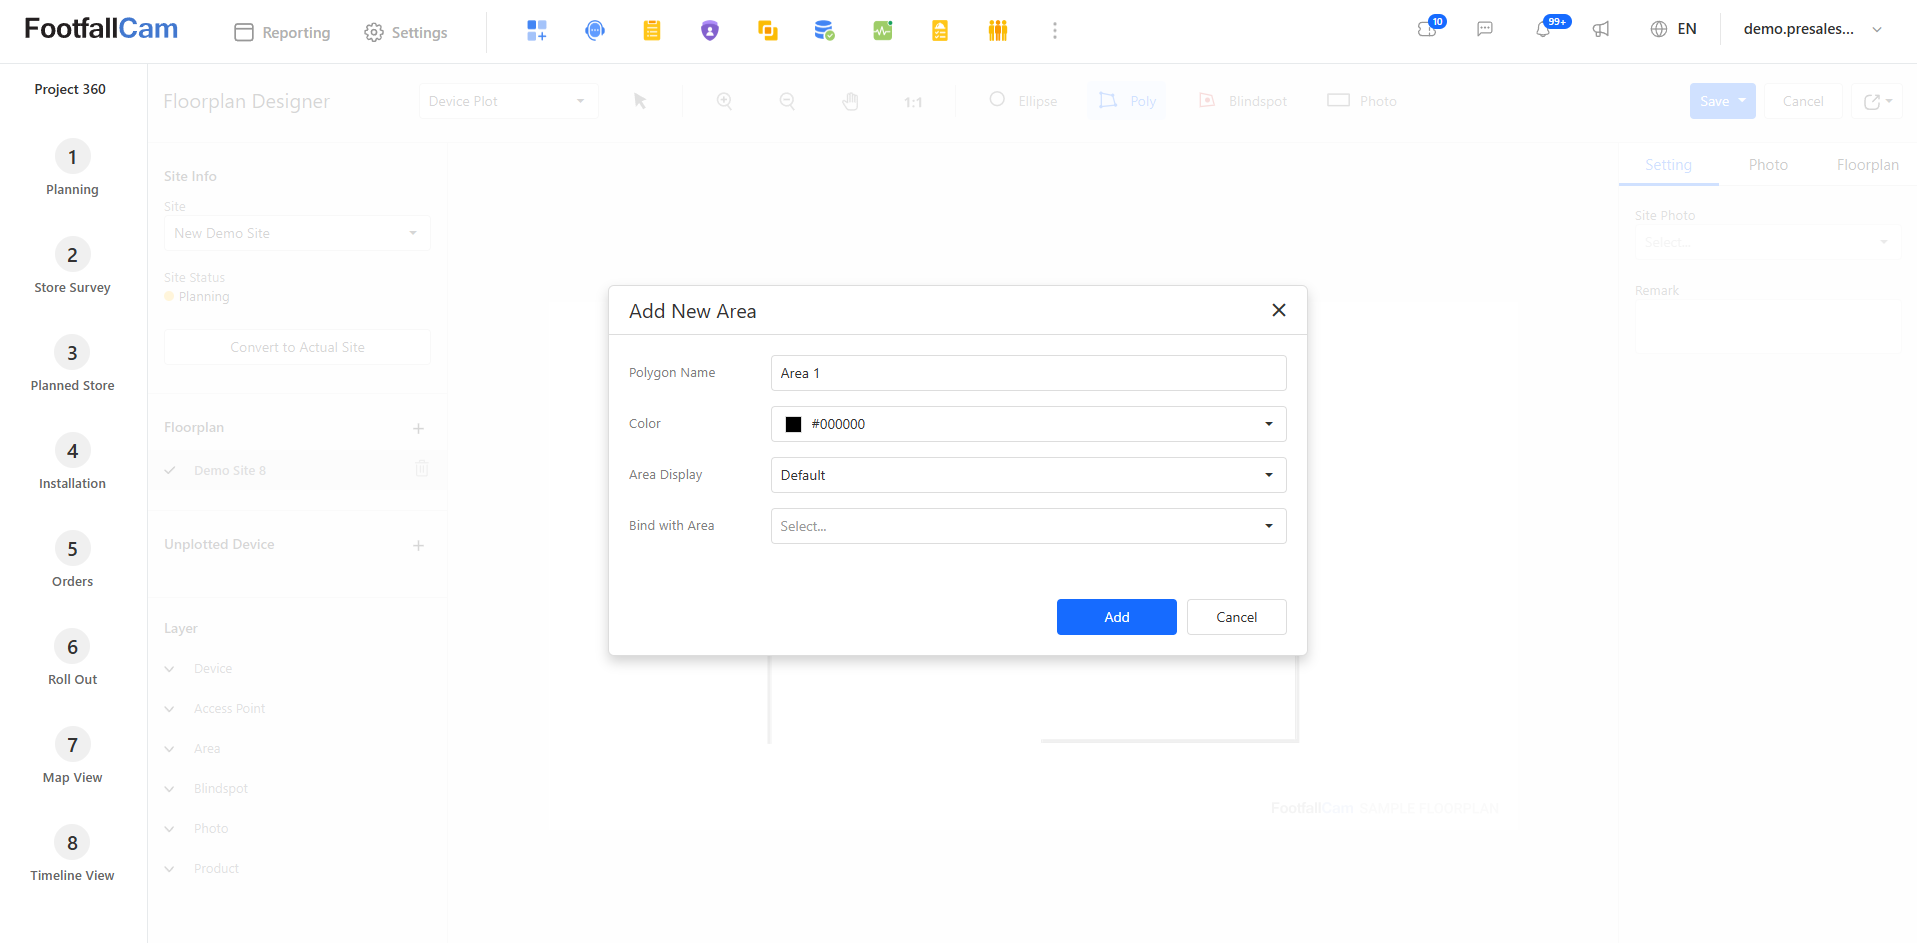
Saving Floorplan Designer Configuration
Once you are finished with configuring with the floor plan, select the Save button at the top right of the page. Select Yes to confirm saving the current changes.
Store Survey
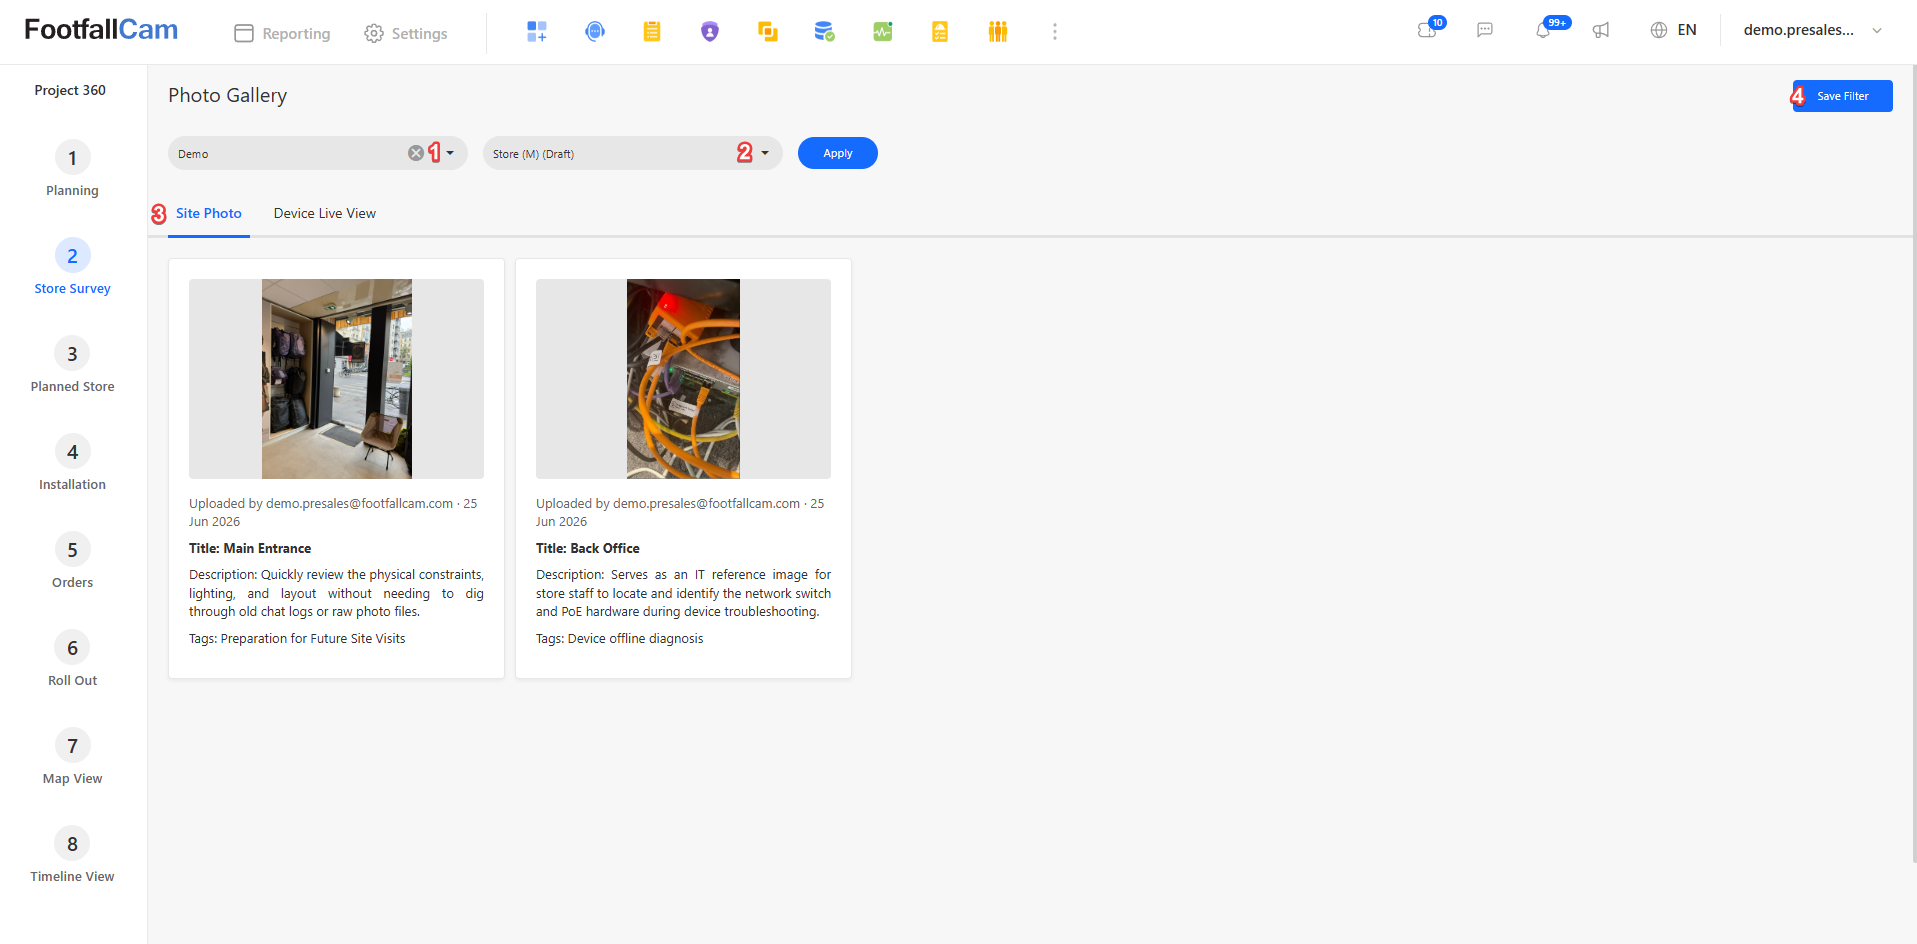
This page shows the site and device live view photos that are uploaded under the floor plan. Uploaded photos can be used as reference for technical issues.
| Item | Description |
| Site Dropdown | Select the site the floorplan is assigned under |
| Floorplan Dropdown | Select the floorplan to view the gallery |
| Gallery Tabs | Switch between tabs to view the uploaded site photos and the device live view |
| Save Filter Button | Save the current site and floorplan selection |
Purpose:
To assess the site and CCTV views before Centroid installation, or while the Centroid is offline, and identify potential deployment issues in advance.
| No. | Main Requirement | Customer Prerequisite | Details / Assessment Criteria |
| 1 | CCTV Floor Plan & Camera Mapping | Provide the latest CCTV floor plan with all cameras labelled by channel/ID. | Channel/ID must correspond to the actual camera and its physical location. |
| 2 | CCTV Live View / Footage | Provide live view or sample footage for each proposed camera, with the channel/ID visible. | Footage should represent the actual CCTV stream intended for Centroid. |
| 3 | Camera Position & Coverage | Camera position and intended counting area must be identified. | Elevated/tilted view is required; human eye-level view is not recommended. Counting area should have sufficient coverage with minimal blind spots or occlusion. |
| 4 | Video Quality | Provide footage at the actual resolution and stream quality. | Resolution, clarity, frame rate, compression/bitrate and image stability should be sufficient for AI detection. |
| 5 | Environmental Conditions | Provide representative footage under normal operating conditions. | Check lighting, glare, reflections, shadows, obstructions and other environmental factors. |
| 6 | Day & Night Conditions | Required for outdoor cameras. | Provide both daytime and night-time footage to assess differences in visibility and image quality. |
| 7 | Crowded Conditions | Provide footage during peak/busy periods where possible. | Assess image quality, occlusion and detection suitability when the area is crowded. |
| 8 | CCTV Stream Accessibility | Confirm that the CCTV/VMS can provide an RTSP video stream to Centroid. | Verify that the camera/VMS supports RTSP streaming and that the required stream can be accessed by Centroid with the assessed resolution, frame rate and video quality. |
Refer below attached form for more information:
Planned Store List
This page shows the list of planned sites created for pre-opening. Users are able to create new planned site for pre-opening, configure or delete existing planned sites.
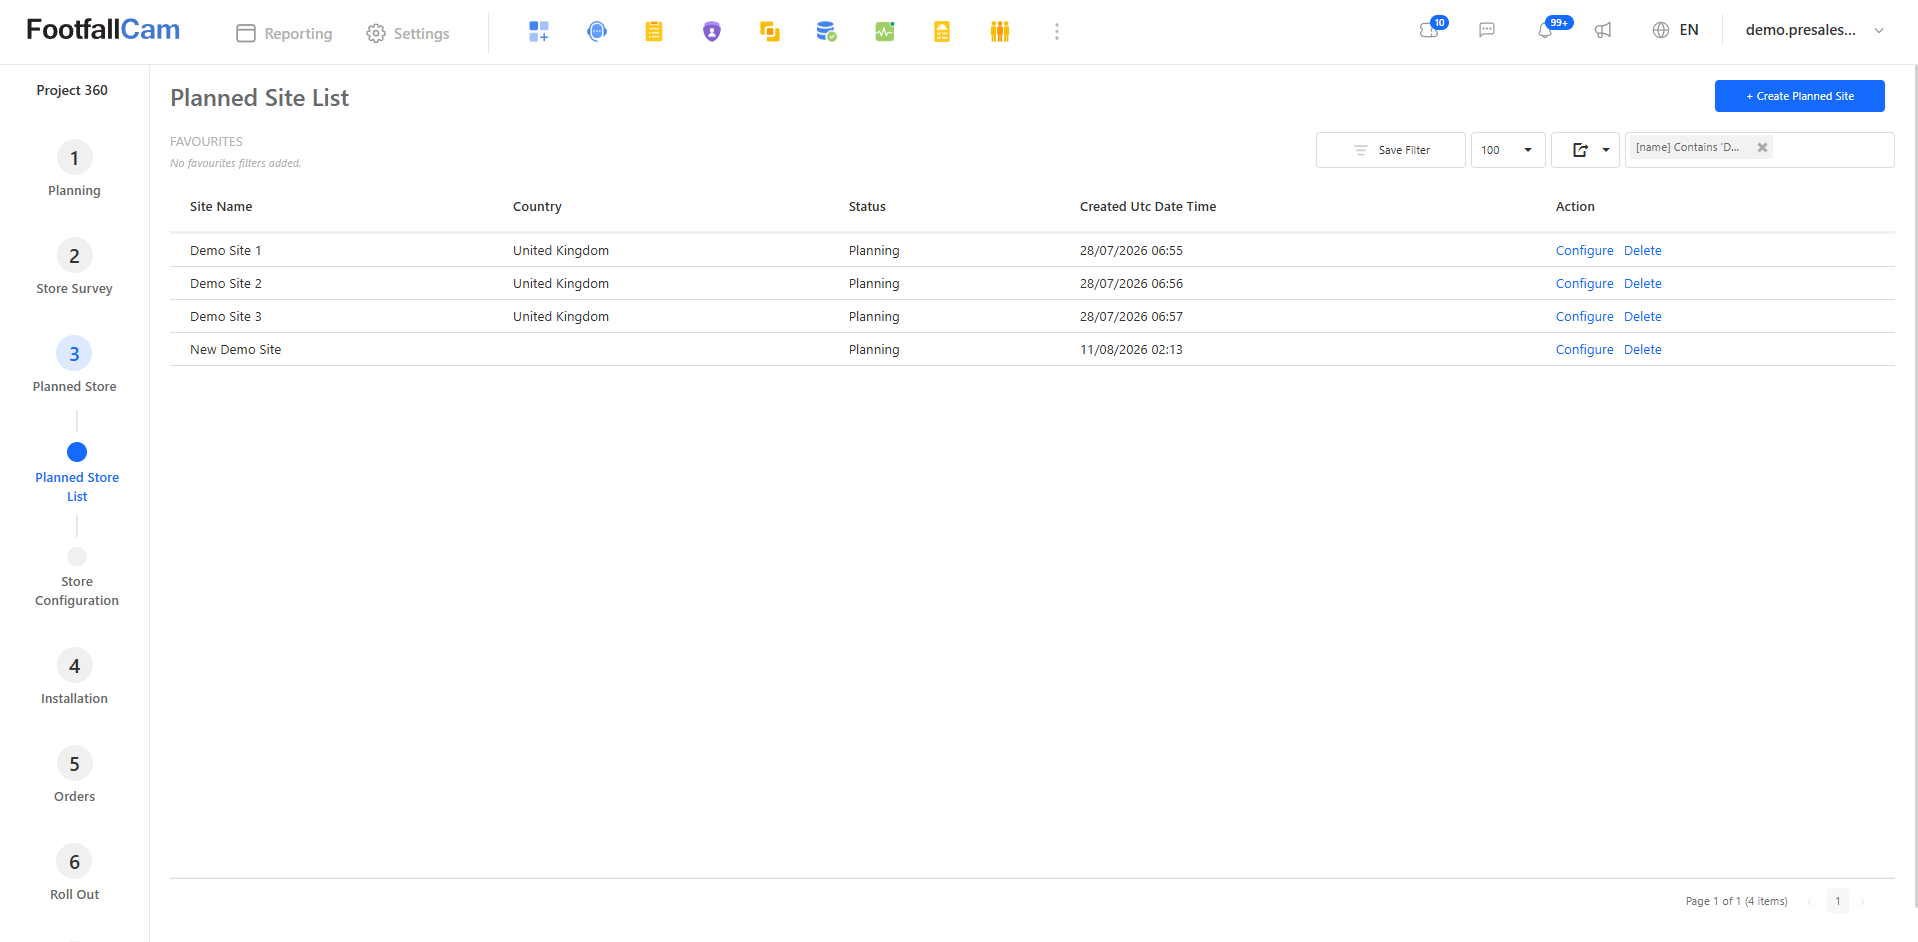
- Select Configure under the Action column to configure the planned site. This will redirect the user to the Store Configuration page with the site information prefilled.
- Select Delete to remove the planned site.
Store Configuration
This page is used to arrange details for a site's pre-opening. Users are required to fill in information such as site details, site devices, policy of the devices and installation details for the site.
Add a New Planned Site
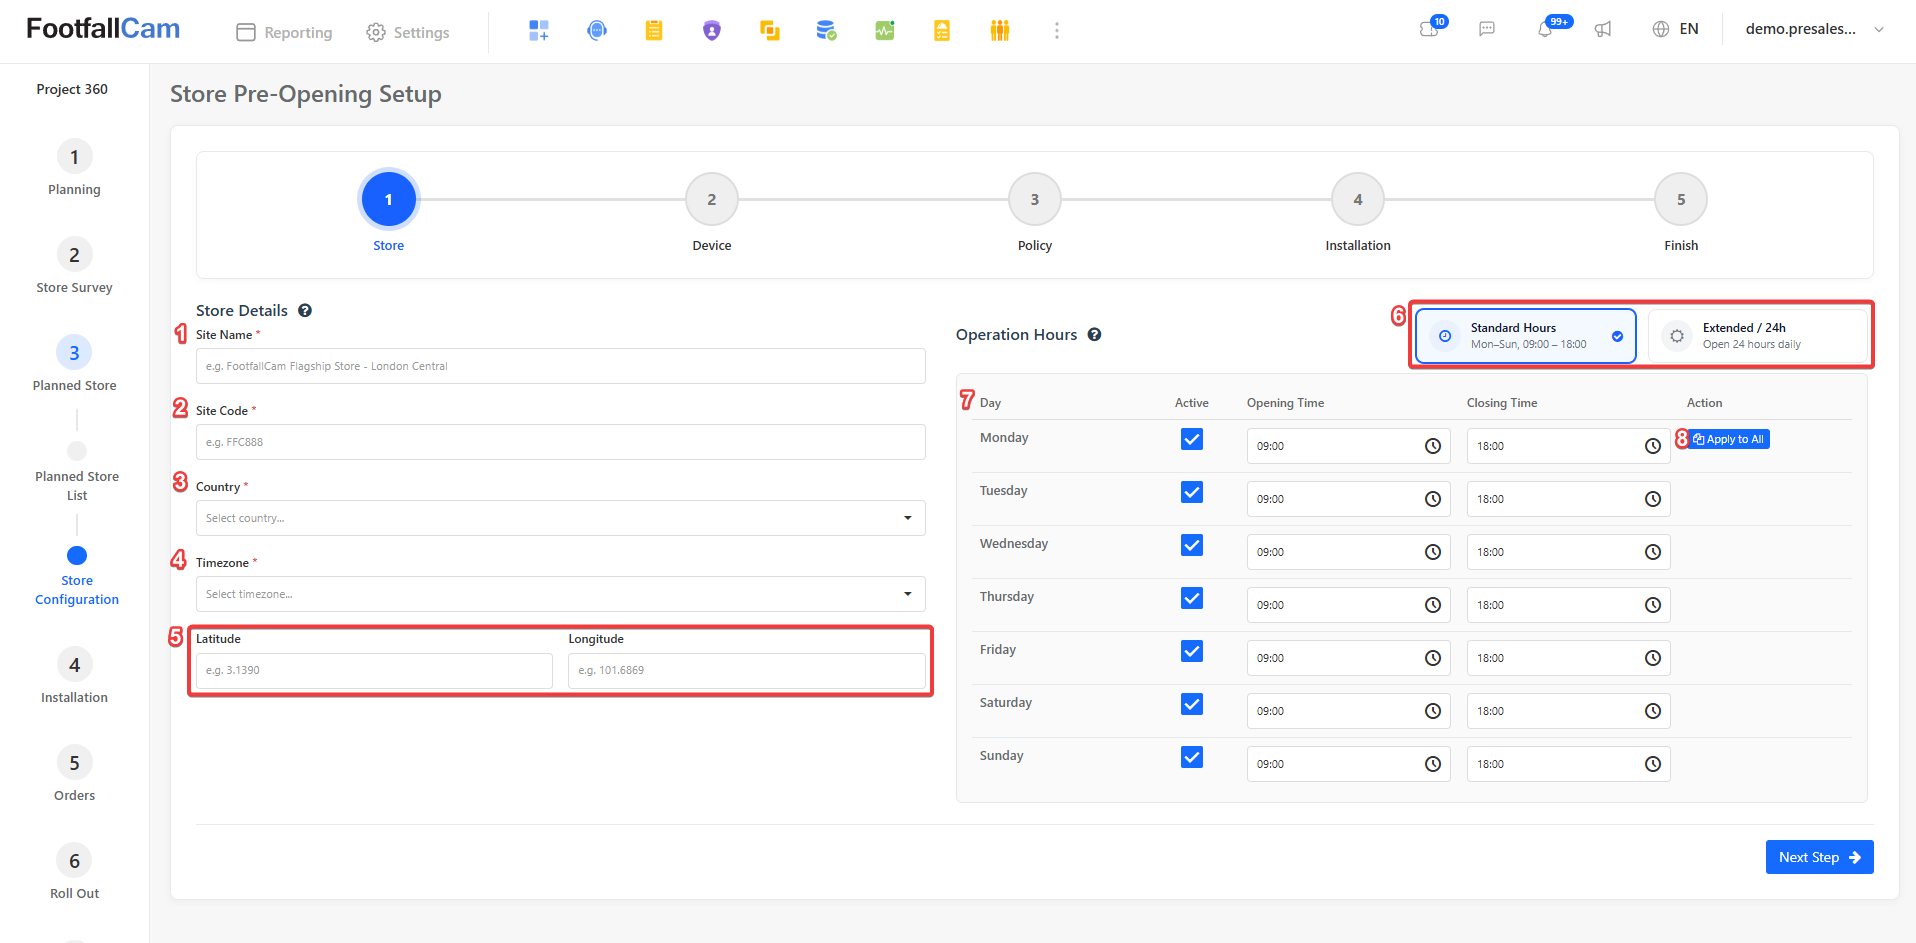
To add a new planned site, select 'Create Planned Site' at the top right of the page. This will redirect to the Store Configuration page.
| Item | Details |
| Site Name | Name for the site |
| Site Code | Code for the site |
| Country | Country of where the site is located in |
| Timezone | Time zone the site uses |
| Latitude & Longitude | Geographical location of the site |
| Operation Hours Preset | Standard Hours: Store will operate from 9:00 AM to 6:00 PM daily. Extended / 24h: Store will operate 24 hours daily |
| Operation Hours Settings | Opening and closing hours for the site for each day. Check box can be used to indicate which days the store will be opened or closed. |
| Apply to All Button | Operating hours settings for the row will be applied to all rows |
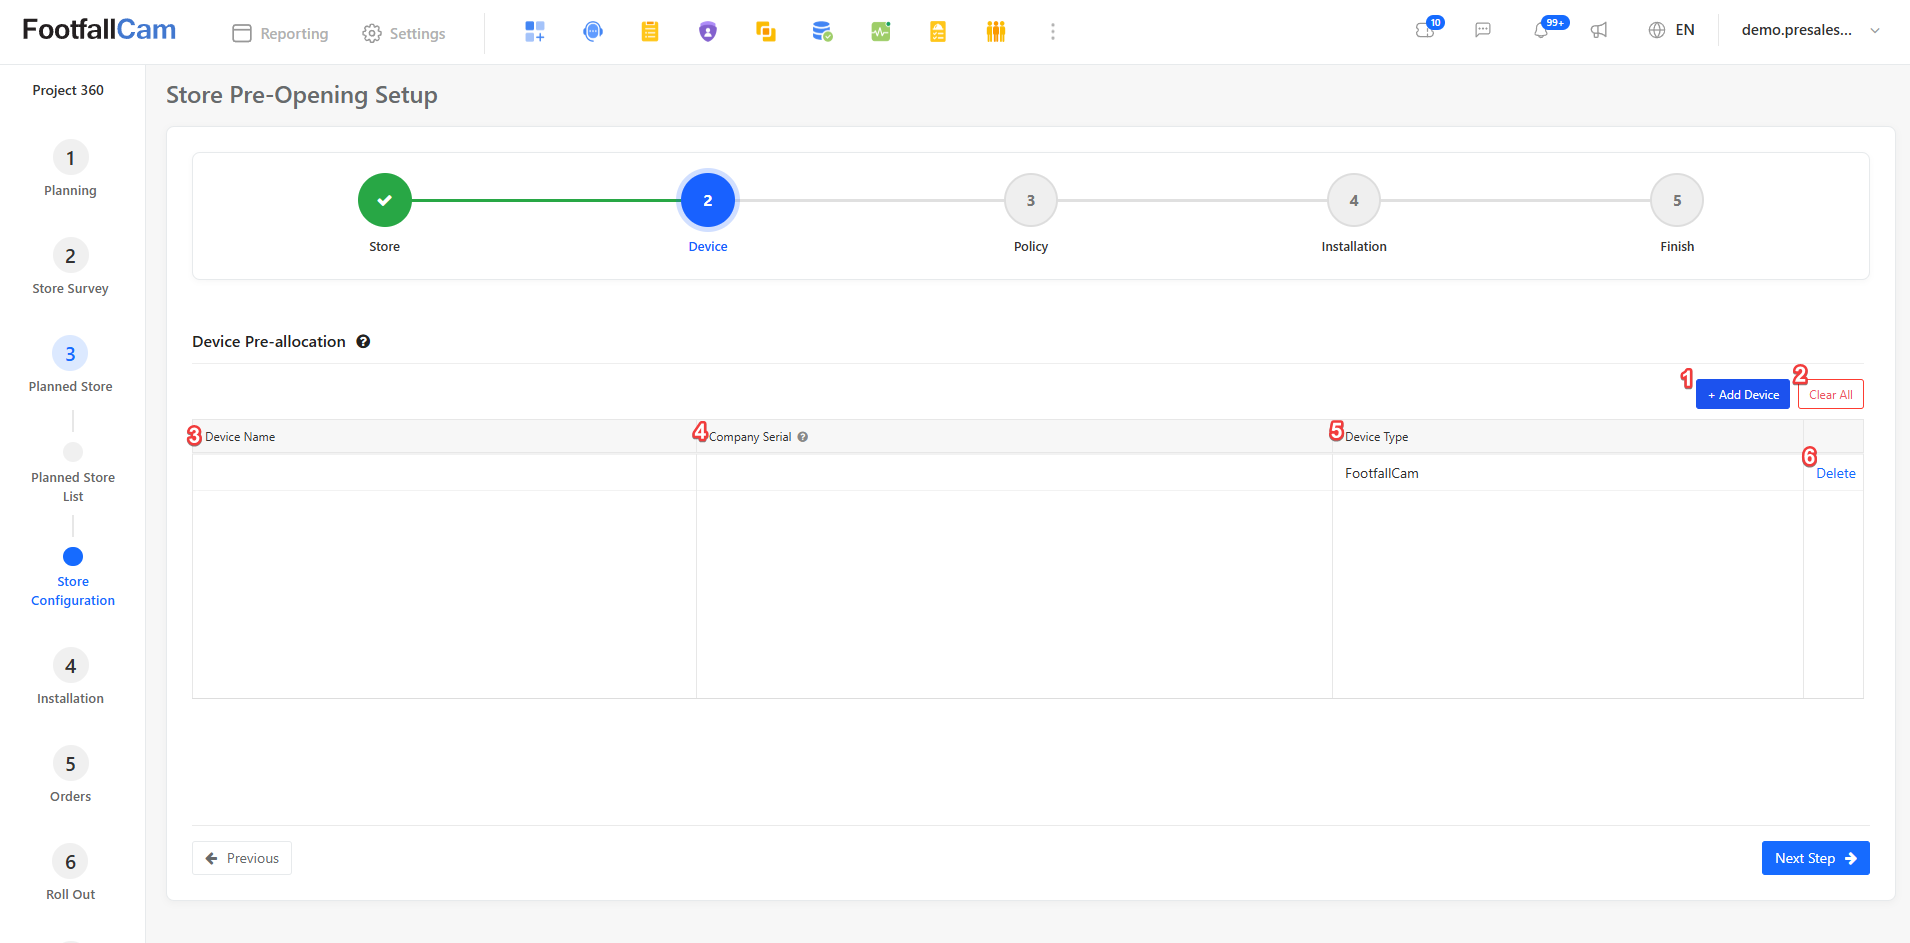
| Item | Details |
| Add Device Button | Add a row to the device table |
| Clear All Button | Clears the device table |
| Device Name | Name of the device |
| Company Serial | Serial shown on the device Serial format: 15F.... or 25F.... |
| Device Type | Type of device |
| Delete | Removes device row from table |
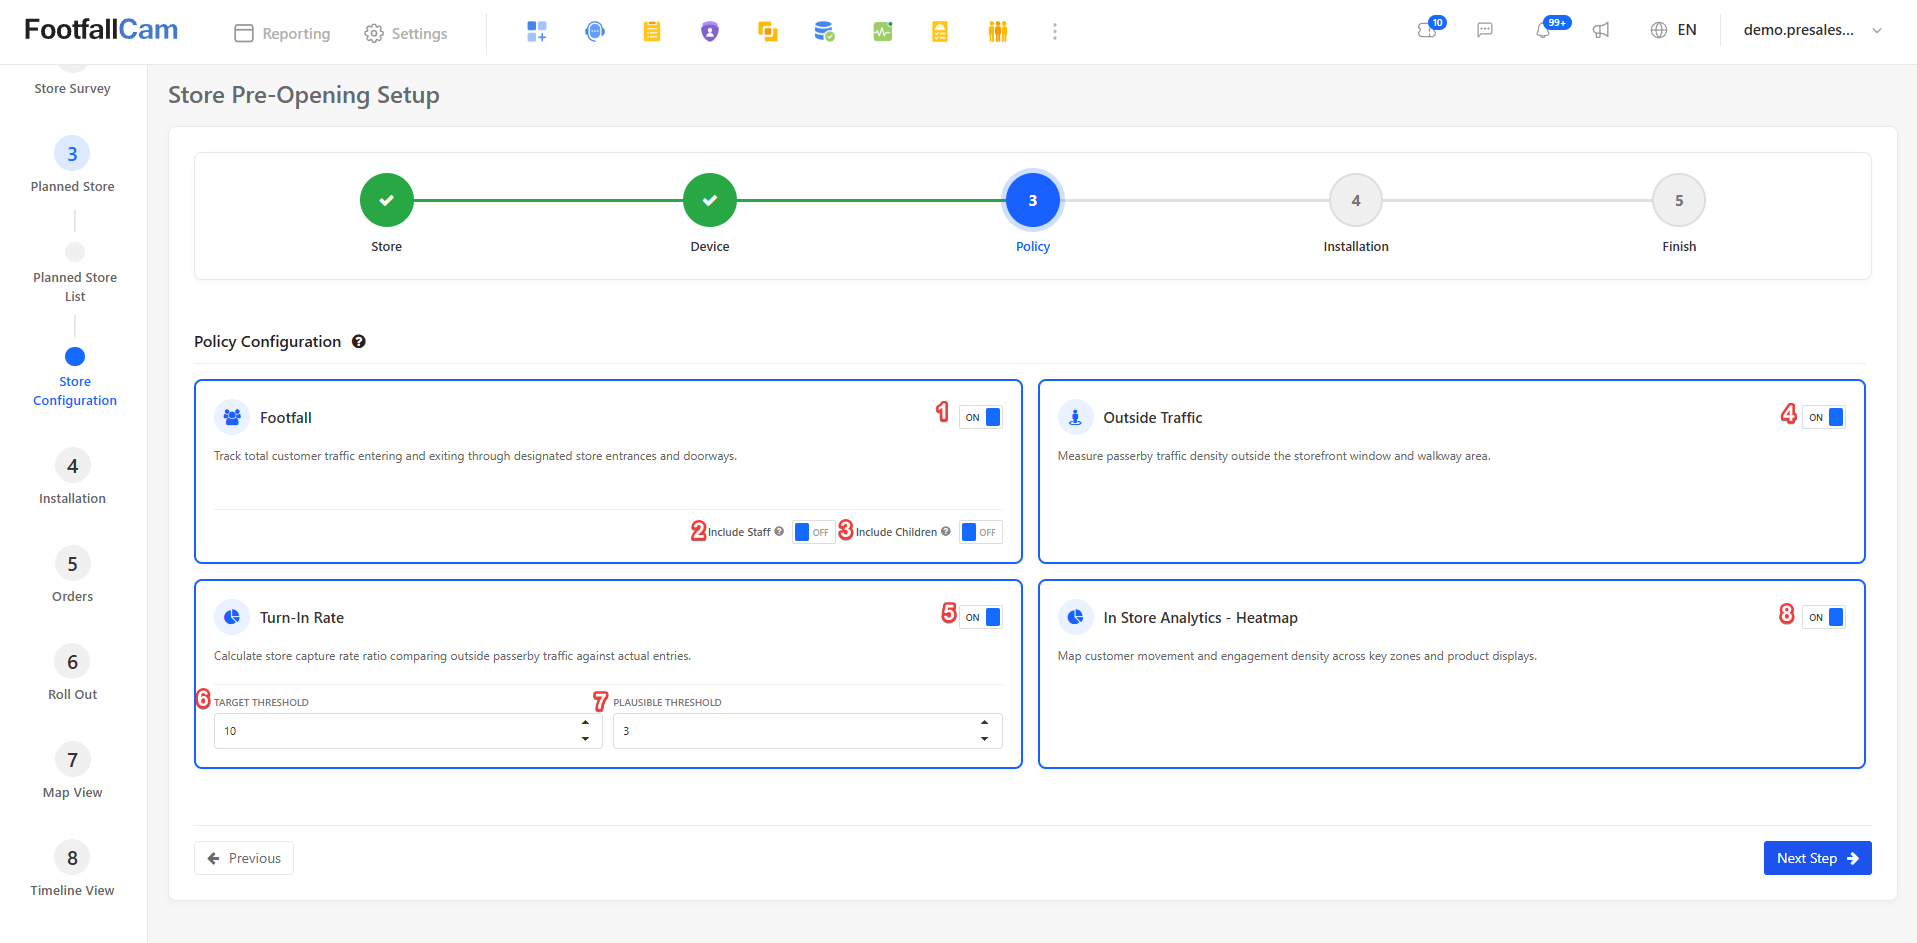
| Item | Details |
| Footfall | Track customers entering and exiting store entrances and doorways |
| Include Staff | Include staff counting in visitor counts |
| Include Children | Include children counting in visitor counts |
| Outside Traffic | Measure passerby traffic outside of storefront |
| Turn-In Rate | Calculate store capture rate ratio via comparison between footfall and outside traffic |
| Target Threshold | The target benchmark or KPI goal for your store's capture rate |
| Plausible Threshold | The minimum baseline percentage expected for valid store capture rate performance |
| In Store Analytics - Heatmap | Map customer movement and engagement within the store |
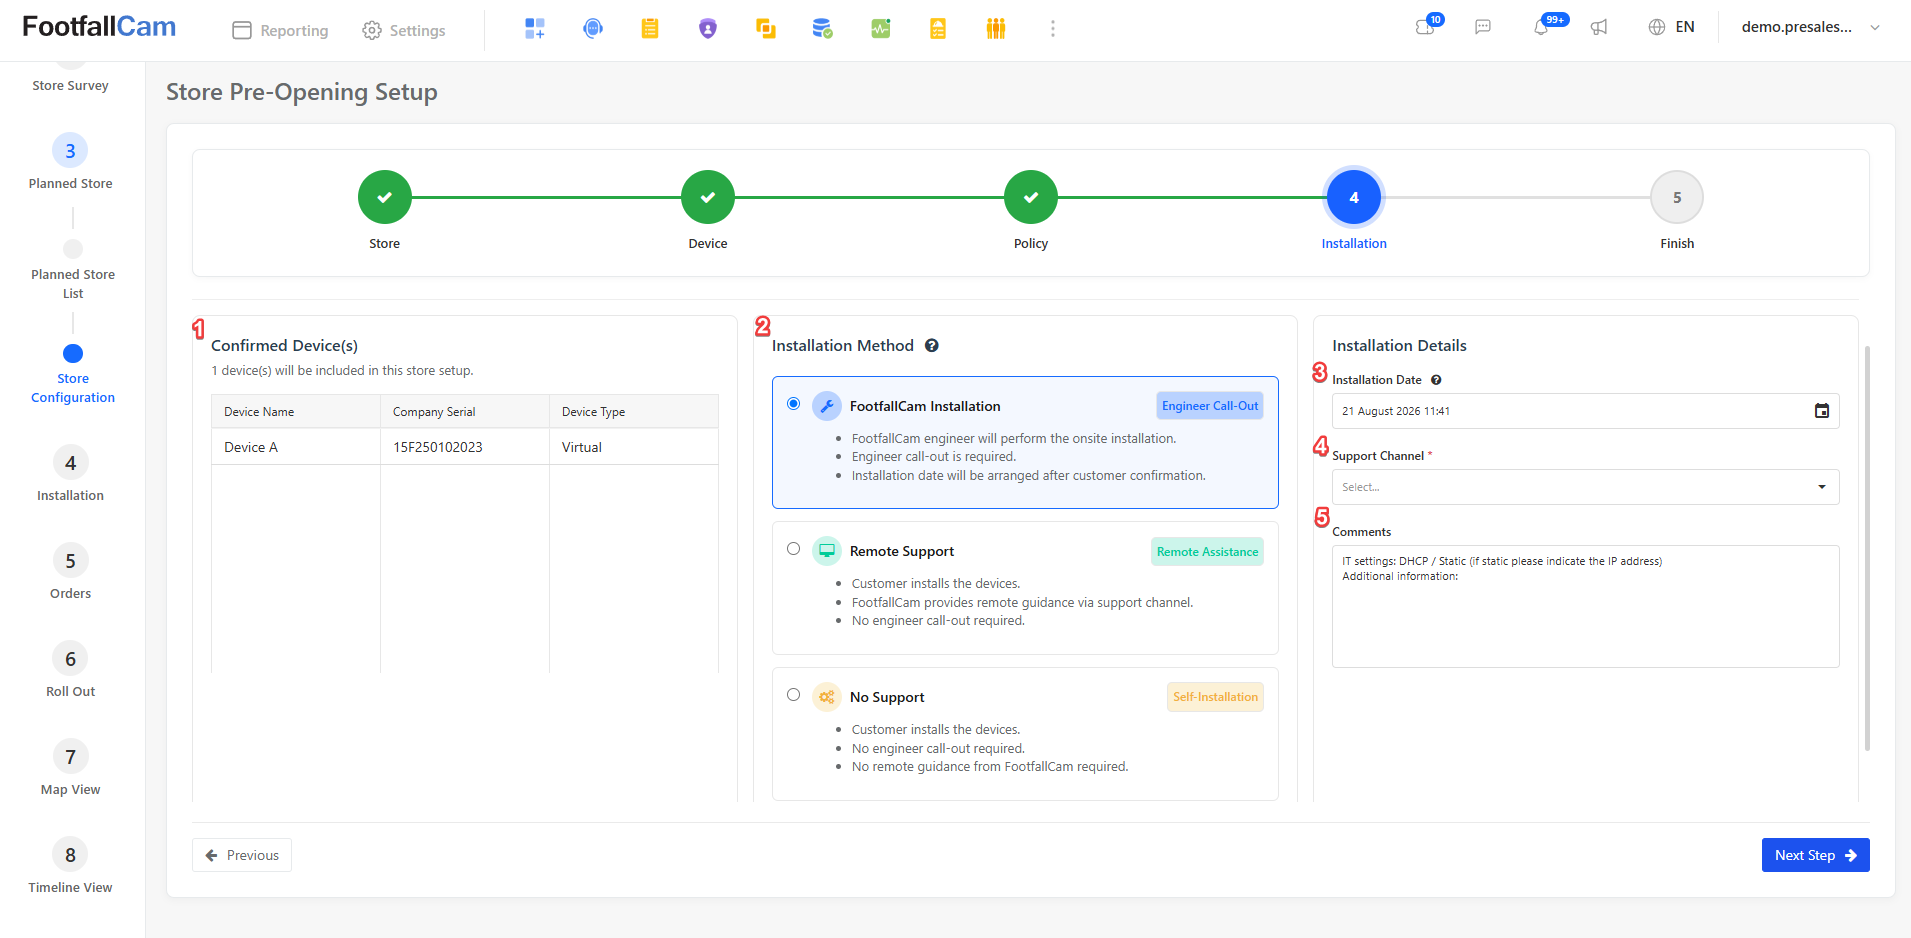
| Item | Details |
| Confirmed Device List | List of devices to be installed |
| Installation Method | Installation type to be carried out for site |
| Installation Date | Date of installation |
| Support Channel | Channel to communicate with installation team Support Chat: Select Support Chat Room WhatsApp: Provide the group link and group name |
| Comments | Additional information for the installation team to take note on |
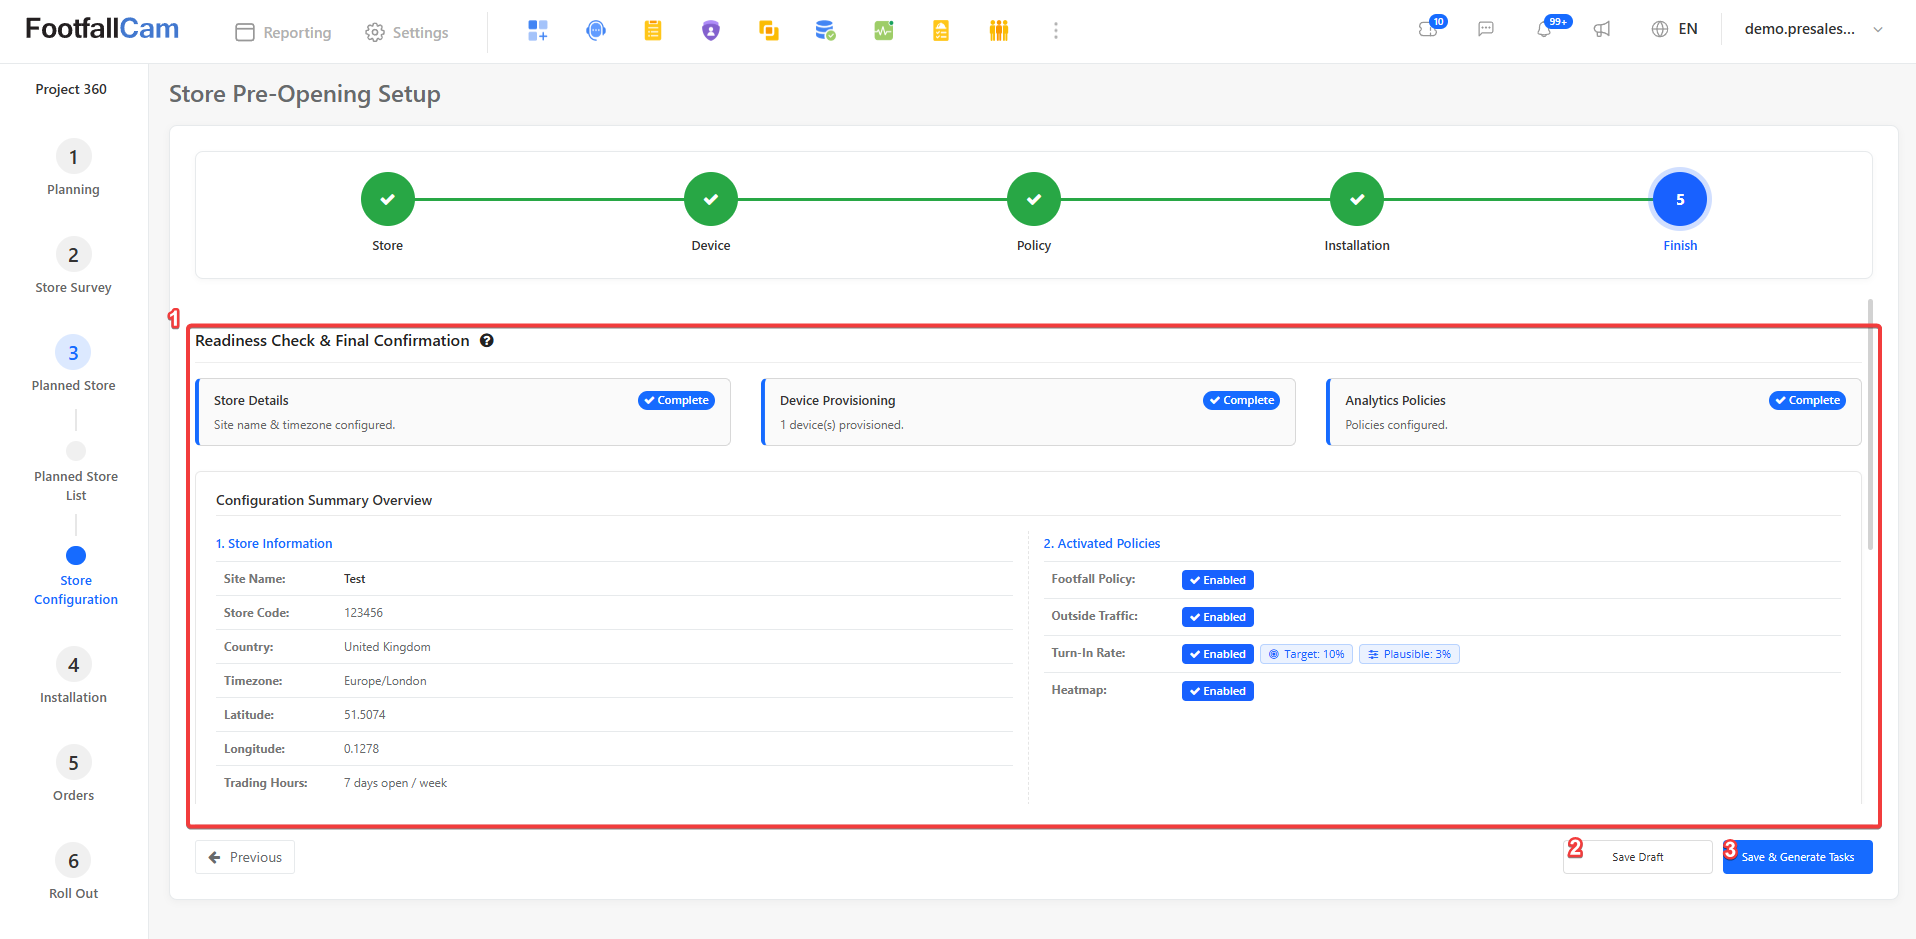
| Item | Details |
| Readiness Check & Final Confirmation | Summary details of store pre-opening |
| Save Draft | Save current setup under planned site |
| Save & Generate Tasks | Save current setup as an actual site and generate relevant tasks to be carried out for store pre-opening |
Site Installation Completion
The site installation completion form is completed after each site visit by the engineer. Engineer is required to fill up the relevant fields and get the store to confirm on the completed tasks.
Refer below attached site installation completion form for more information:
New Request
This page shows all engineer call-out jobs that were created for the company. Users are able to view the details of the call-out and create new call-out for their sites.
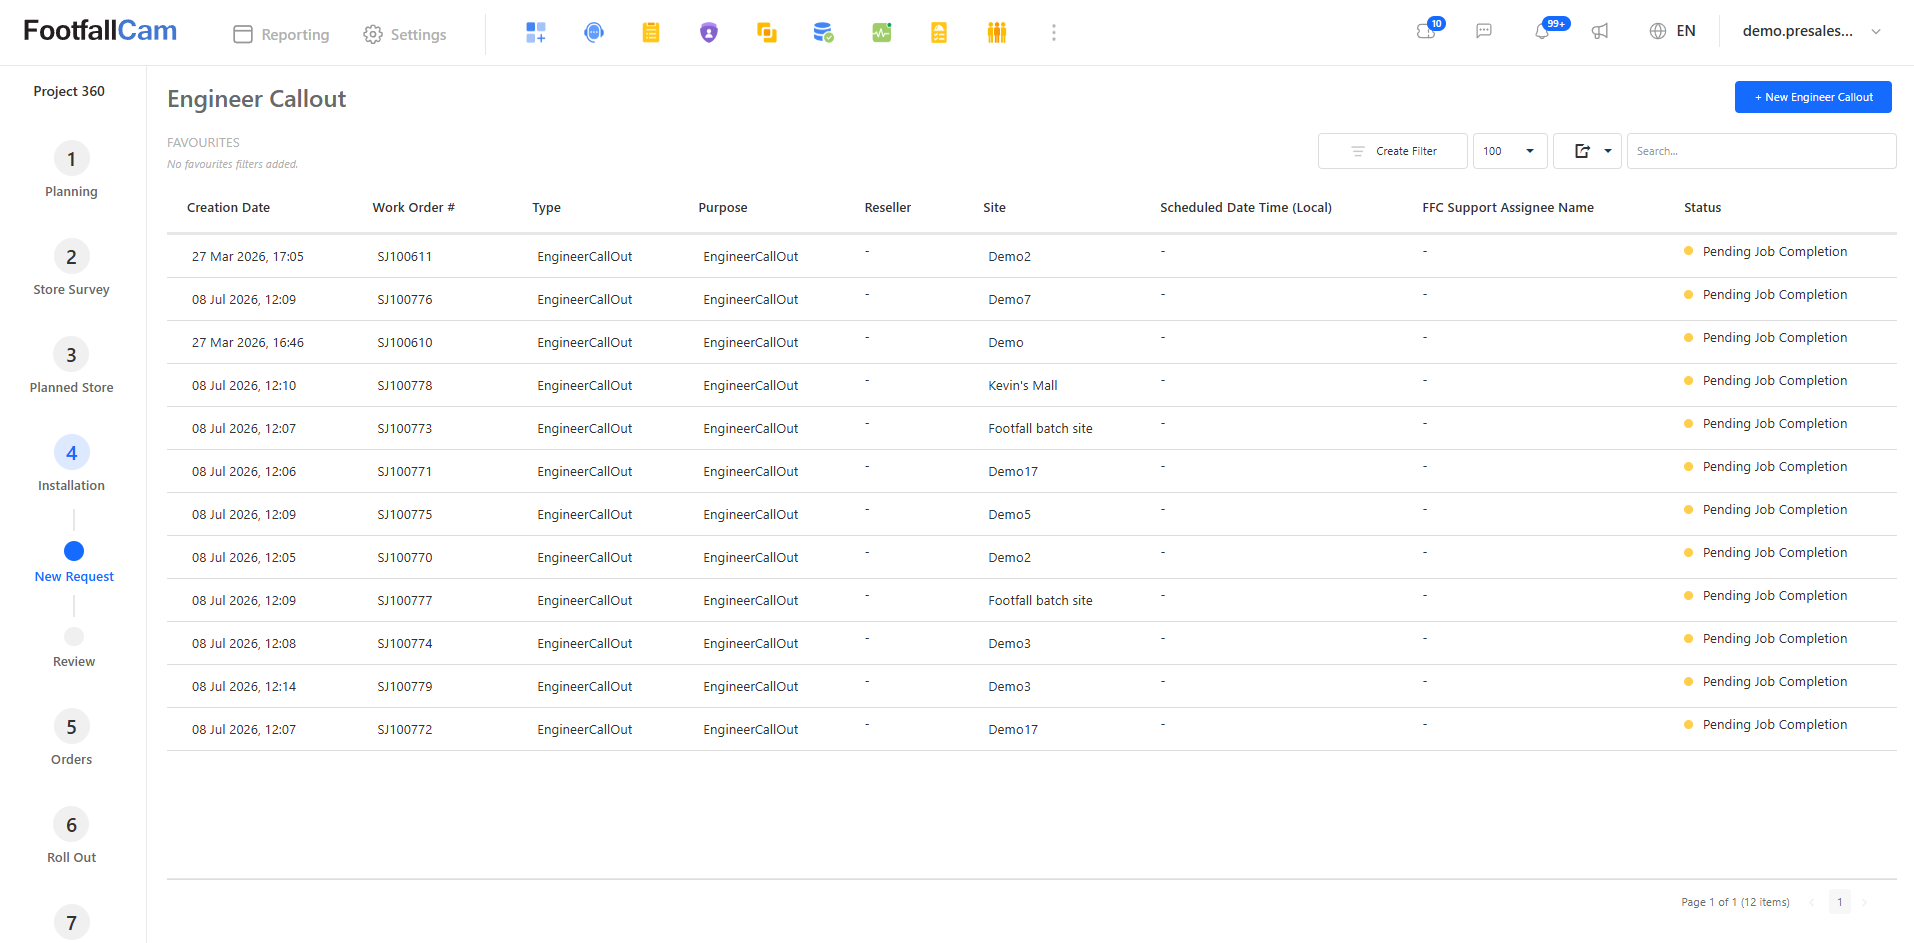
Create New Engineer Callout
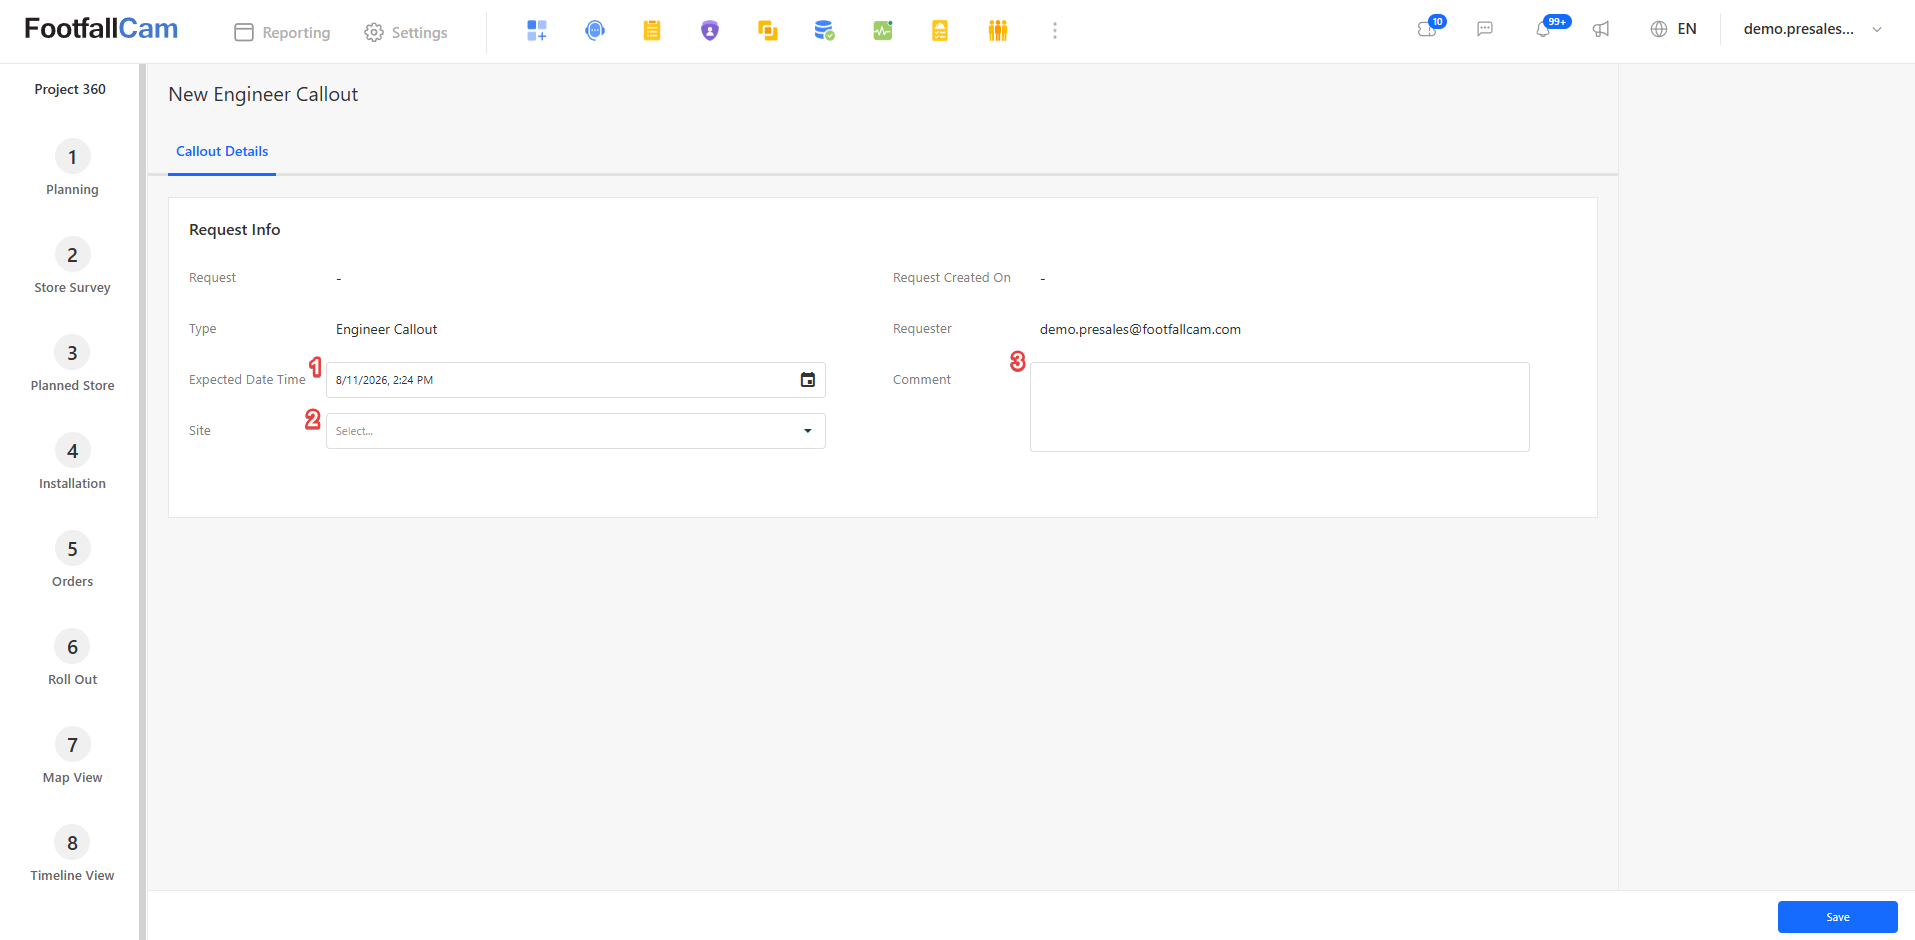
Select 'New Engineer Callout' to create a new engineer call-out. This will redirect to the New Engineer Callout Form.
- Enter the expected Date Time for the call-out.
- Select the site that requires the call-out.
- Add additional details for the call-out
- Once all details are filled, click Save.
Engineer Callout
This page shows the details of the engineer call out. Access this page by selecting thew work order in the New Request page.
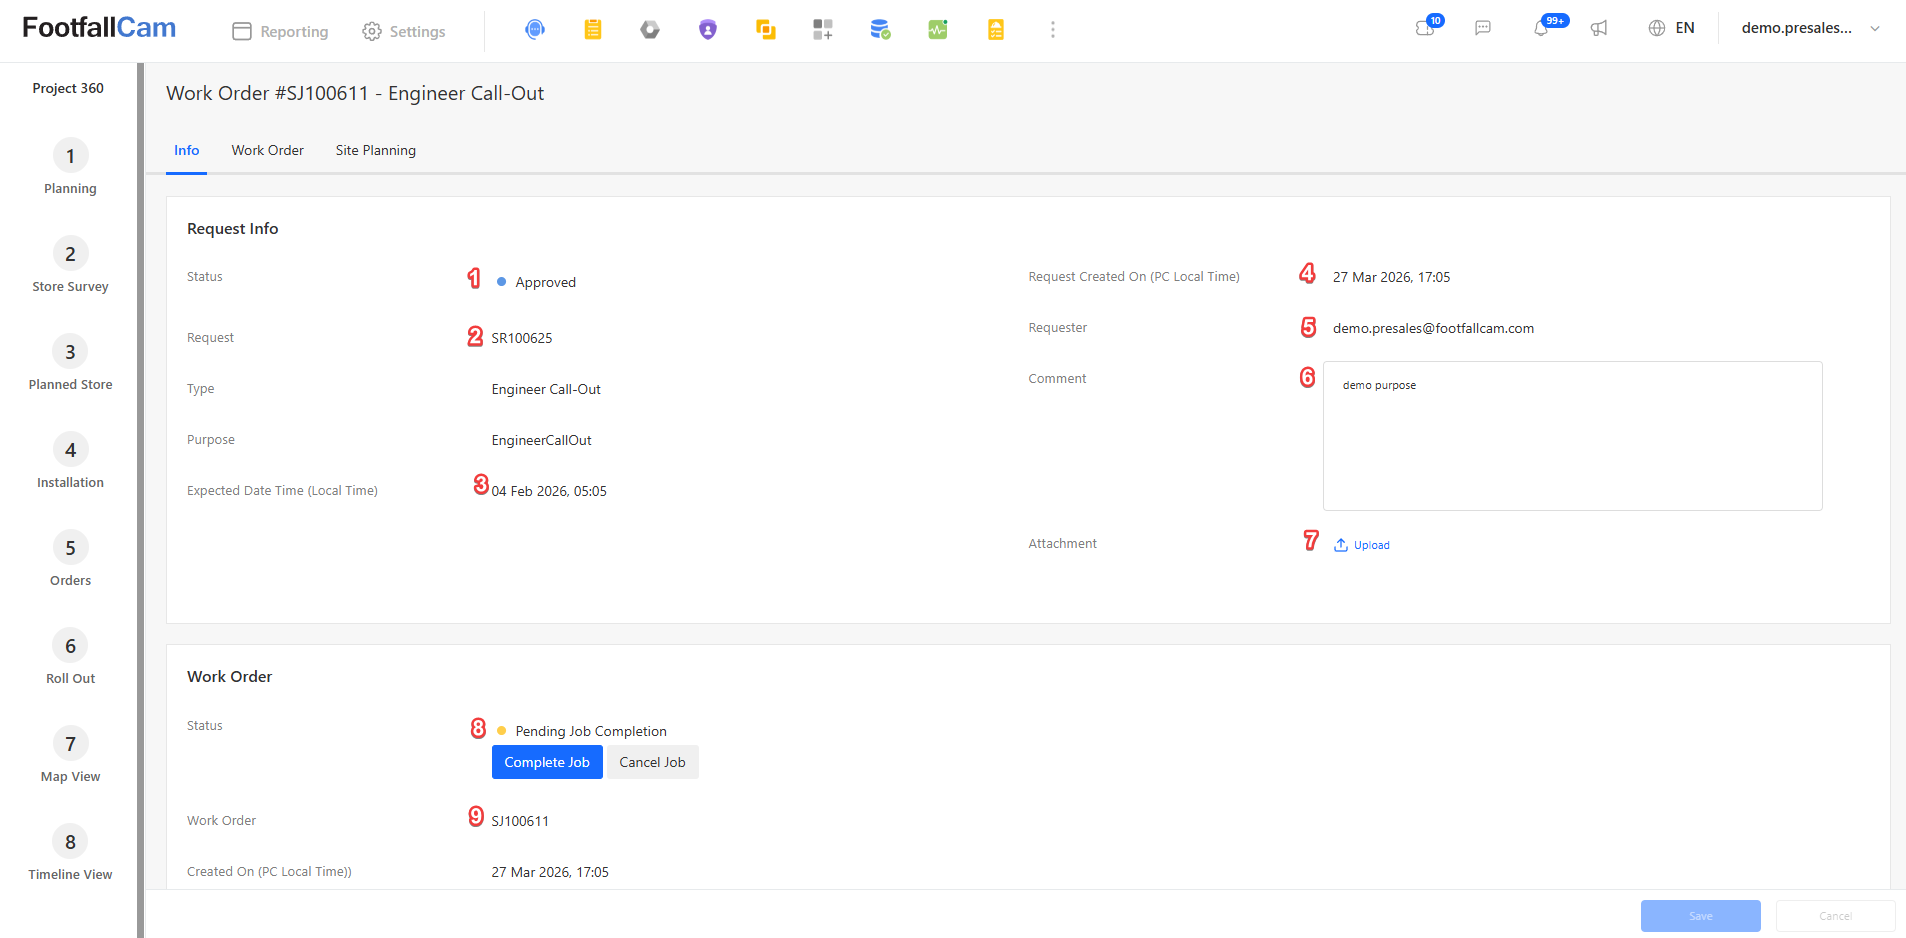
| Item | Details |
| Request Info Status | Status of request |
| Request ID | ID for the request |
| Expected Date Time | Expected date time for engineer call out |
| Request Created | Date time when request was created |
| Requester | Account that created the request |
| Comment | More information about engineer call-out request |
| Attachment | Upload documents/pictures for call-out |
| Work Order Status | Status of the work order |
| Work Order ID | ID of the work order |
Review
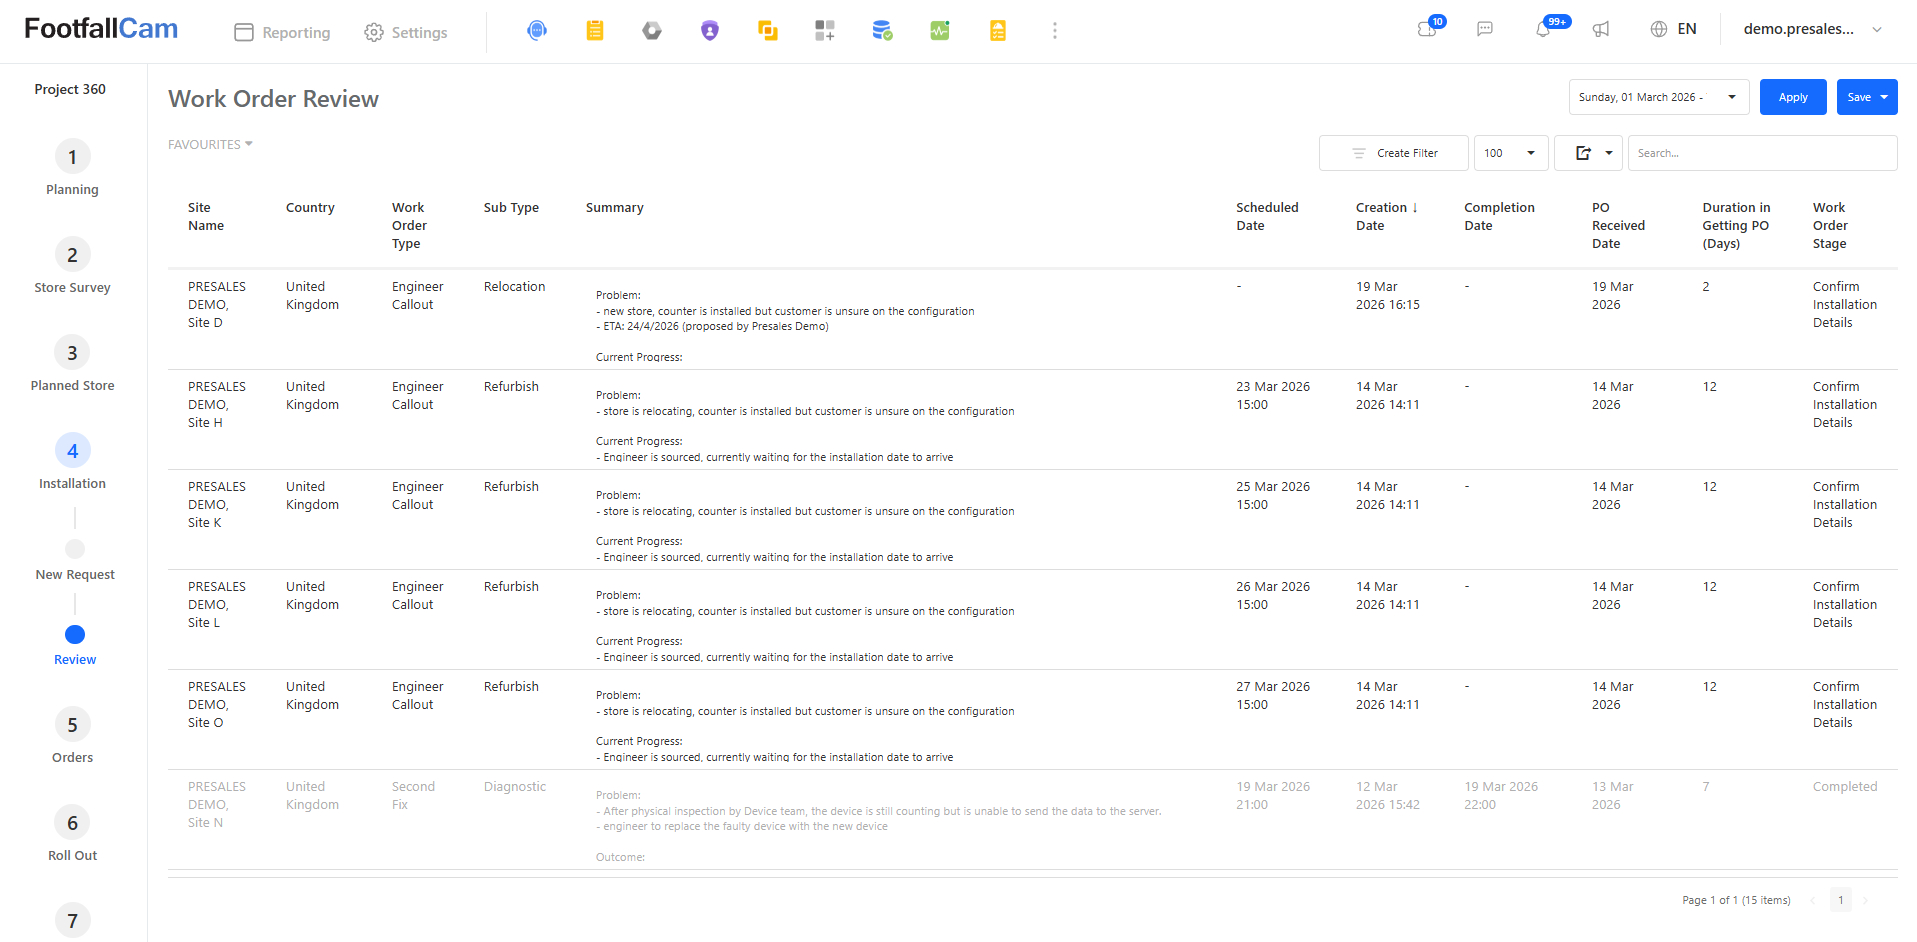
This page shows a list of work orders created. The user is able to view the current status of each work order from the list.
Quotation Request
In this section, the user can request a quotation for a specific device or product.
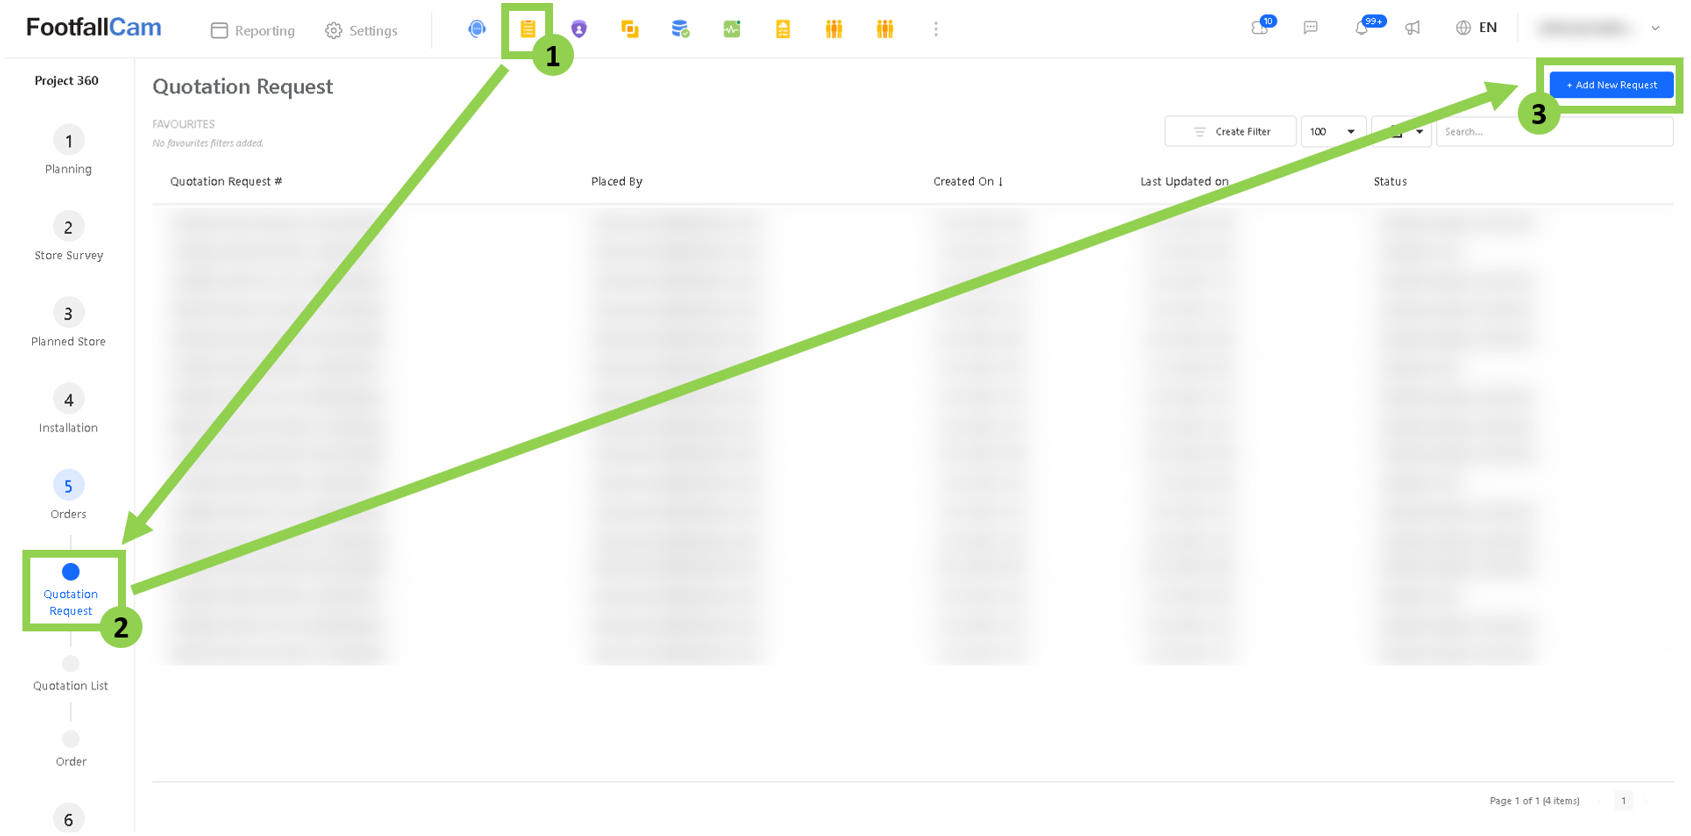
Step 1 - Go to Project 360 > Orders > Quotation Request > Click on "+ Add New Request"
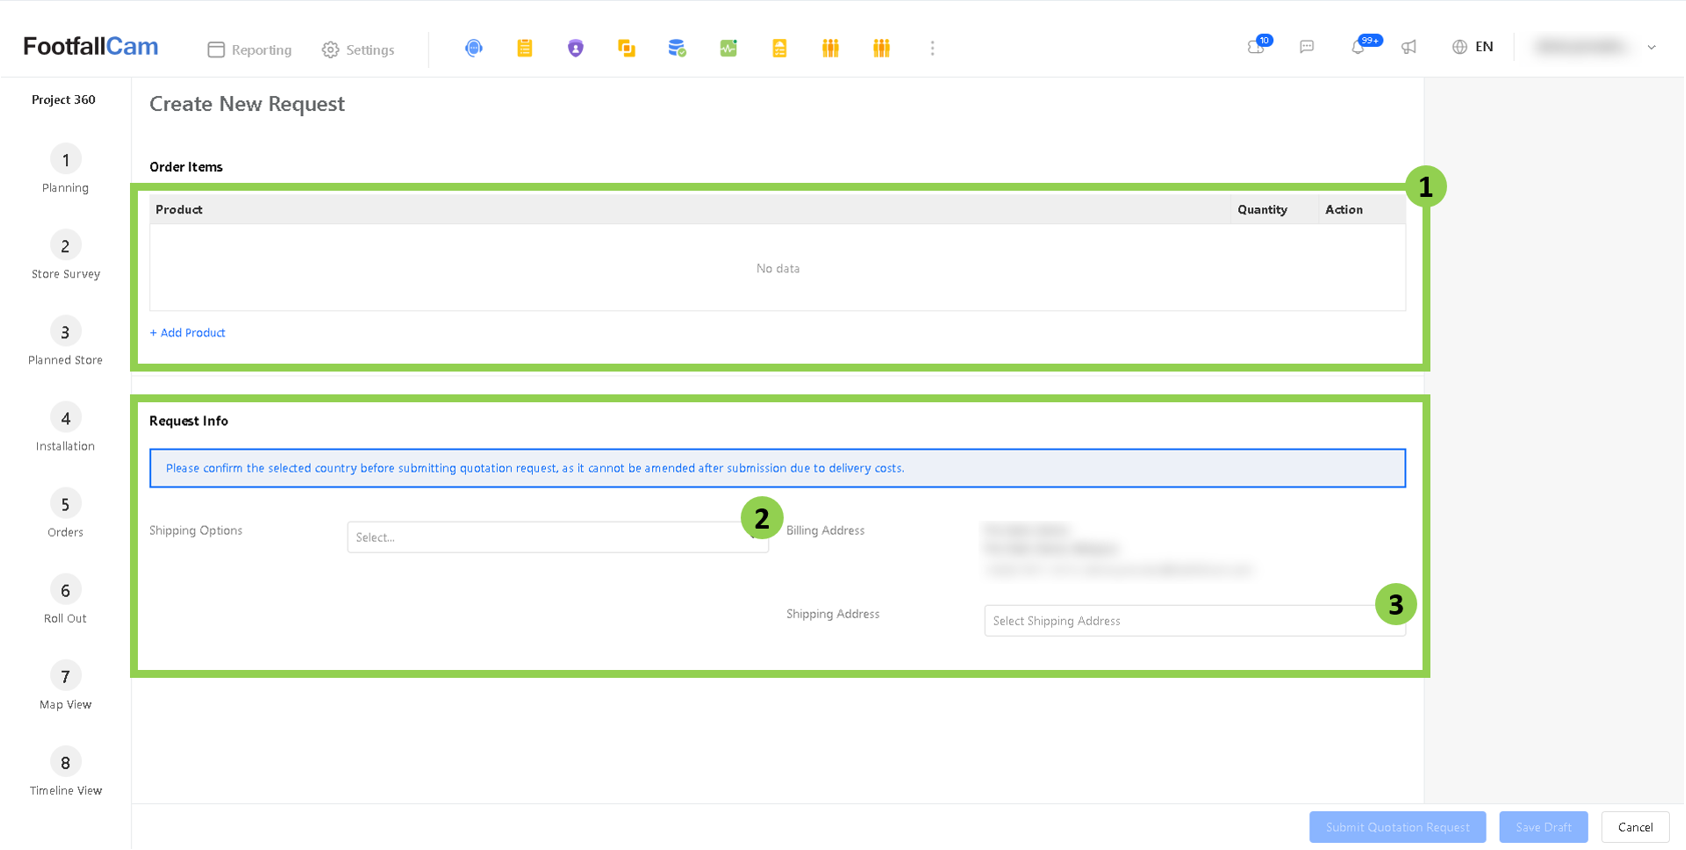
Step 2 - Select the expected devices/products and their quantity, shipping option, and the shipping address
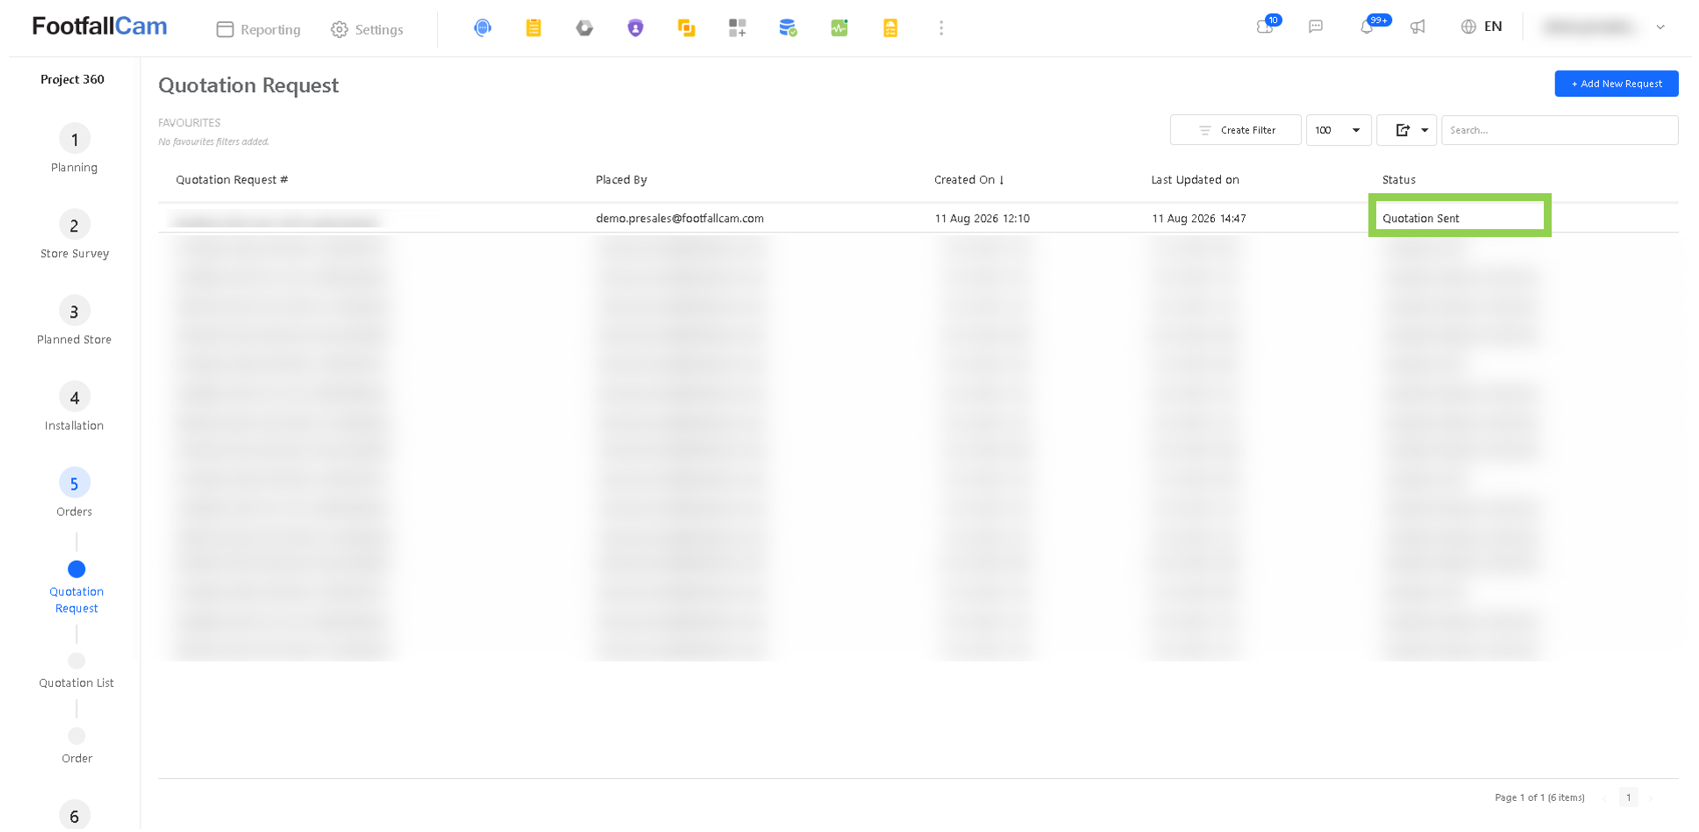
Note: After the request has been submitted and reviewed by FootfallCam Sales, the status will be updated to "Quotation Sent," and the quotation details can be viewed in the Quotation List
Create Quotation Request Draft
Before submitting the request, users can save the current quotation request as a draft if the information hasn't been confirmed yet (eg. product list, shipping option, or the shipping address).
Please follow steps 1 to 3 to create a request and fill in the information. Although the information hasn't been confirmed, all the fields cannot be null, and then click on the "Save Draft" button.
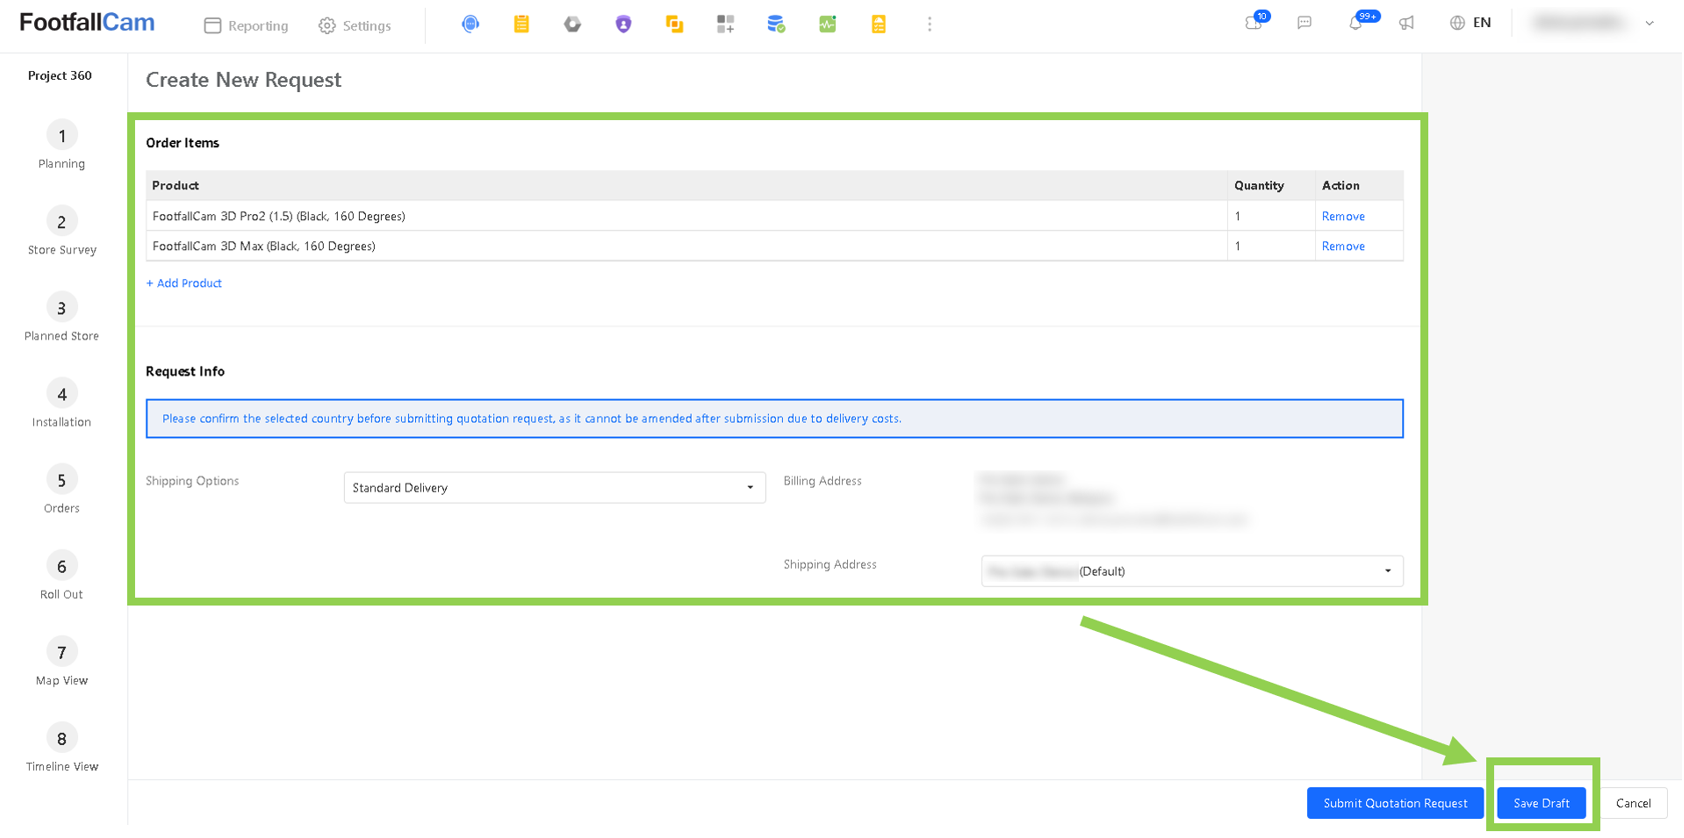
Note: When the quotation request is in draft status, it will NOT be received or processed by FootfallCam Sales.
Update Quotation Request Draft
After creating and before the quotation request has been submitted, the user is allowed to make any edits in the quotation request and to save it until they click on the submit button.
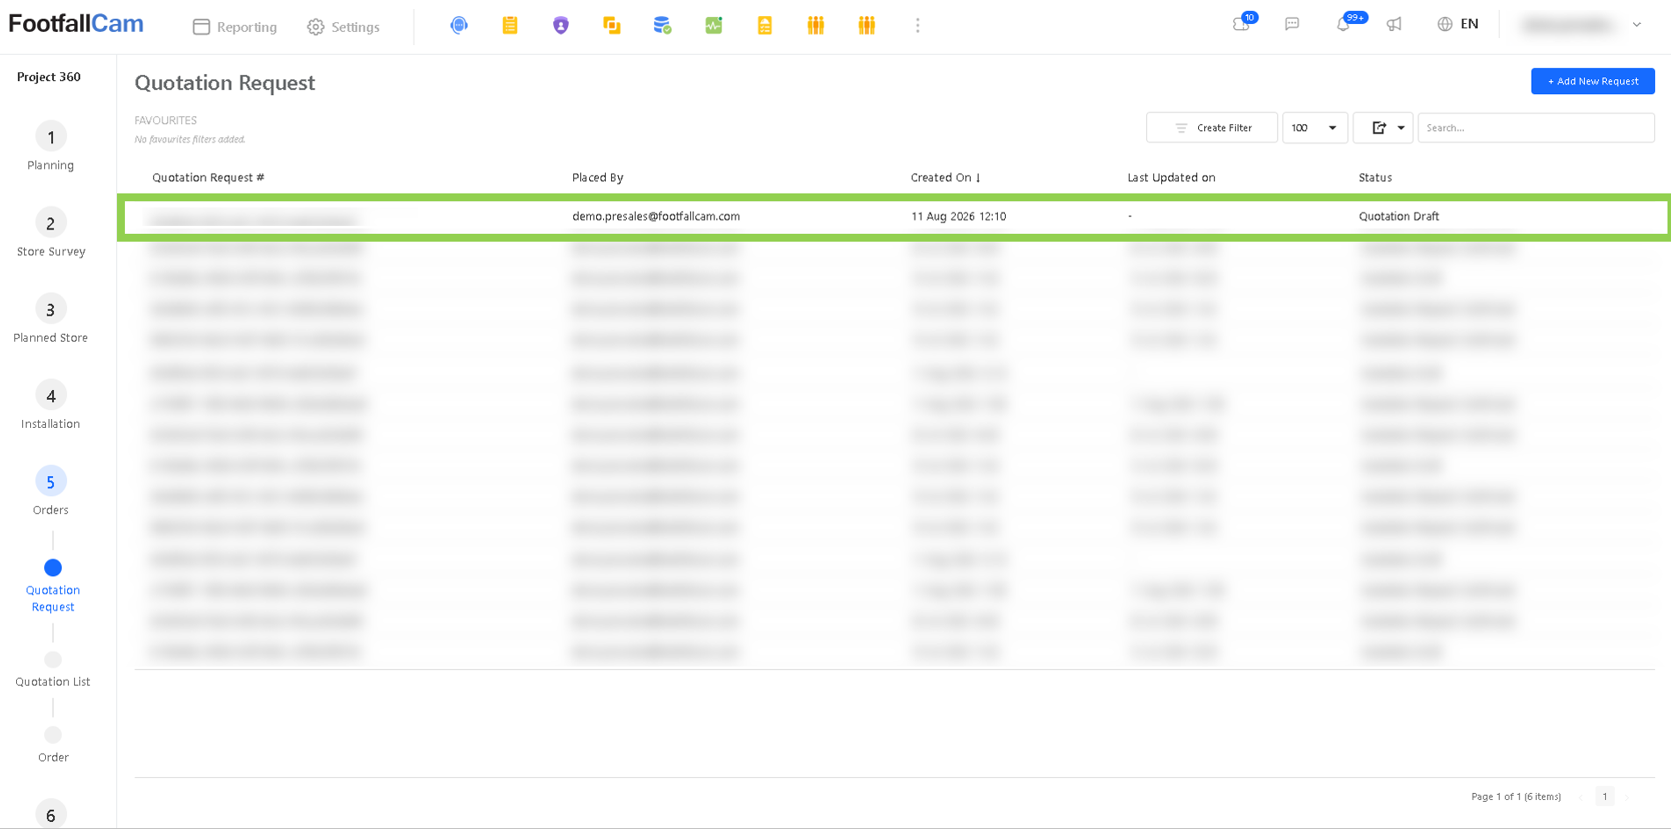
Step 1 - Click on the row where the status is under "Quotation Draft"
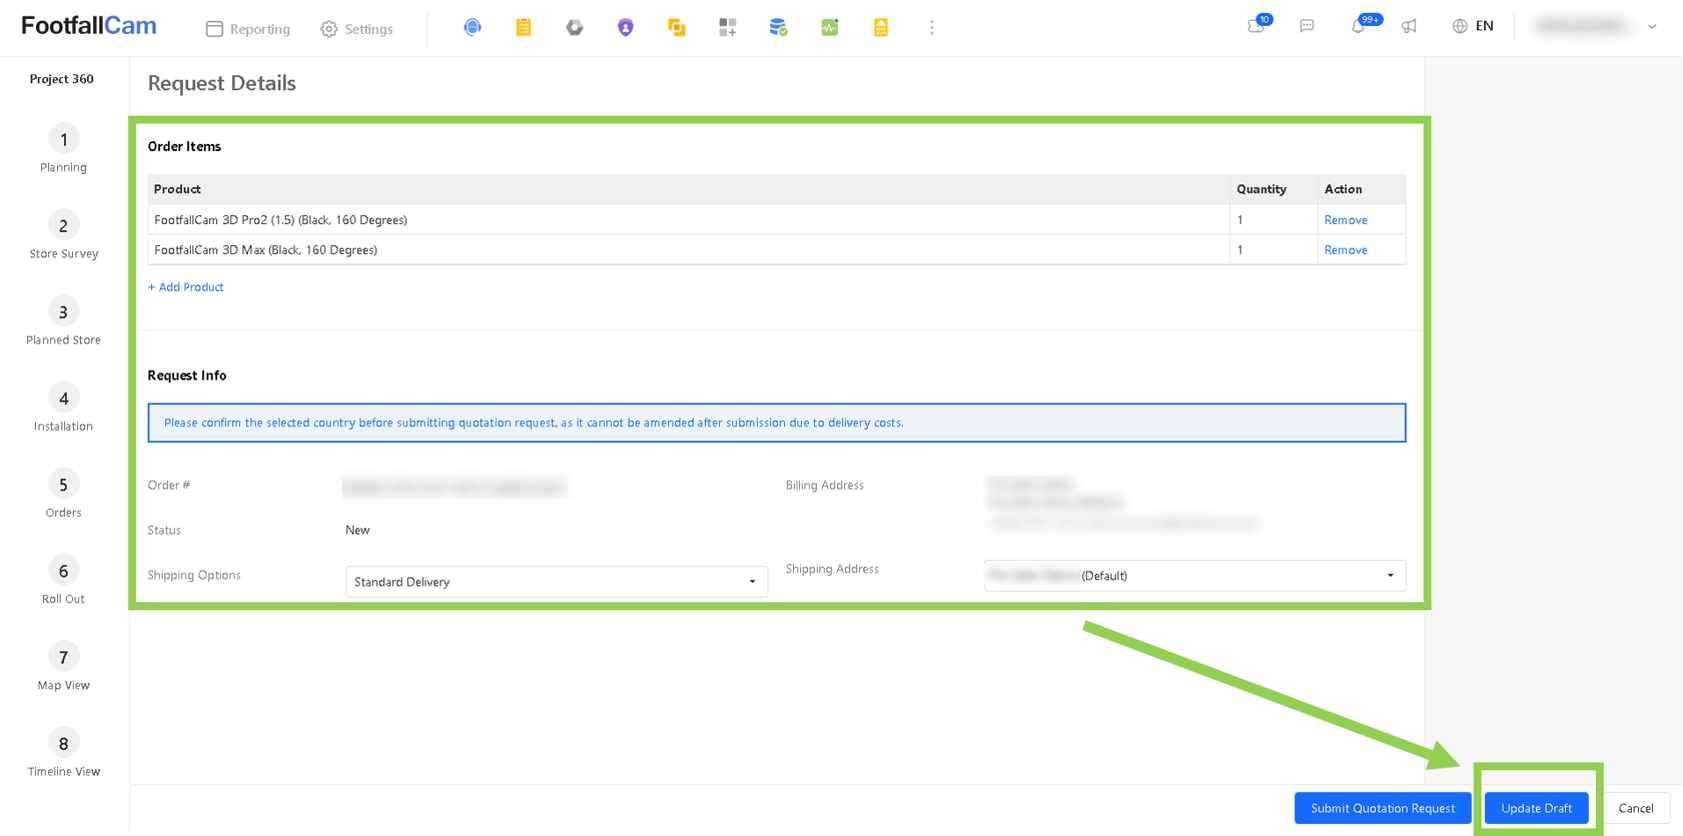
Step 2 - Edit the columns and click on "Update Draft" to save the changes.
Confirm and Submit Quotation Request
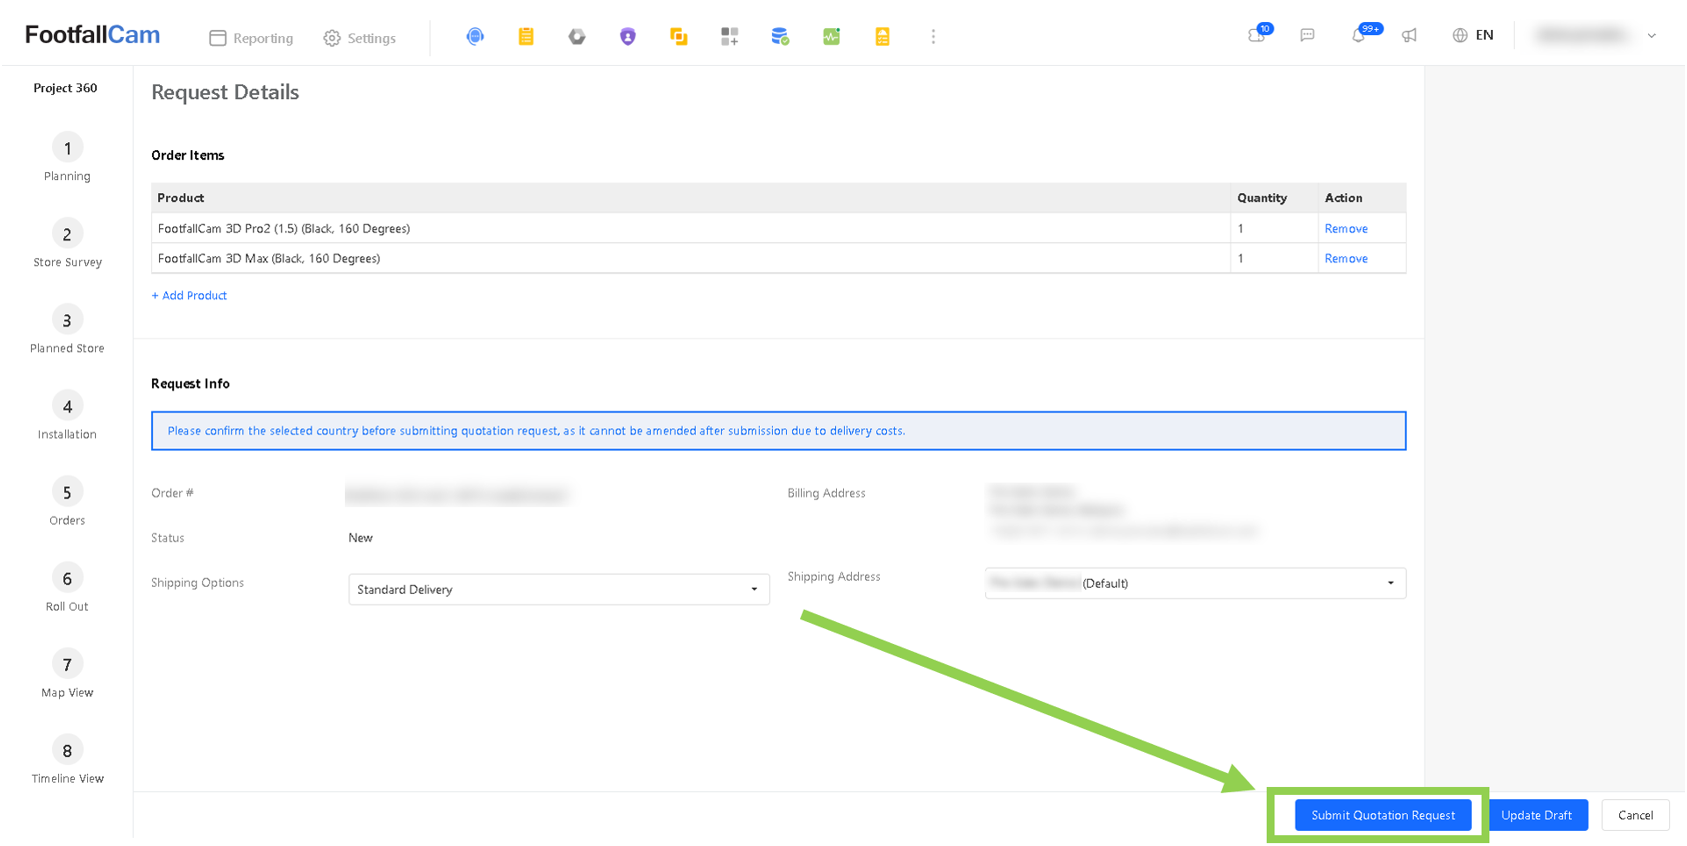
After confirming all the information (Product List, Shipping Option, and Shipping Address), the users need to click on the "Submit Quotation Request" to submit the request.
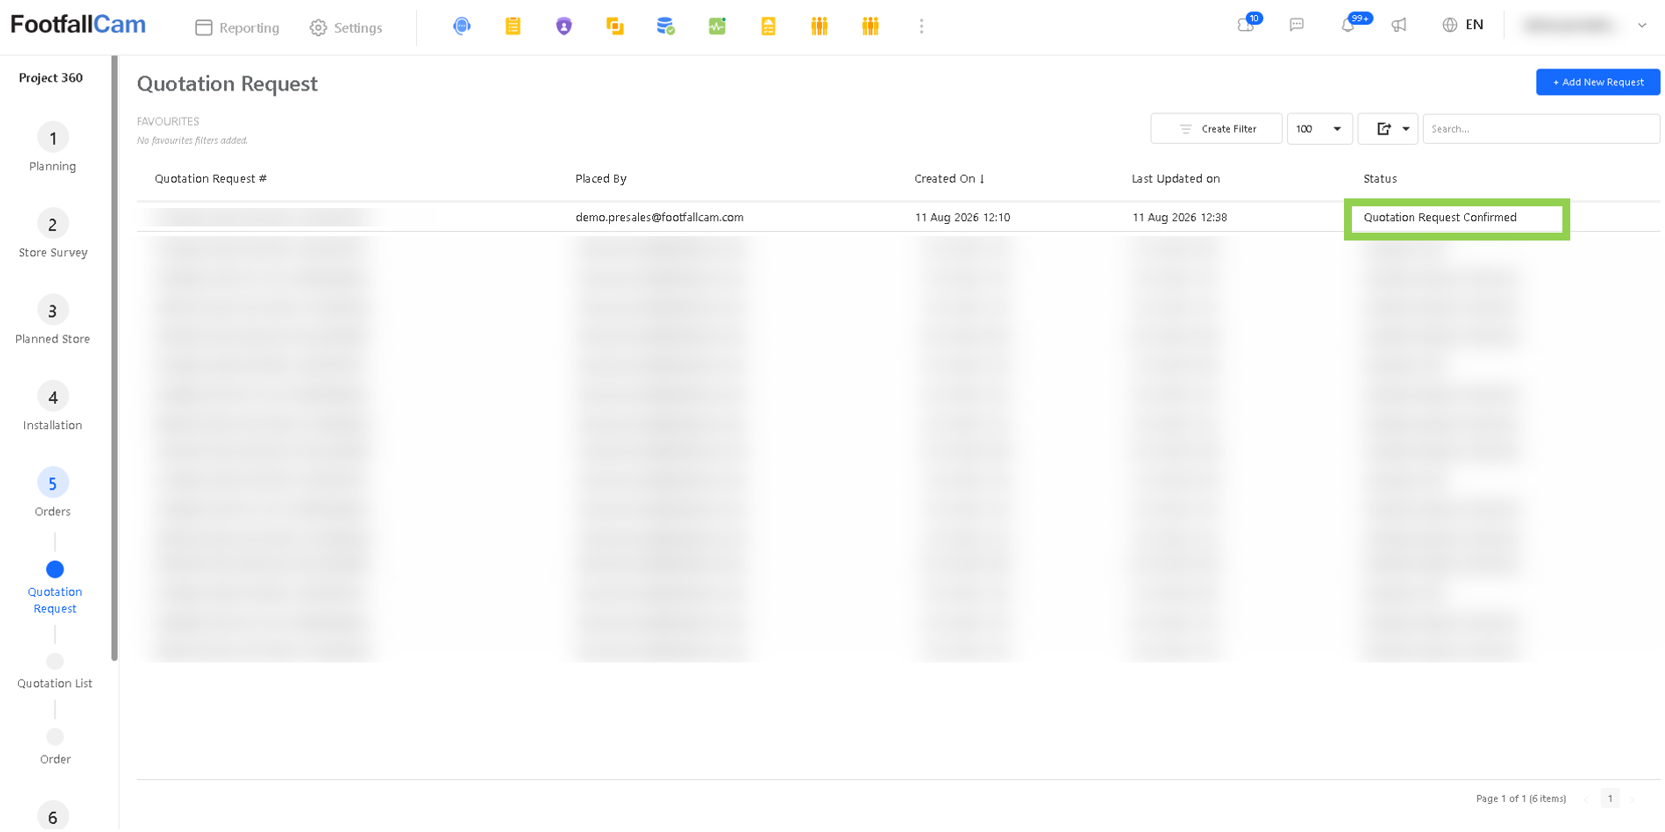
Note: FootfallCam Sales will receive the request only after it has been submitted, and the status is "Quotation Request Confirmed"
Quotation List
In this section, the users can view the related pricing of the expected product list in the quotation request.
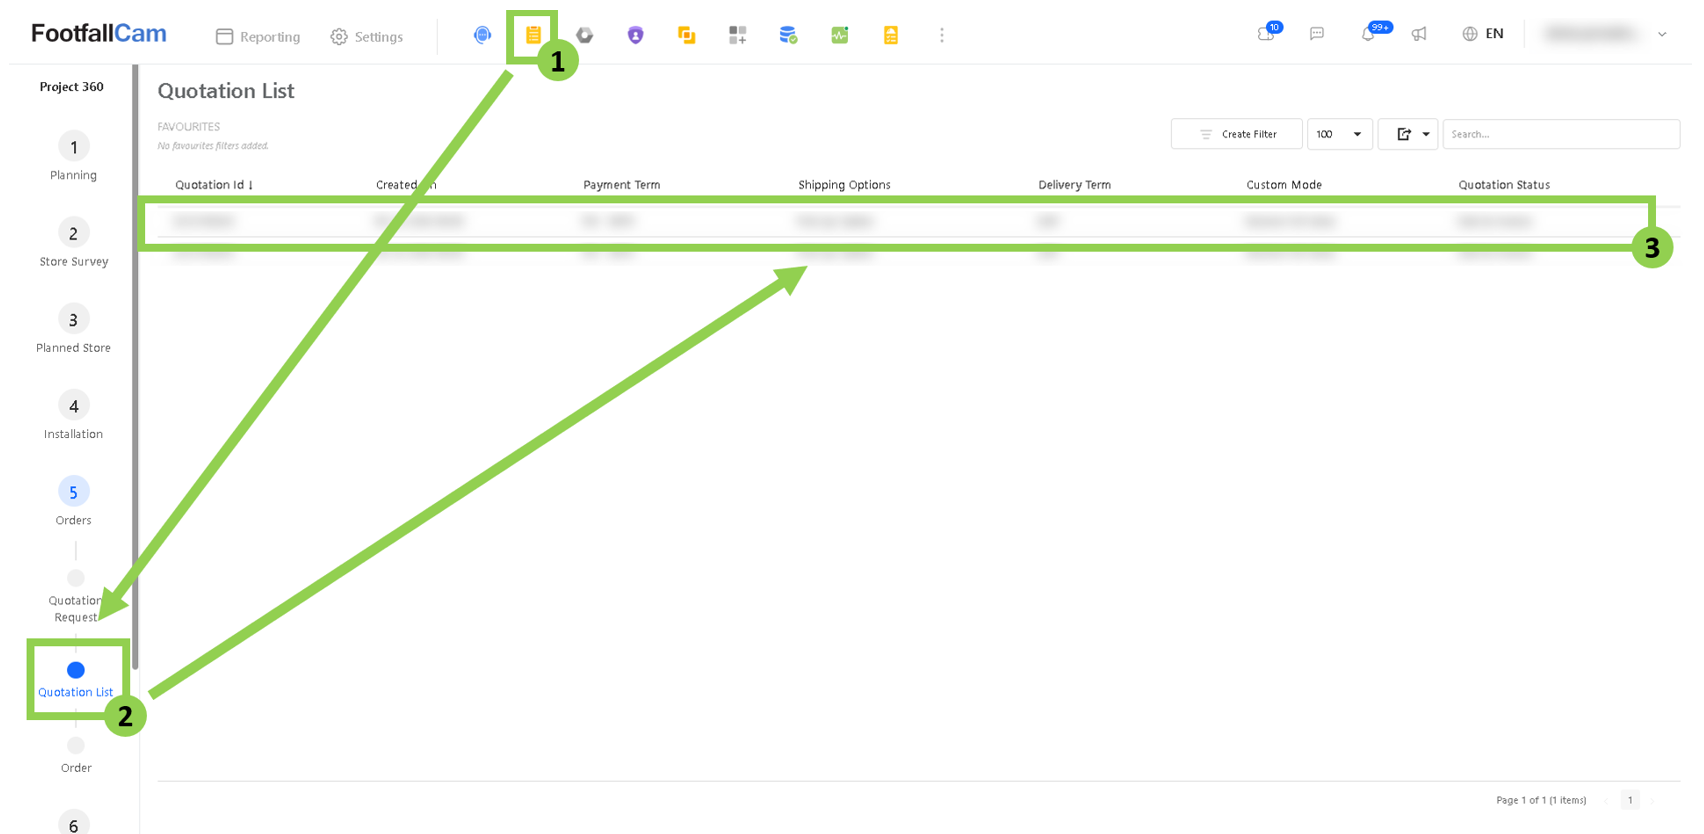
Step 1 - Go to Project 360 > Orders > Quotation List > Click on the row to open the form view to view the detailed information
Confirm and Update Payment Receipt
After receiving the quotation, the required information must be confirmed in order to proceed with the purchase.
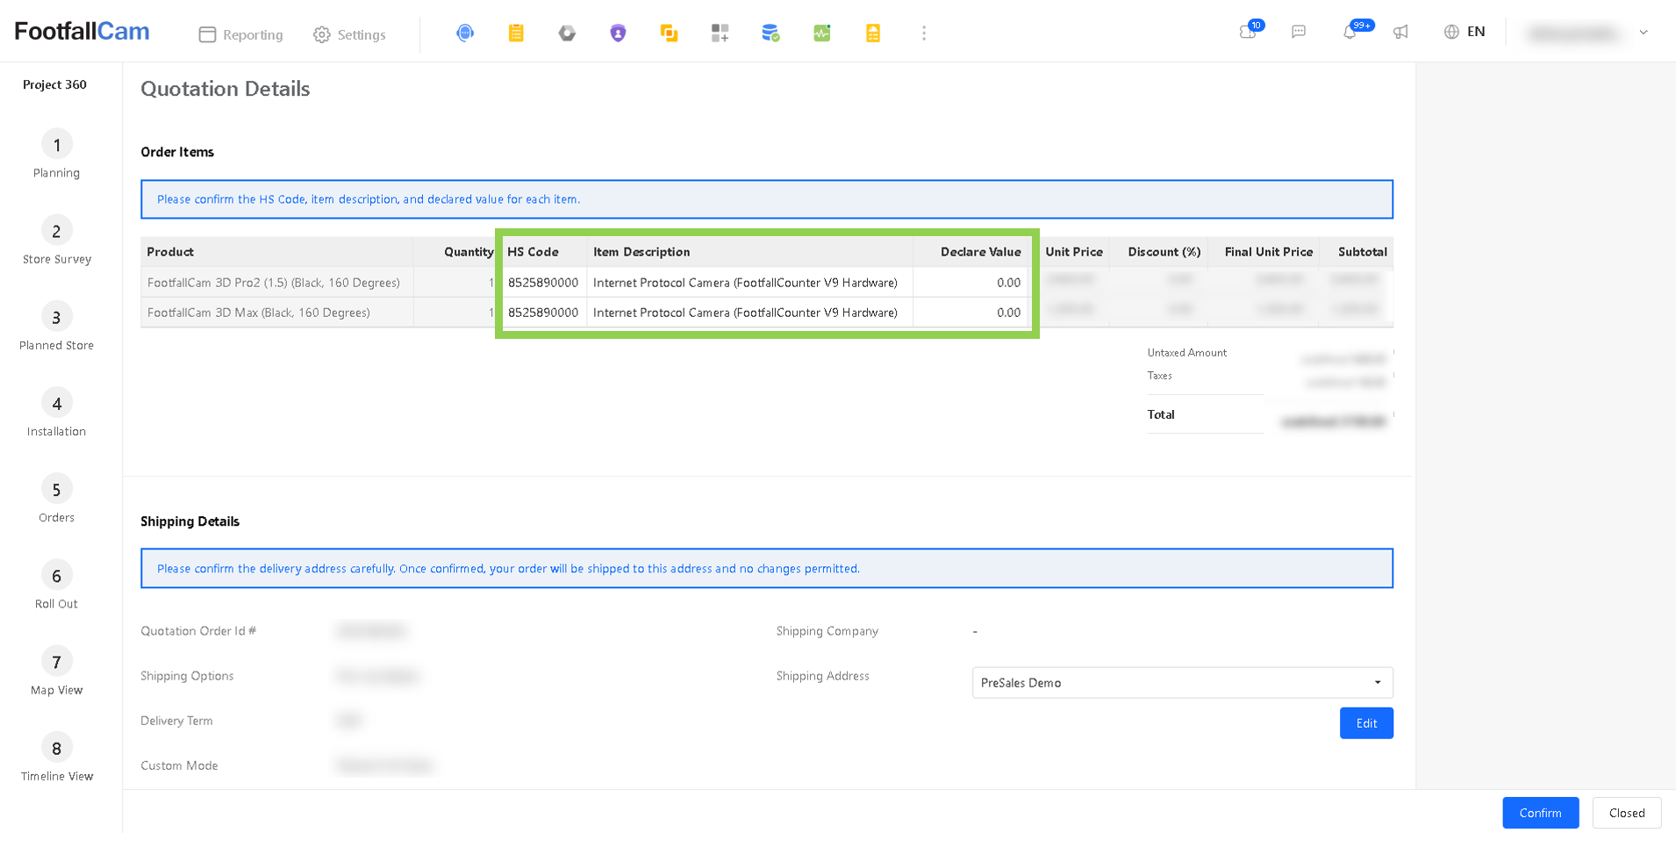
Step 1 - Confirm the HS Code, Item Description, and the Declare Value for each of the products.
Step 2 - Confirm the Shipping Address. If you need to modify the current shipping address, click the "Edit" button to open the pop-up and make the necessary changes.
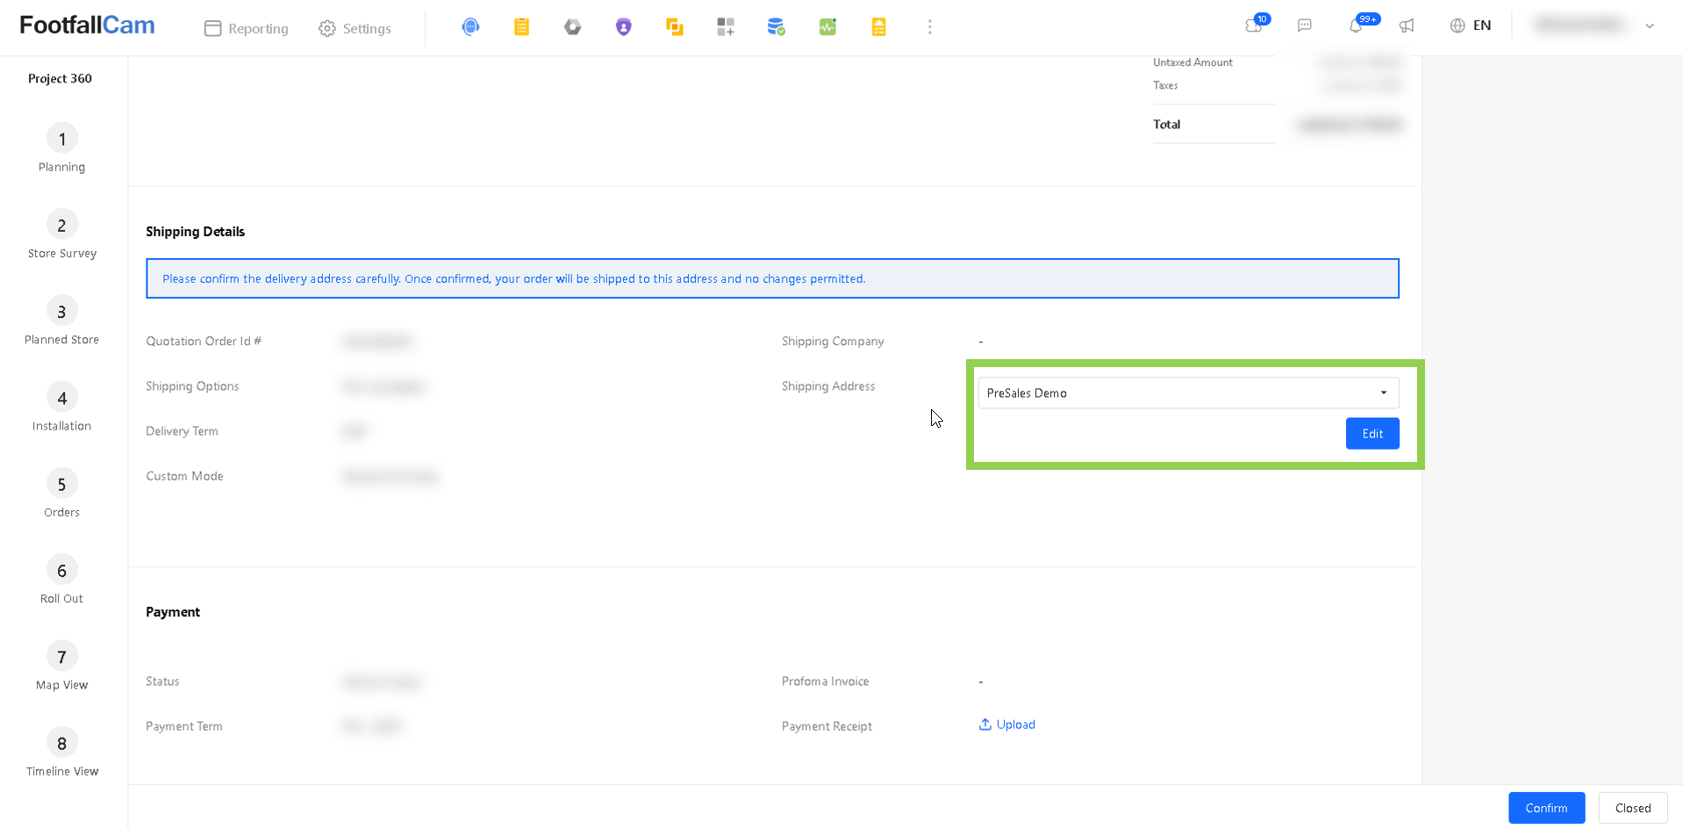
Note: The updated shipping address MUST have the SAME country as the current address. If you need to select a DIFFERENT country, please create a NEW quotation request.
Step 3 - Upload Payment Receipt. Once the payment is completed, please upload the receipt (screenshot or file).
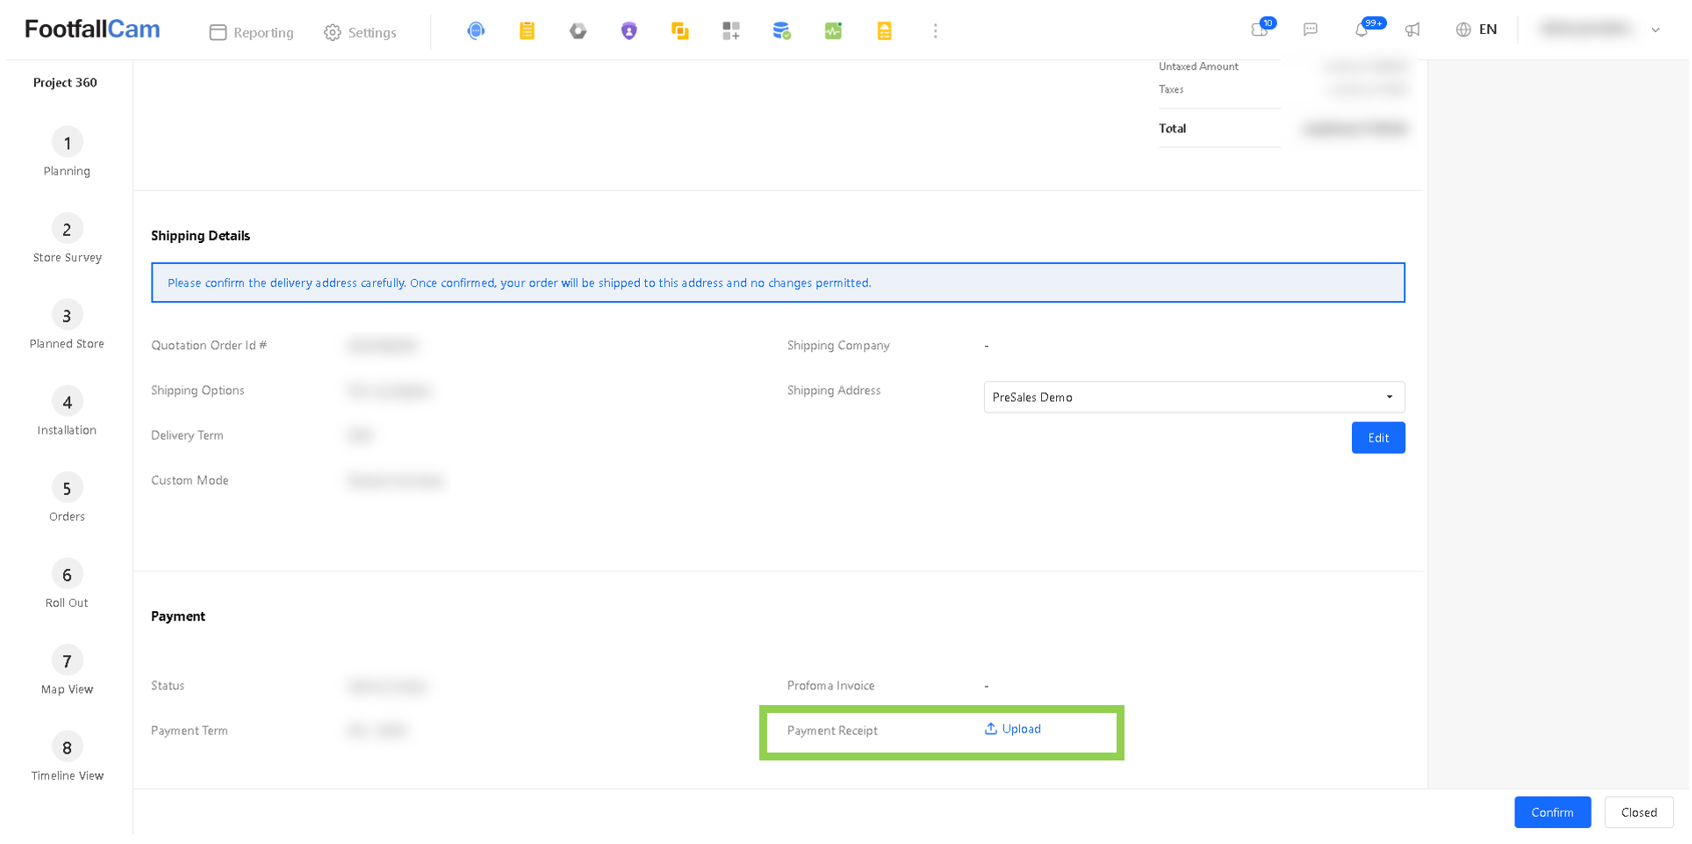
Step 4 - Please click the "Confirm" button to update the quotation details. Once confirmed, no further changes can be made.
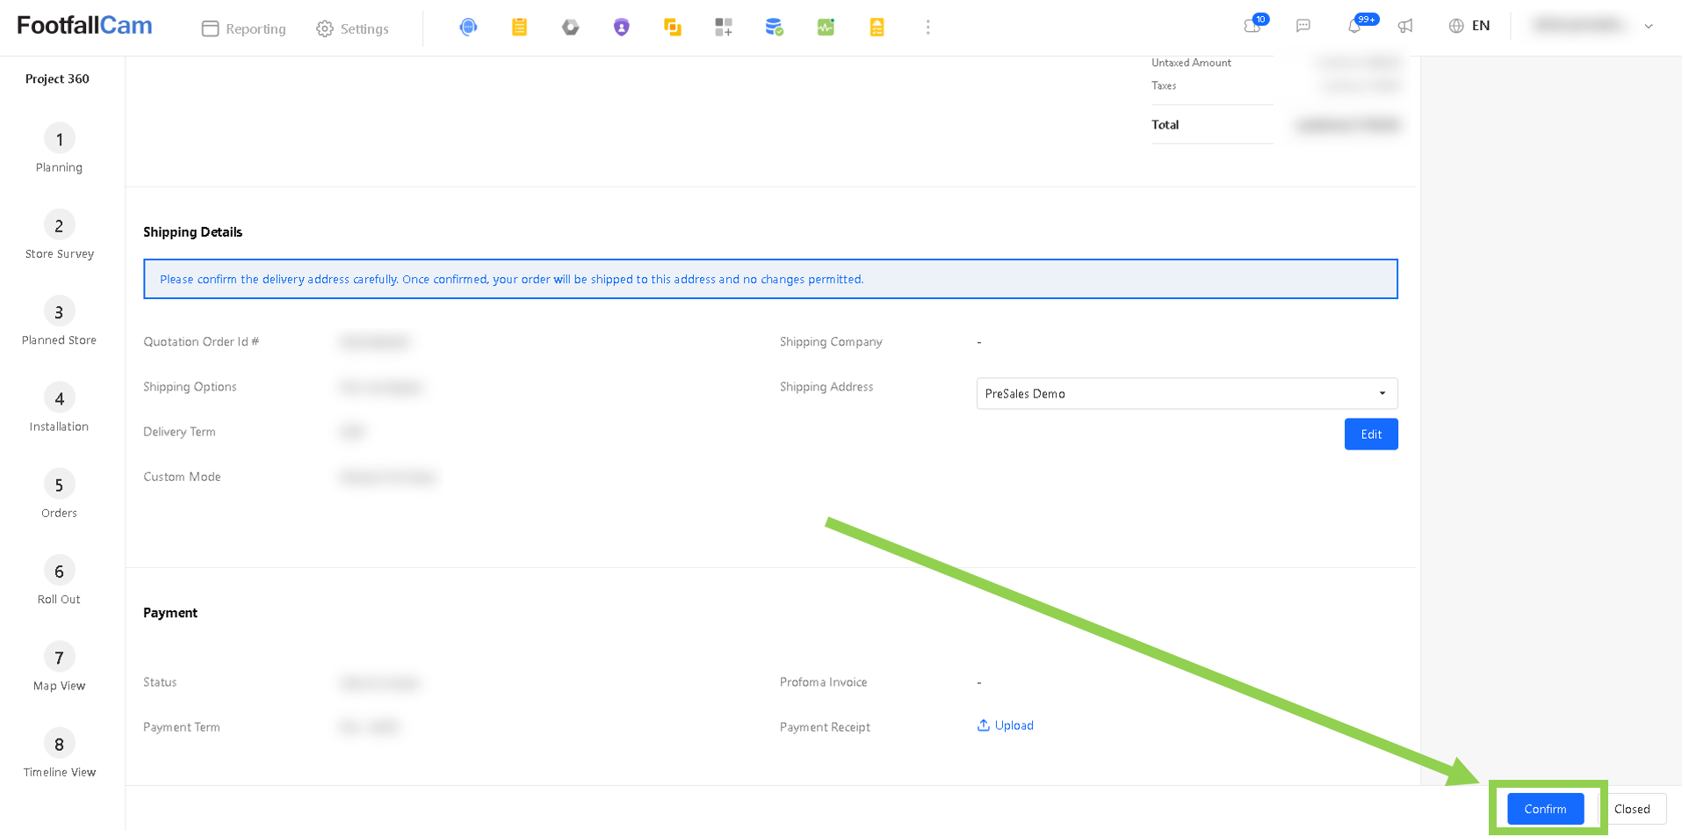
Note: Once FootfallCam Sales has reviewed the payment slip and processed the update, the status will change to "Payment Received."
Orders
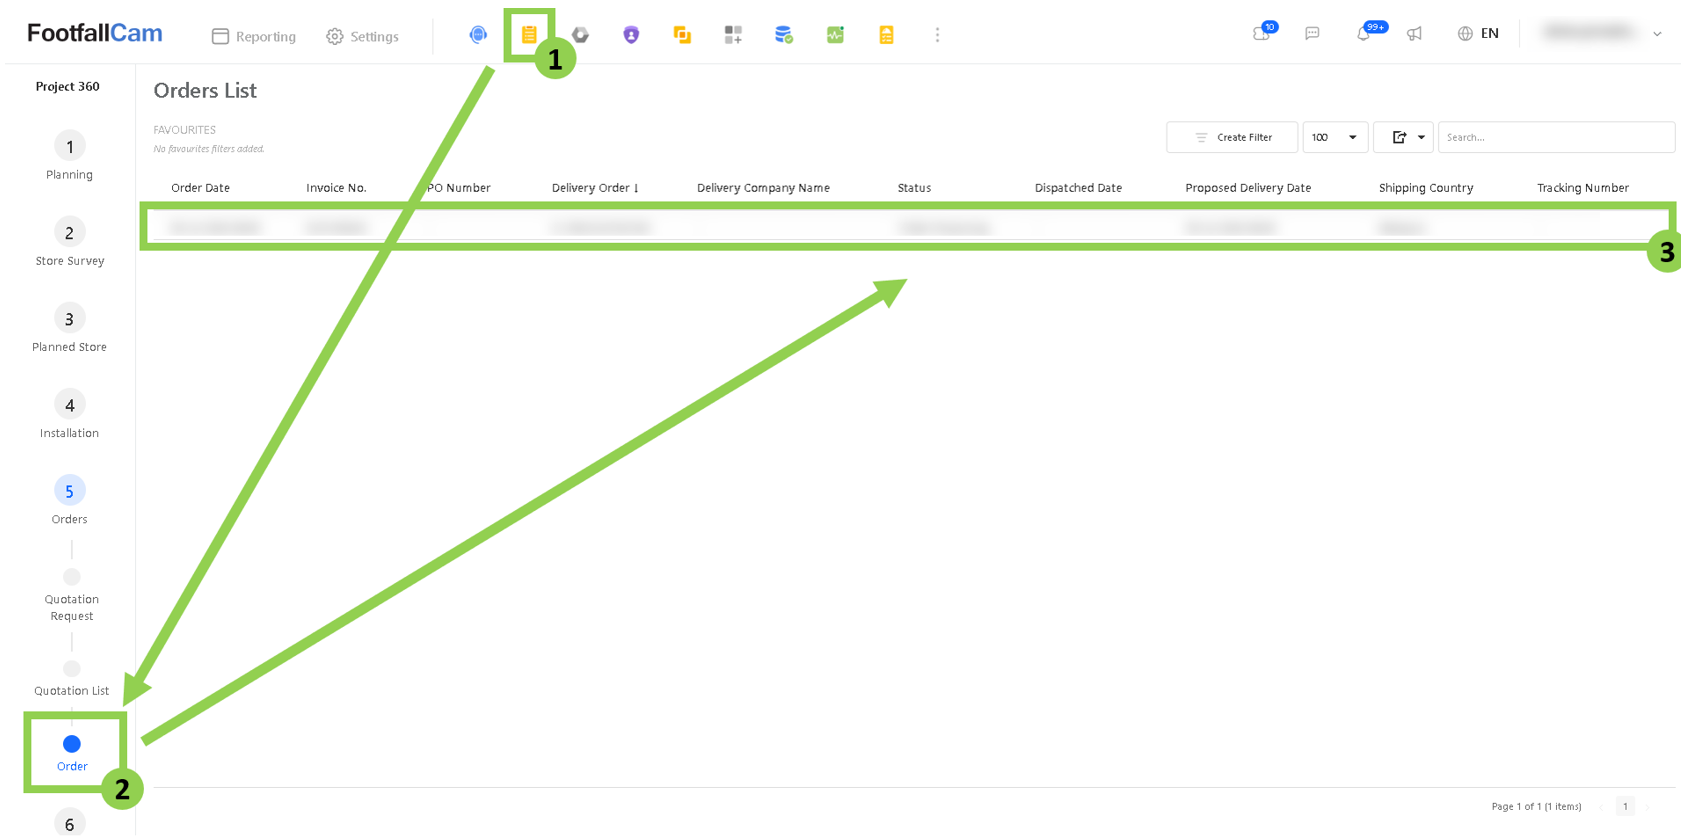
This section allows users to view and track their orders. Go to Project 360 > Orders > Orders and click on the row to open the form view.
Roll Out Overview
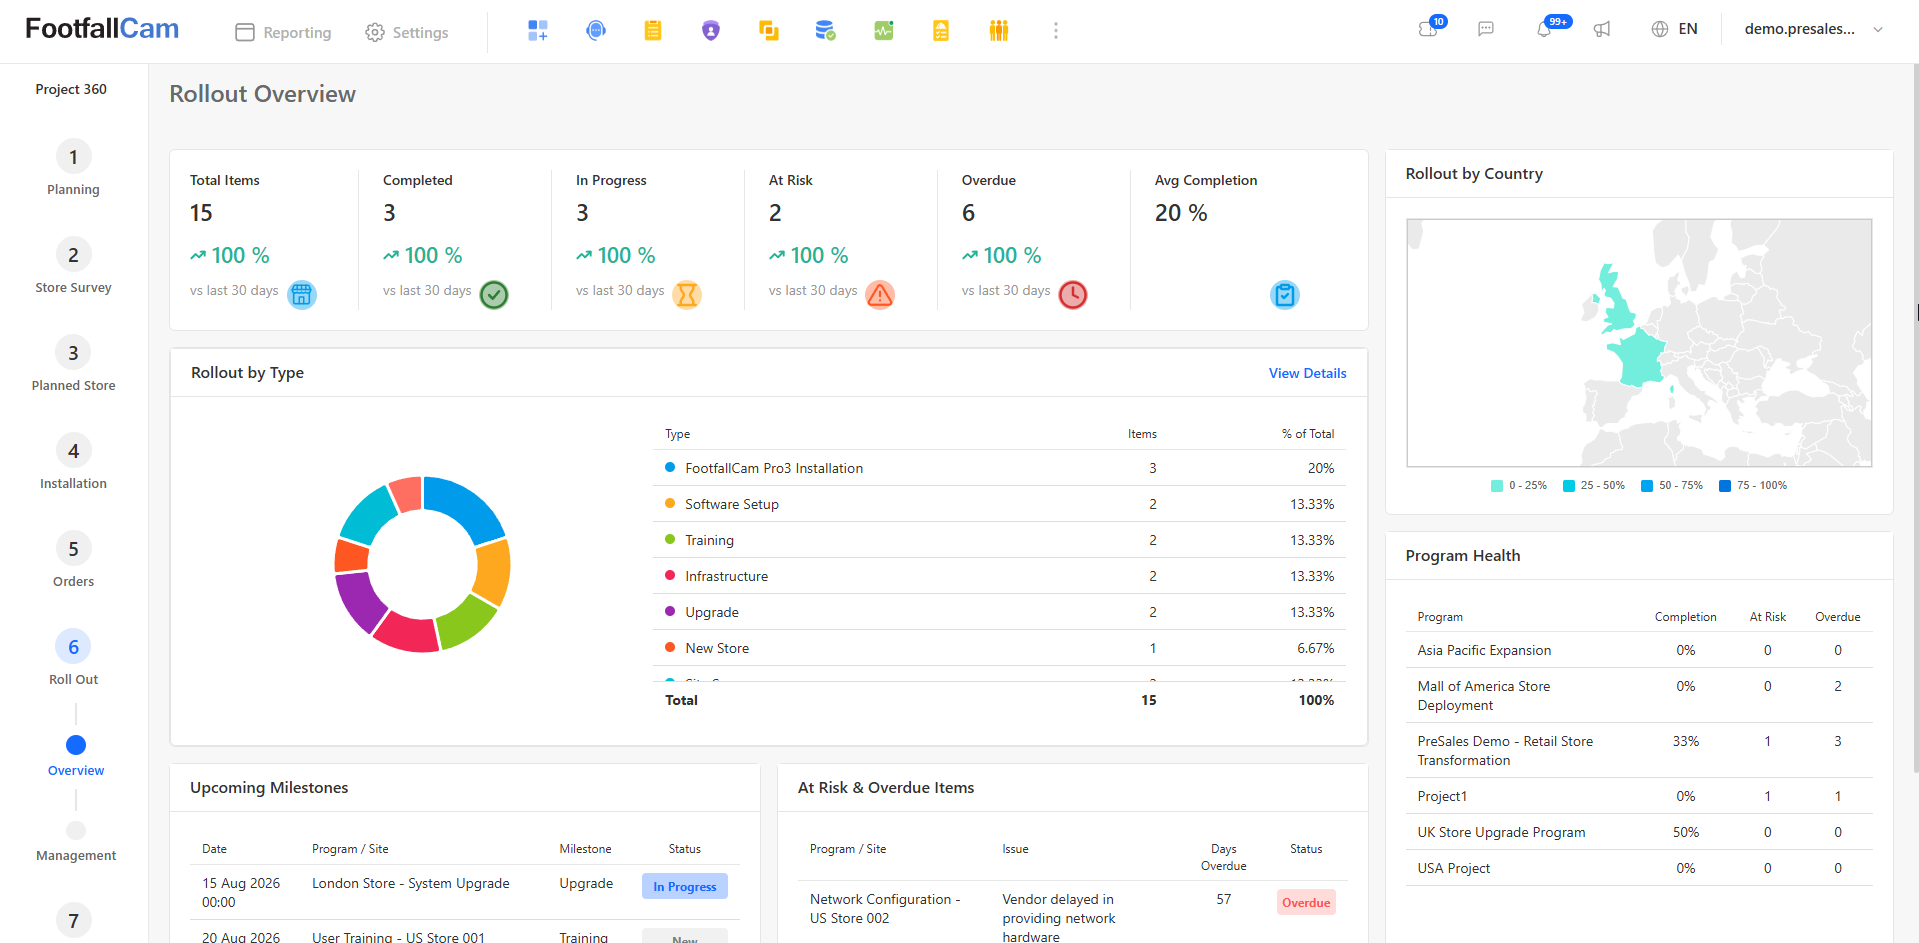
This page details the number of project items, the number of items under each status, type of project items, upcoming milestones, project items that require immediate attention as well as the program health.
Roll Out Management
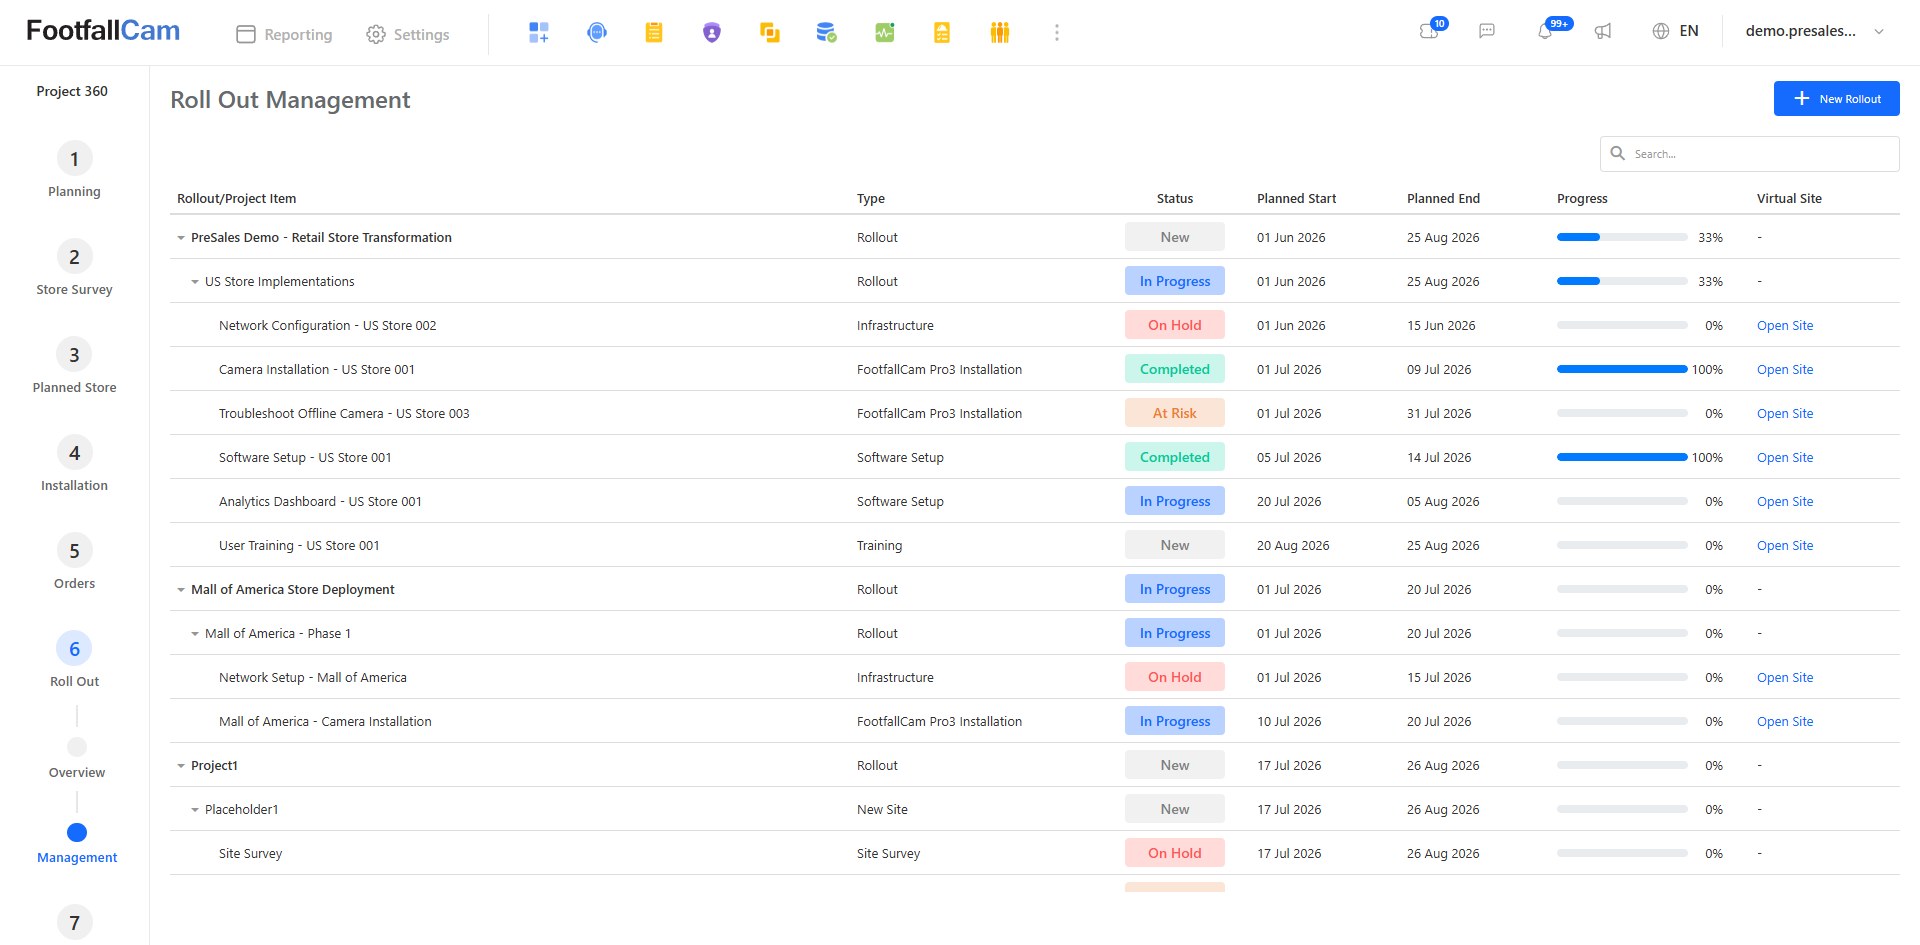
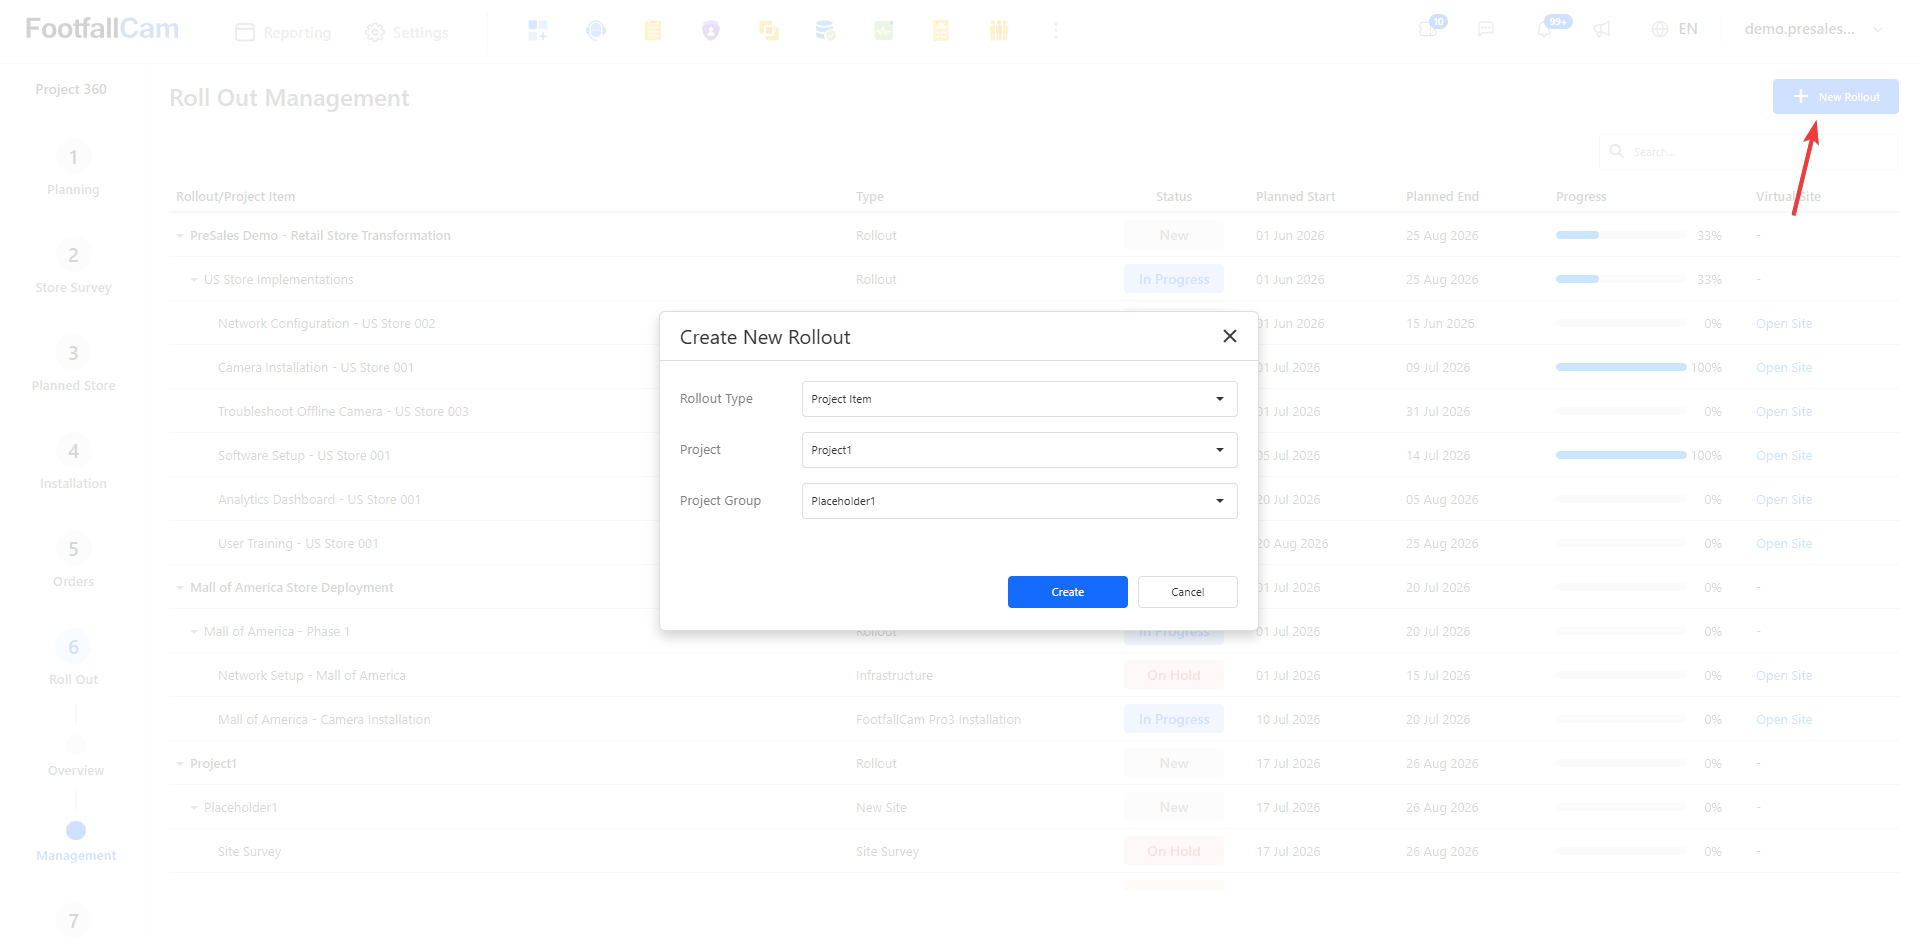
This page shows the list of Projects, Project Groups and Rollout/Project Items. Users are able to view the details of each item, such as status and progress, and they are able to create, edit or remove items.
Create Rollout
To create a new roll out, select New Rollout at the top right to open the pop-up. Select the Rollout Type before selecting Create to enter the form view.
Project: Select the Rollout Type as Project then select Create.
Project Group: Select the Rollout Type as Project Group, select the Project which the group will be under. Select Create once done.
Project Item: Select the rollout Type as Project Item, select the Project the Item will be under as well as the Project Group. Select Create once done.
The page will redirect to the Form View, which will be different based on the type of rollout chosen for creation.
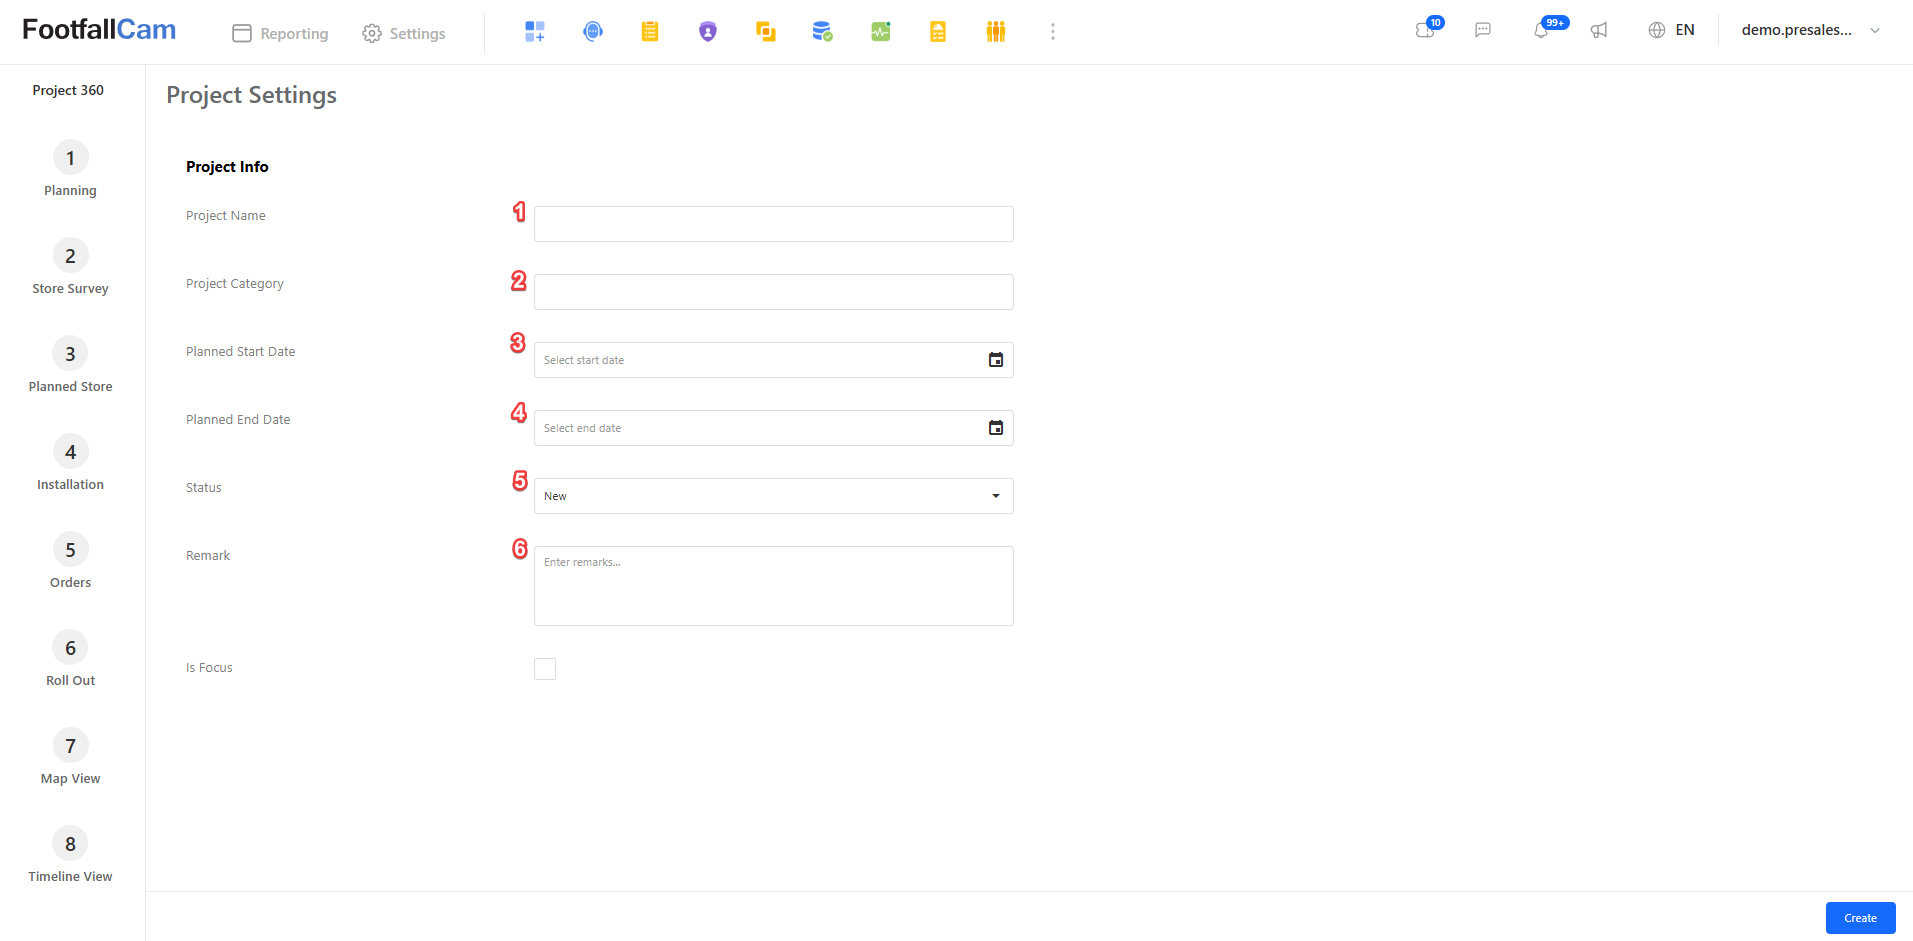
| Item | Details |
| Project Name | Name of the project |
| Project Category | Category of the project |
| Planned Start Date | Start date for project |
| Planned End Date | End date for project |
| Status | Current status of the project |
| Remark | Additional comment for the project |
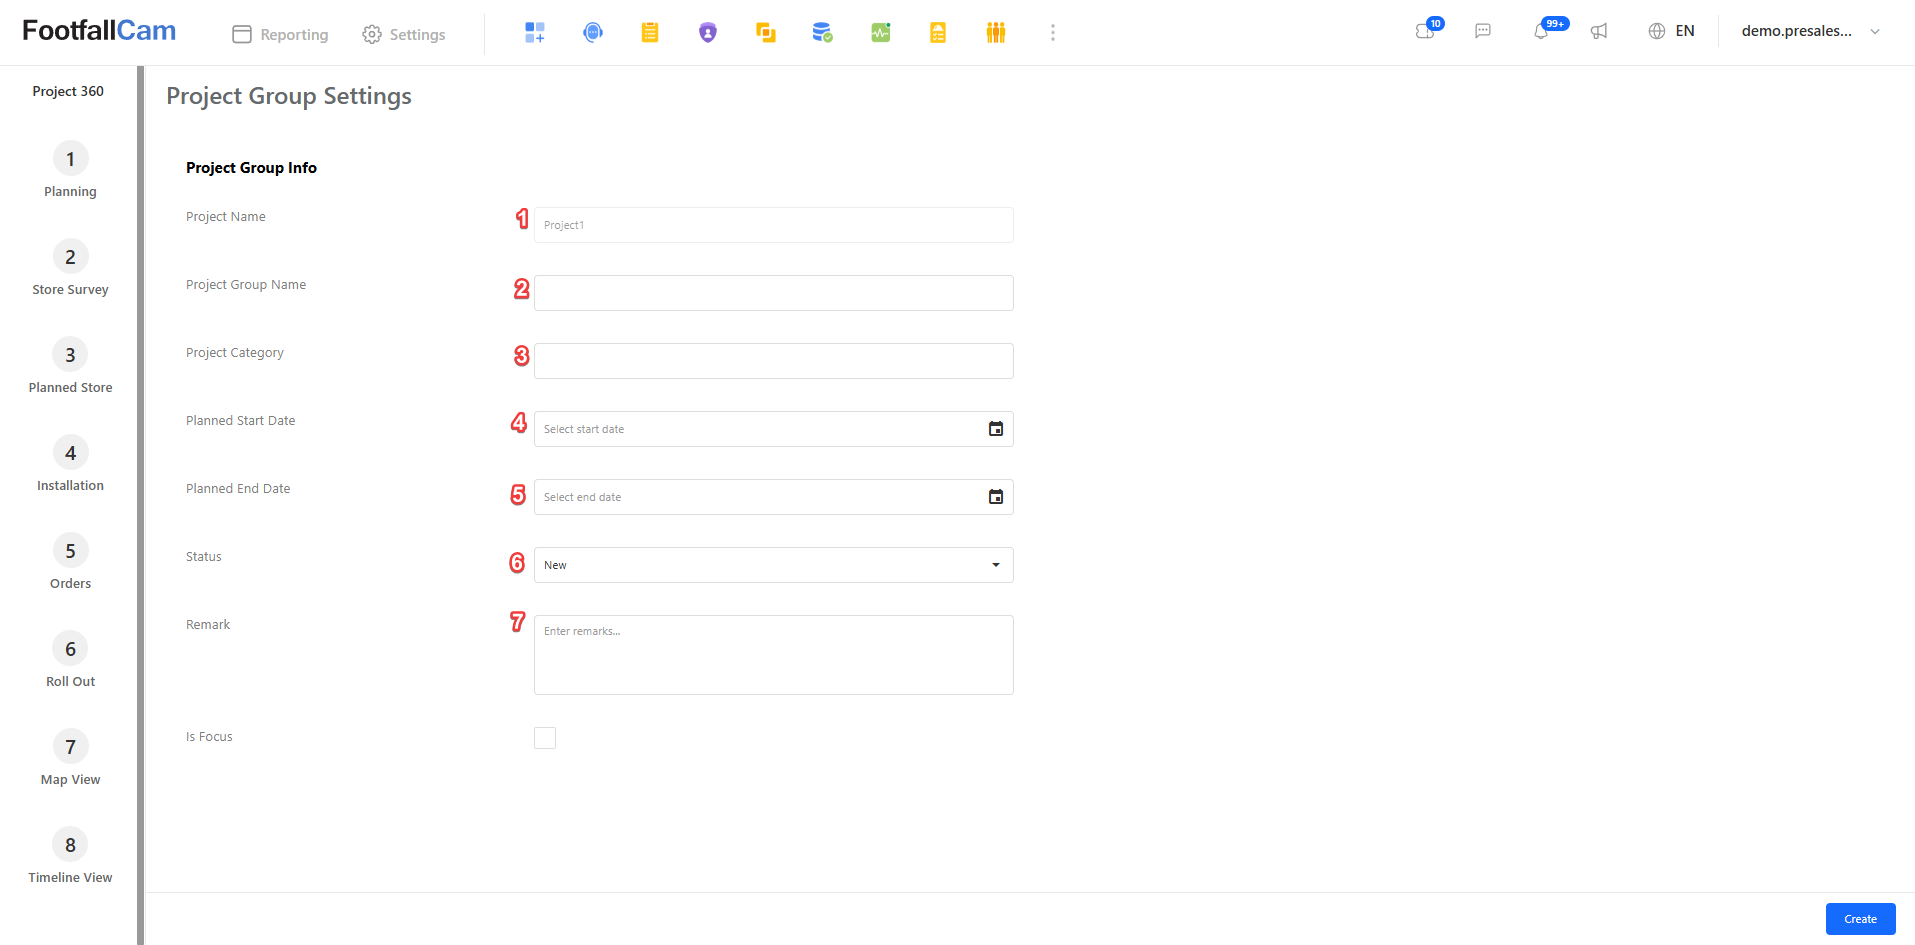
| Item | Details |
| Project Name | Name of the project the group is under |
| Project Group Name | Name of the project group |
| Project Category | Category of the project group |
| Planned Start Date | Start date for project group |
| Planned End Date | End date for project group |
| Status | Status of the project group |
| Remark | Additional comment for the project group |
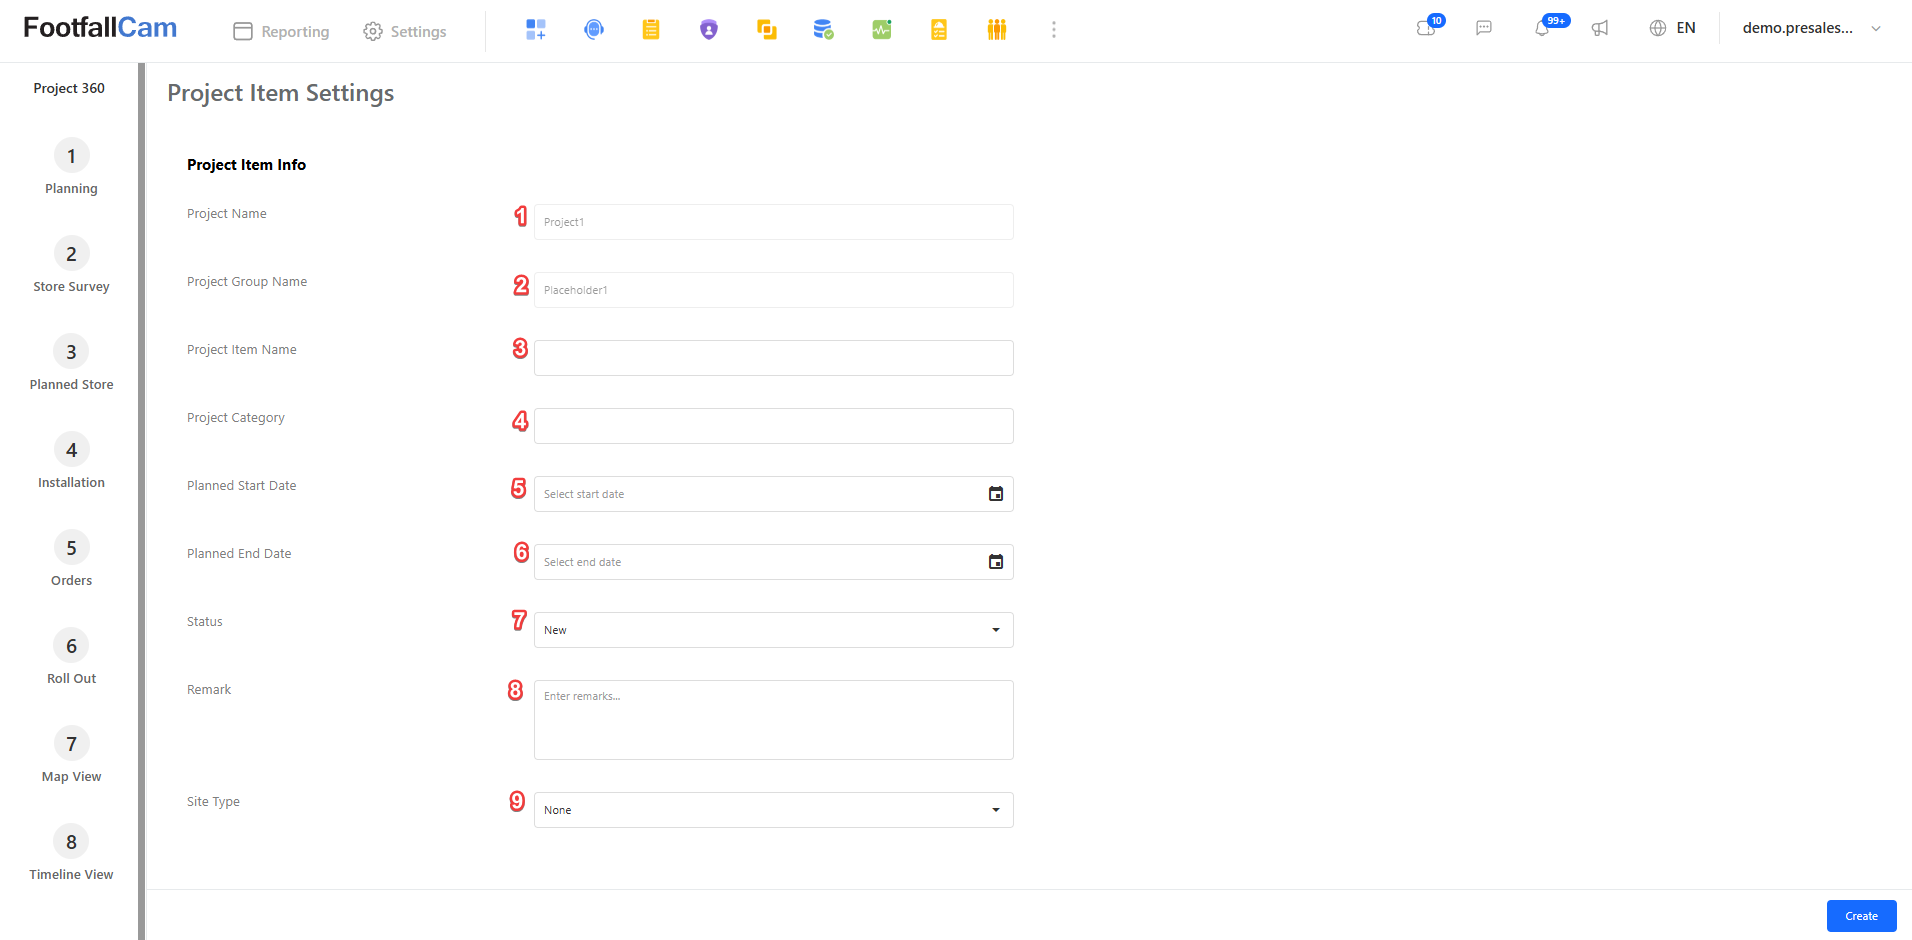
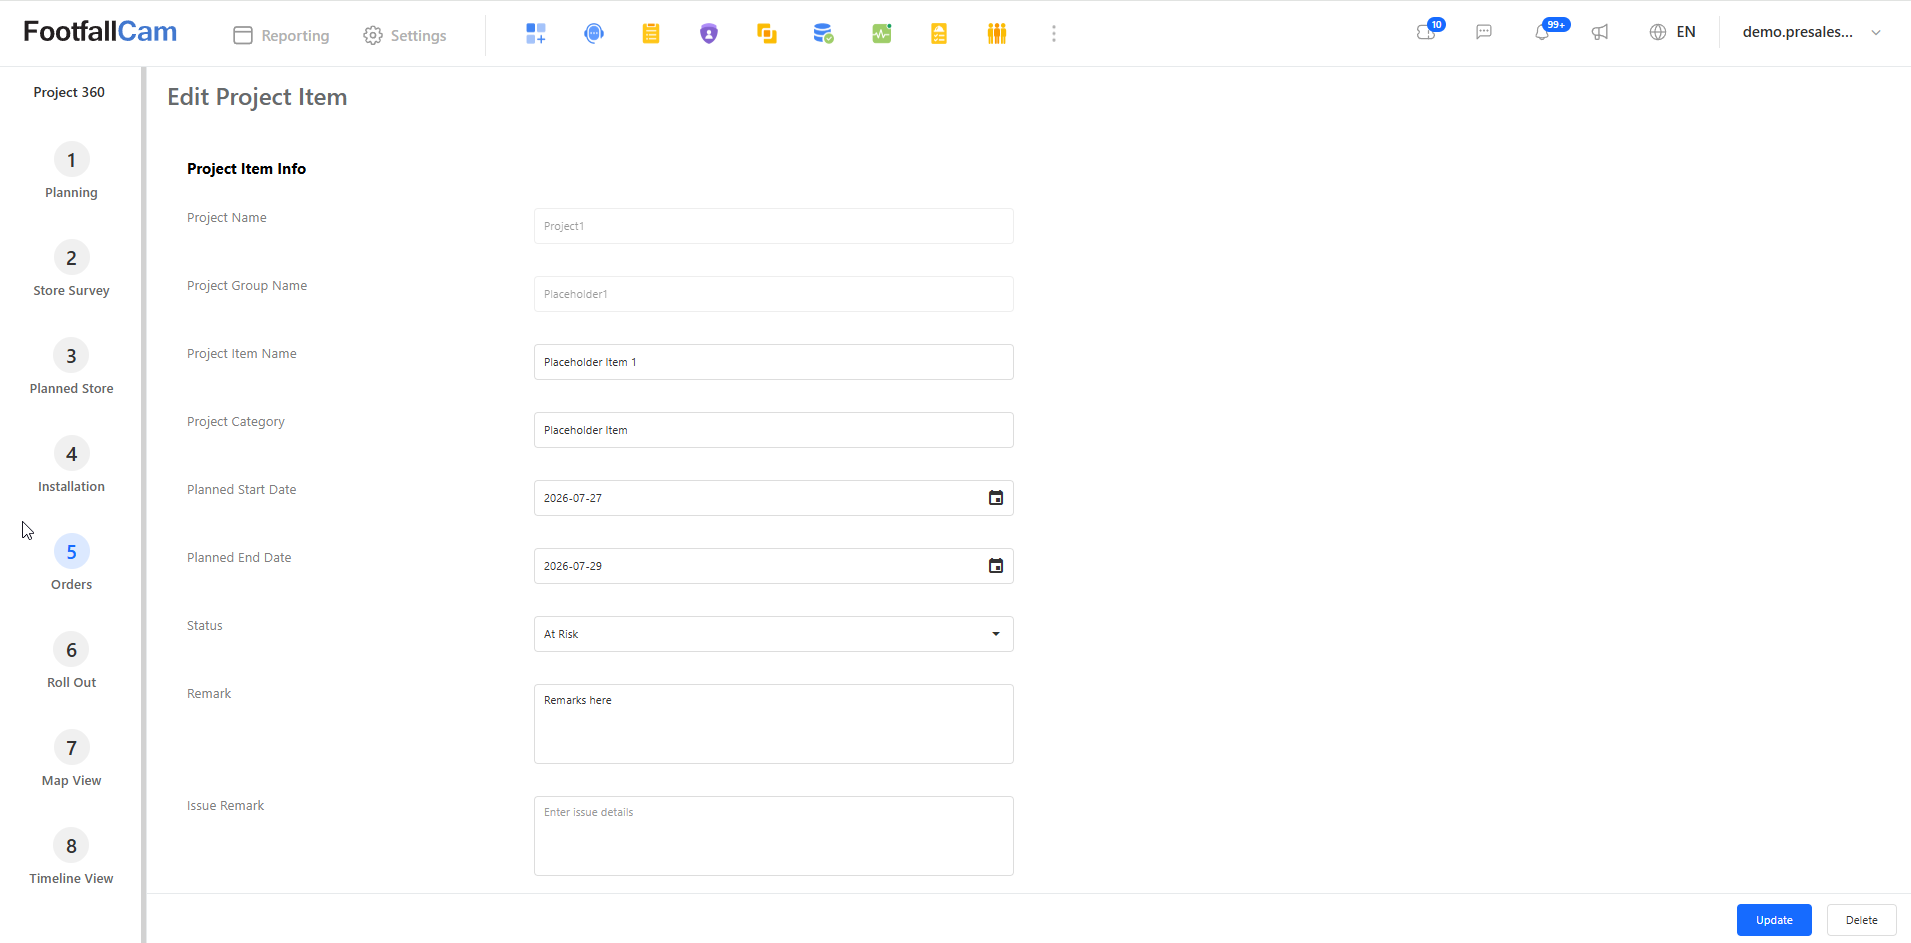
| Item | Details |
| Project Name | Name of the project the project item is under |
| Project Group Name | Name of the project group the project item is under |
| Project Item Name | Name of the project item |
| Project Category | Category of the project item |
| Planned Start Date | Start date for the project item |
| Planned End Date | End date for the project item |
| Status | Status of the project item |
| Remark | Additional comment about the project item |
| Site Type | Type of site the project item will be linked to |
Editing Rollout
Click on the rollout row in the list to open the form view for the rollout. This will redirect to the page where the fields will be prefilled based on the rollout's data. Users can make changes and select Update to save changes or select Delete to remove the rollout.
Map View
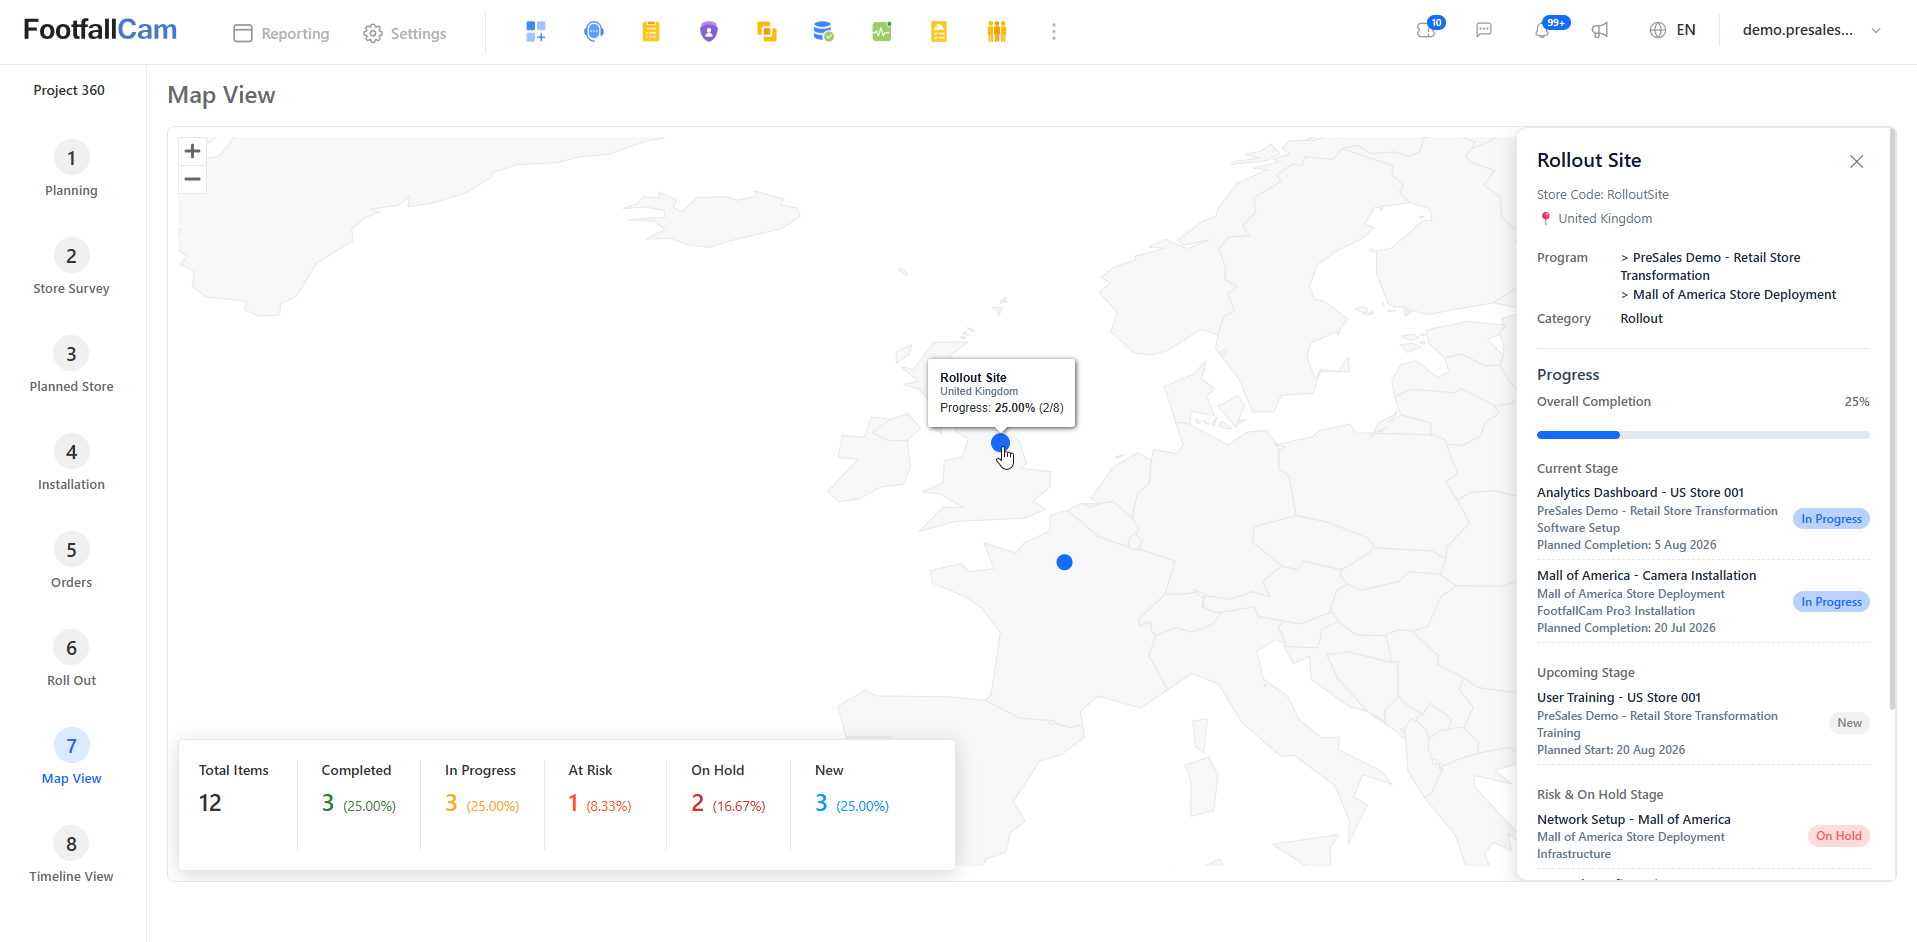
This page shows a map view with points on the map to indicate sites that are involved in projects. Selecting a point will showcase its details such as the progress, current stage, project items that require immediate attention and upcoming stages. A summary of the number of project items that are linked to a site will also show at the bottom left of the map.
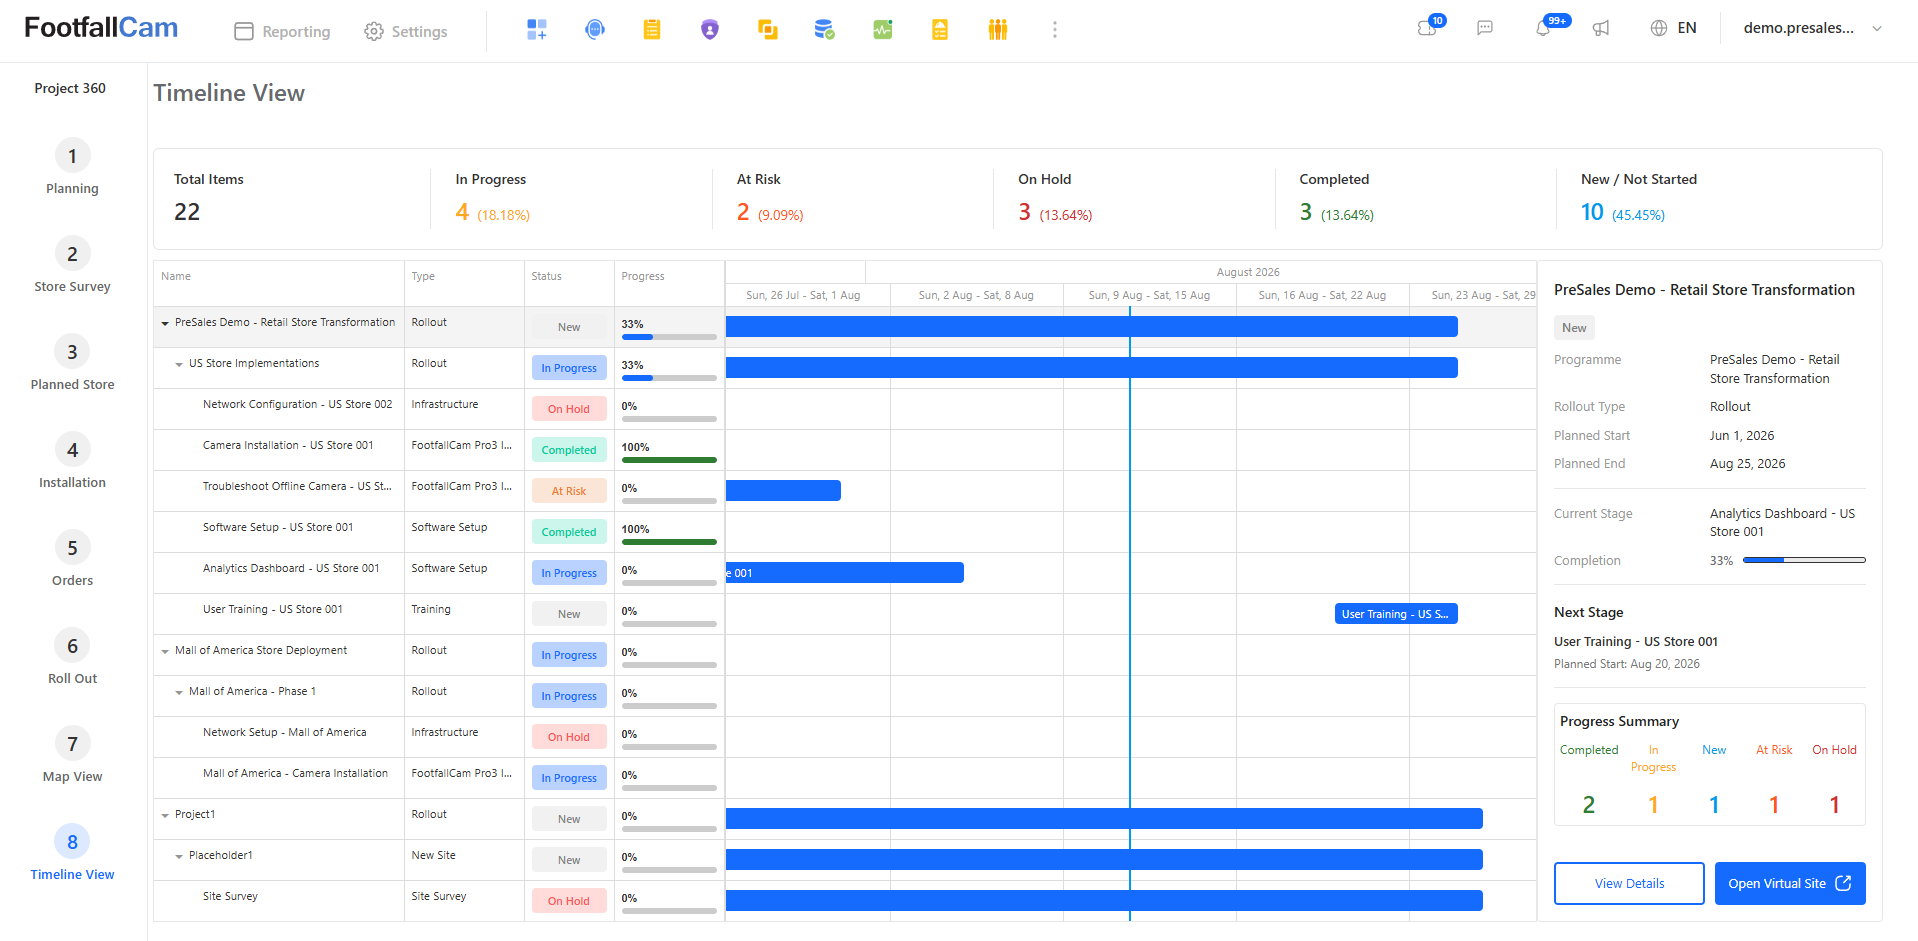
Timeline View
This page shows a Gantt chart of the project items, similar to the Project Management page. Summary of the project items are shown above the and the details of the project are shown on the right. Selecting 'View Details' will redirect the user to the rollout's form view.