



Governance 360 provides a centralised interface for managing user access, privacy levels, compliance settings, governance rules, and related activity logs within the FootfallCam portal.
Accessing Governance 360
The Governance 360 app can be accessed from the application navigation bar at the top of the FootfallCam portal.
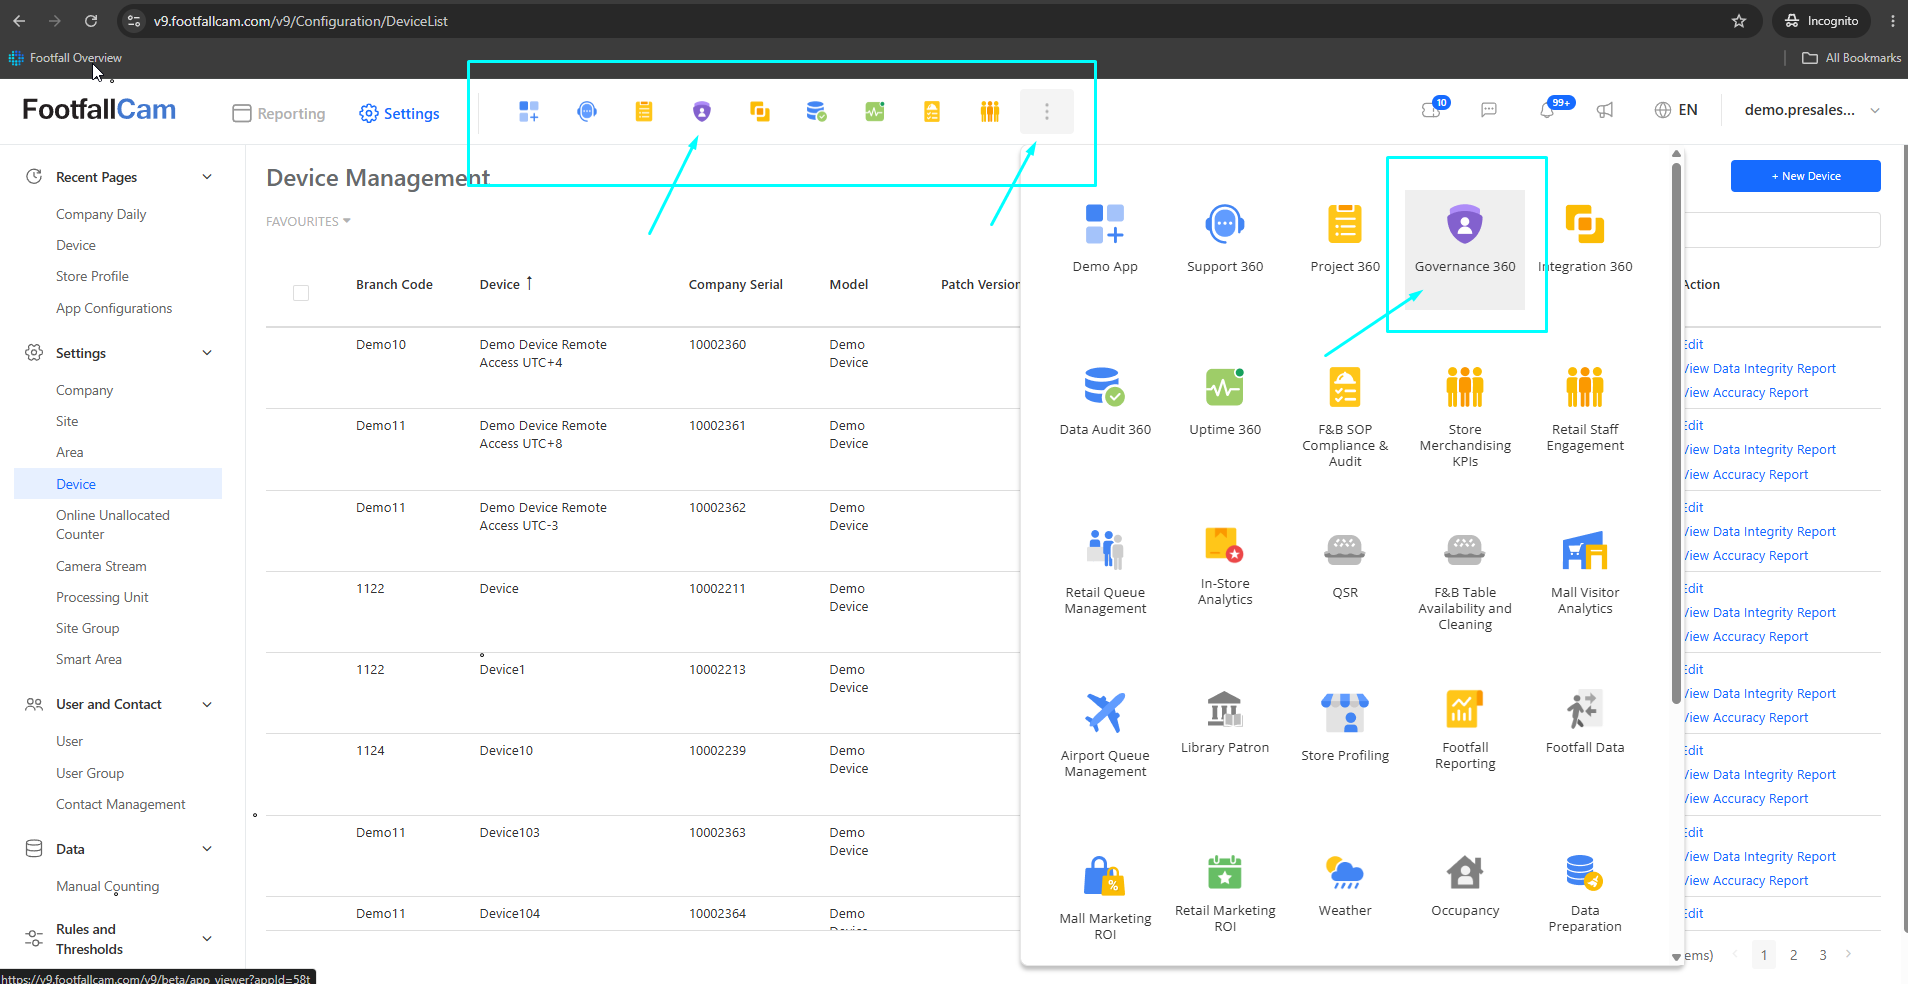
There are two ways to access the application:
Method 1: Access from the top navigation bar
If the Governance 360 icon is available on the top navigation bar, click the Governance 360 icon directly to open the application.
Method 2: Access from More Apps
Step 1: Click the More Apps (⋮) icon on the top navigation bar.
Step 2: The application menu will be displayed.
Step 3: Locate and click Governance 360.
The system will then open the Governance 360 application, where the Governance Overview page is displayed by default.
After entering Governance 360, users can navigate between Overview, Privacy Level, User Access, Compliance Configuration, Governance Rules, and Logs using the navigation menu on the left-hand side.
1. Governance Overview
The Governance Overview page provides a summary of the current governance configuration of the company. It allows users to quickly review the number of users, user groups, privacy levels, and the users currently configured in the system.
Step 1: Navigate to Governance 360 > Overview.
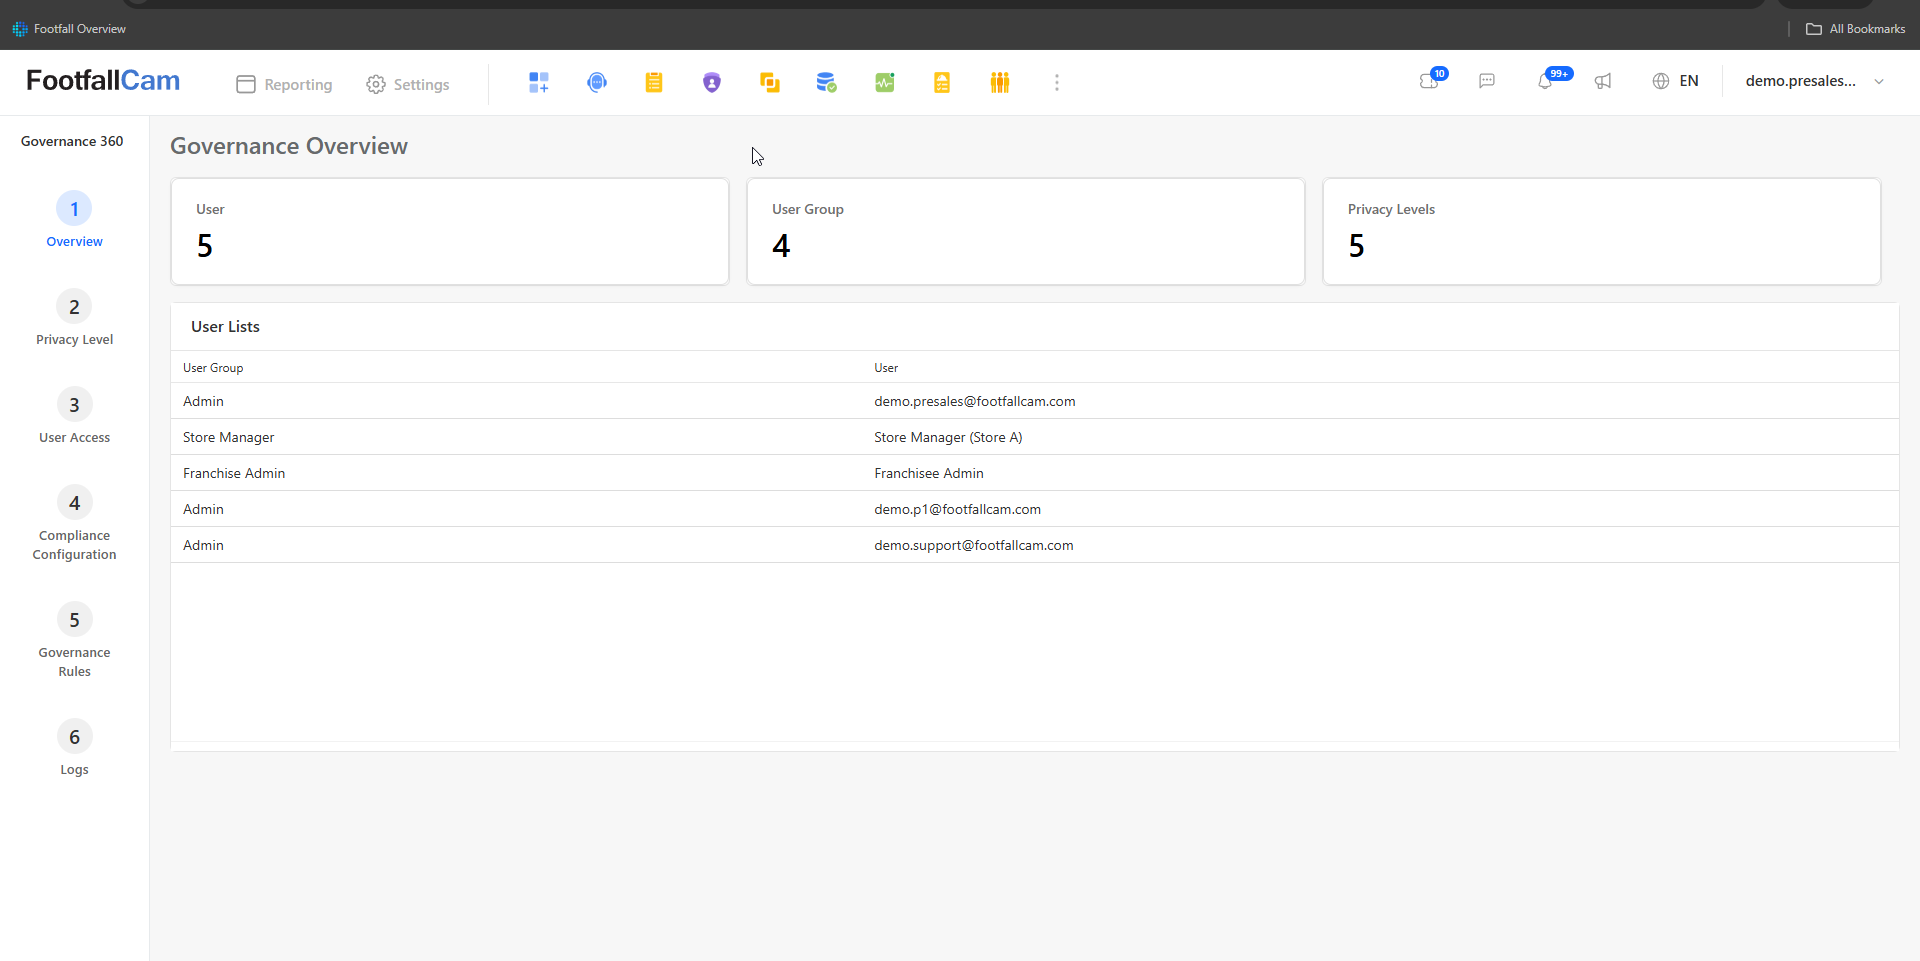
The Governance Overview page displays the following information:
The User Lists section allows administrators to quickly review which user group each user belongs to.
The navigation panel on the left can be used to access other Governance 360 configurations, including Privacy Level, User Access, Compliance Configuration, Governance Rules, and Logs.
2. Privacy Level
The Privacy Level page allows users to review the privacy policy currently applied to the company. The privacy level determines how video data, analytics, validation features, and related security functions are handled within the FootfallCam system.
Step 1: Navigate to Governance 360 > Privacy Level.
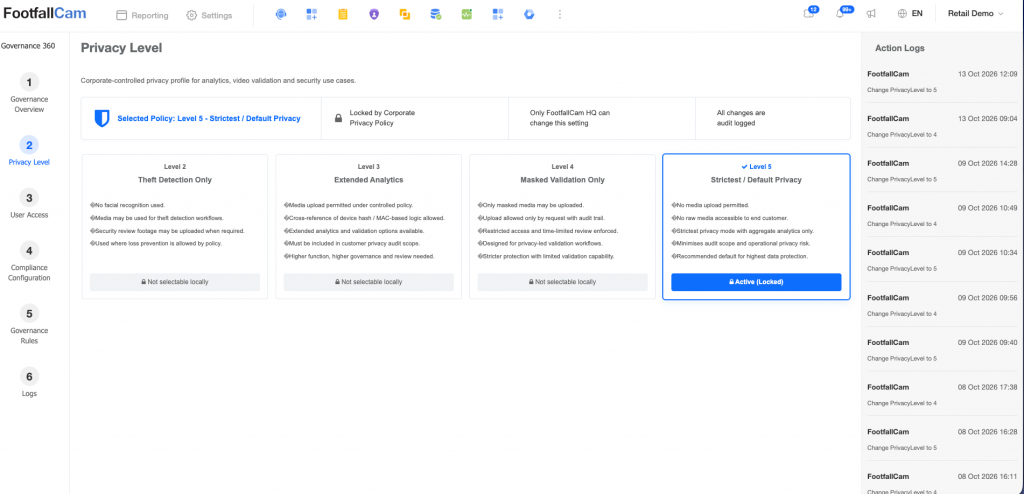
FootfallCam provides four privacy levels:
- Level 2 - Theft Detection Only - Facial recognition is not used, while video may be used for theft detection and security review.
- Level 3 - Extended Analytics - Allows additional analytics and validation functions under controlled privacy policies.
- Level 4 - Masked Validation Only - Only masked video can be used for validation, with restricted and time-limited access.
- Level 5 - Strictest / Default Privacy - Provides the highest level of privacy protection and is the default privacy level.
The currently selected privacy level is highlighted on the page. By default, the system is configured to Level 2 - Theft Detection Only.
2.1 Device Liveview Across Privacy Levels

Device Liveview while in Privacy Level 2 
Device Liveview while in Privacy Level 3 
Device Liveview while in Privacy Level 4 
Device Liveview while in Privacy Level 5
2.2 Changing the Privacy Level
The privacy level is controlled by FootfallCam HQ and cannot be changed directly by the customer. This ensures that changes to privacy-related configurations are properly reviewed and controlled.
If a different privacy level is required, please contact FootfallCam. The FootfallCam team will review the requirement and make the necessary changes accordingly.
2.3 Privacy Level Action Logs
The Action Logs panel on the right-hand side records changes made to the privacy level.
When a privacy level is changed, the log records information such as the user responsible for the change, the date and time of the change, and the privacy level selected.
This provides an audit trail for tracking privacy configuration changes within the company.
3. User Access
The User Access section allows administrators to manage individual user accounts, assign users to user groups, configure their preferences, and control which sites or site groups they are permitted to access.
The User Access section contains two areas:
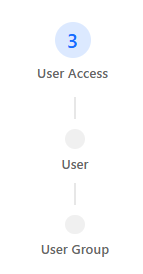
3.1 User
Step 1: Navigate to Governance 360 > User Access > User.
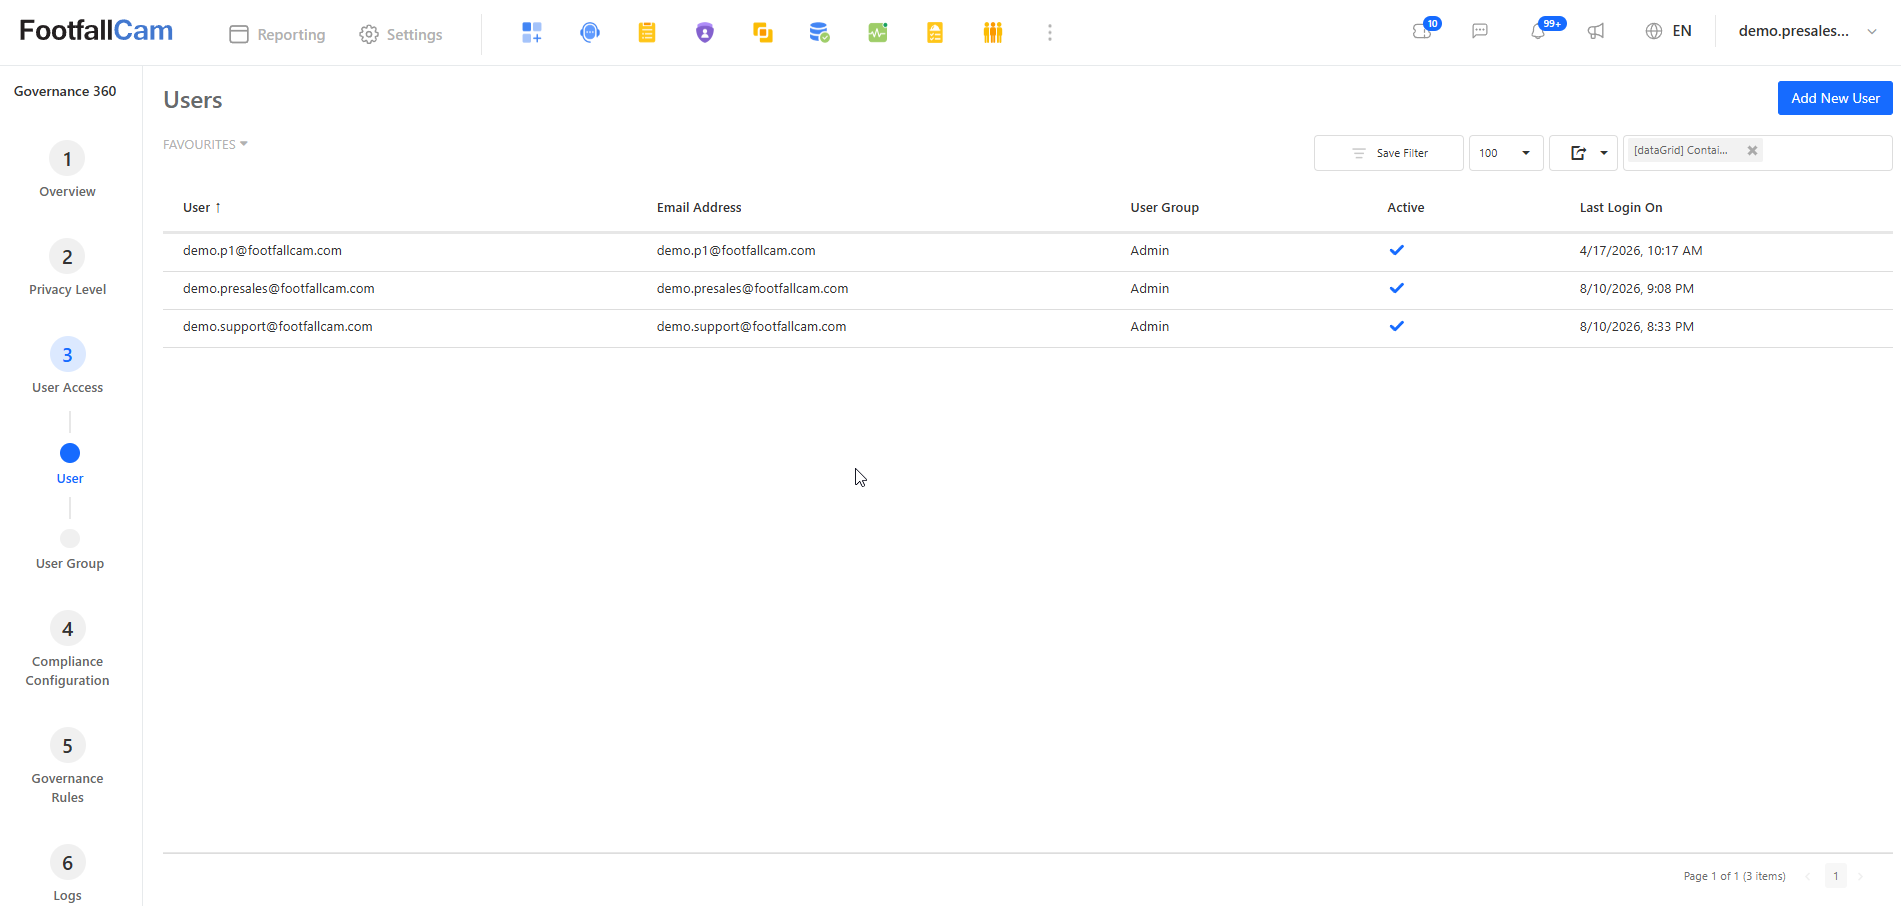
The Users page displays all user accounts configured for the company. Information shown includes:
- User - The user's display name or account name.
- Email Address - The email address associated with the account.
- User Group - The user group assigned to the user.
- Active - Indicates whether the user account is currently active.
- Last Login On - Displays the user's most recent login date and time.
To create a new user, click Add New User at the top-right corner of the page.
To review or modify an existing user, click the respective user from the list.
3.2 User Account Settings
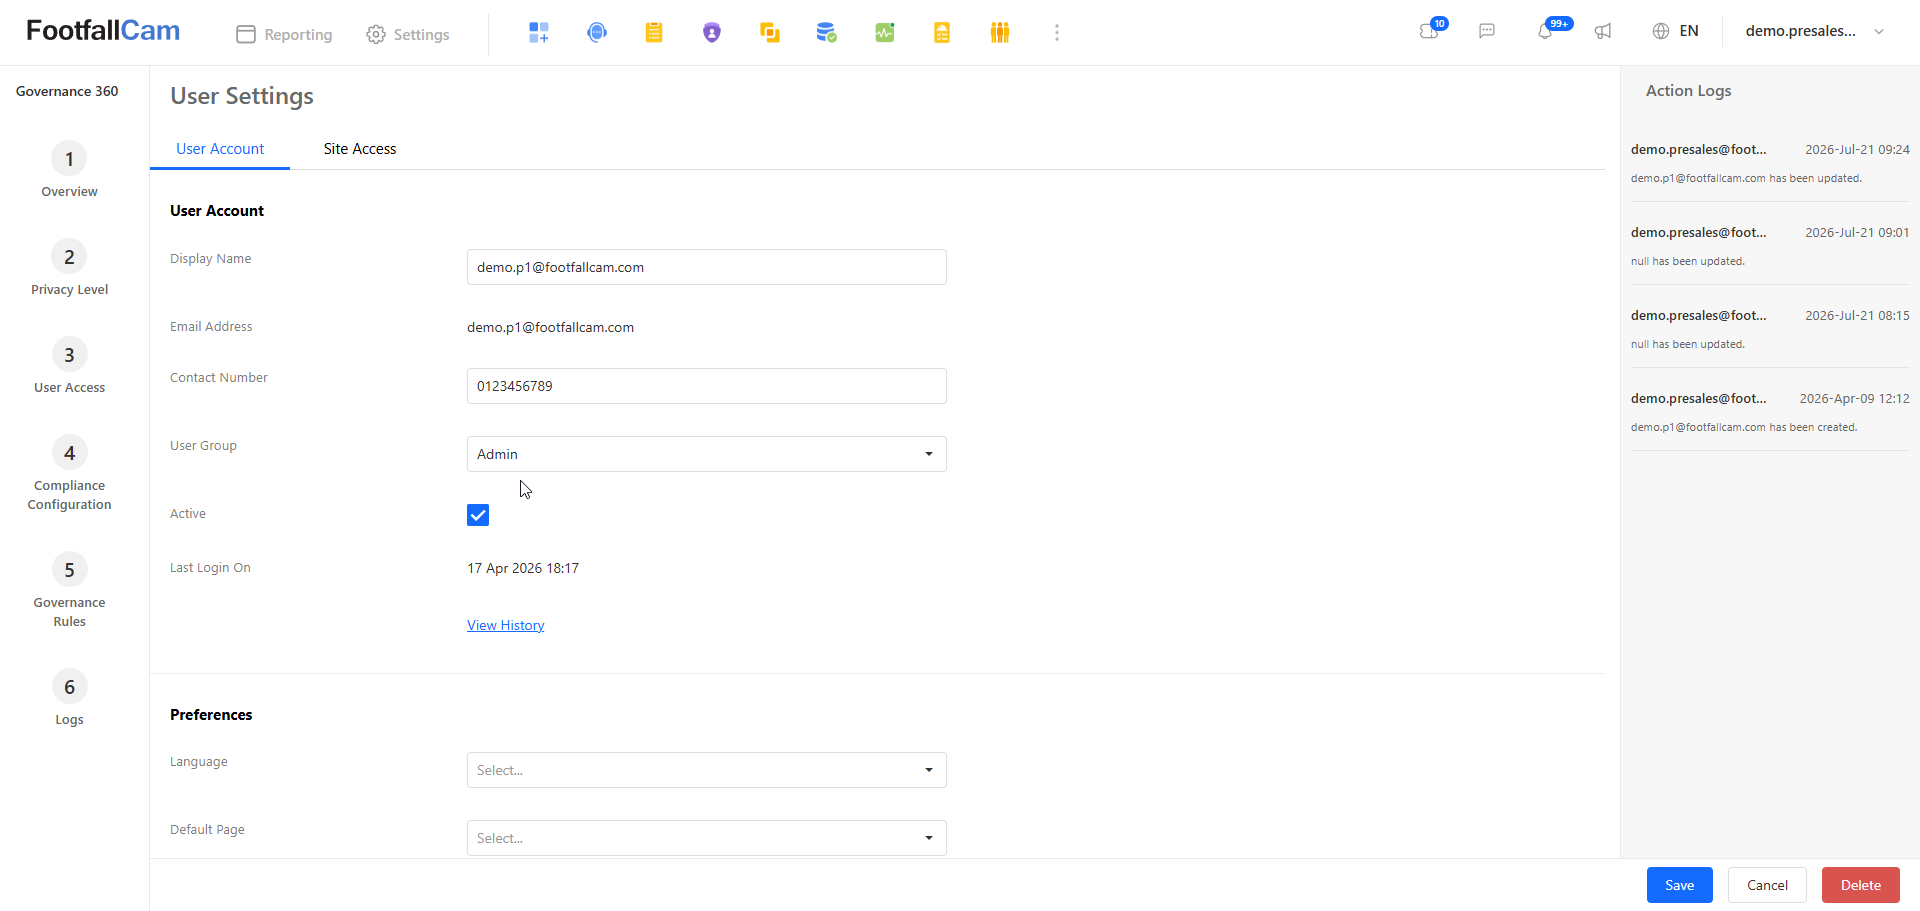
After selecting a user, the User Settings page will be displayed.
3.2.1 User Account
Under the User Account tab, administrators can review and configure the user's account information, including:
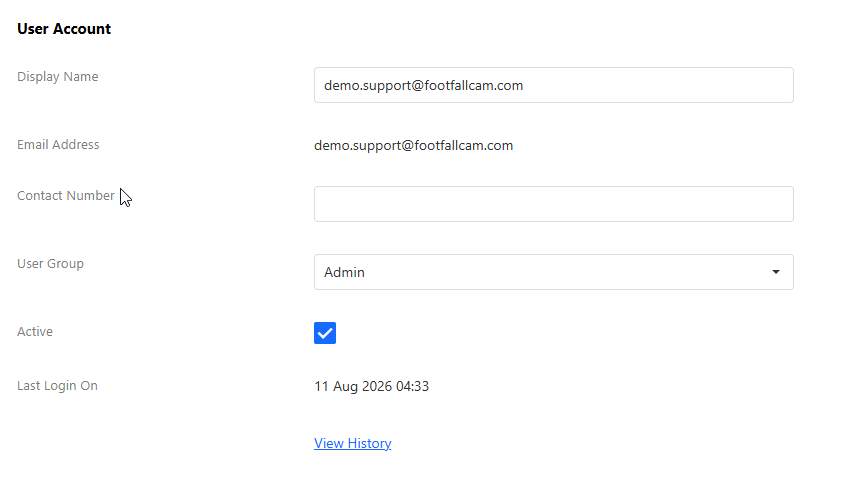
- Display Name - The name displayed for the user within the system.
- Email Address - The email address associated with the account.
- Contact Number - The user's contact number.
- User Group - Assigns the user to the appropriate user group.
- Active - Determines whether the user account is active.
- Last Login On - Shows the latest login date and time.
The View History option can be used to review the available history associated with the user account.
3.2.2 Preferences
The Preferences section allows the user's system preferences to be configured, including:
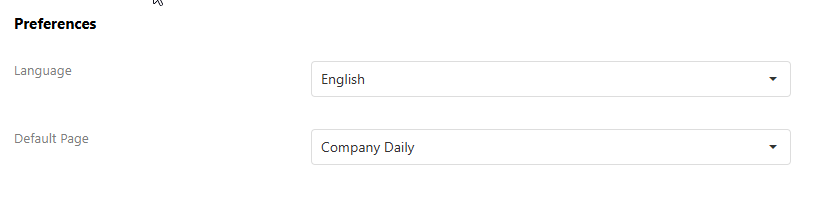
- Language - Sets the preferred language for the user.
- Default Page - Sets the page that will be displayed by default when the user accesses the system.
After making the required changes, click Save to apply the configuration.
3.3 Site Access
The Site Access tab controls which sites or site groups the selected user is permitted to access.
Step 1: Open the required user and select the Site Access tab.
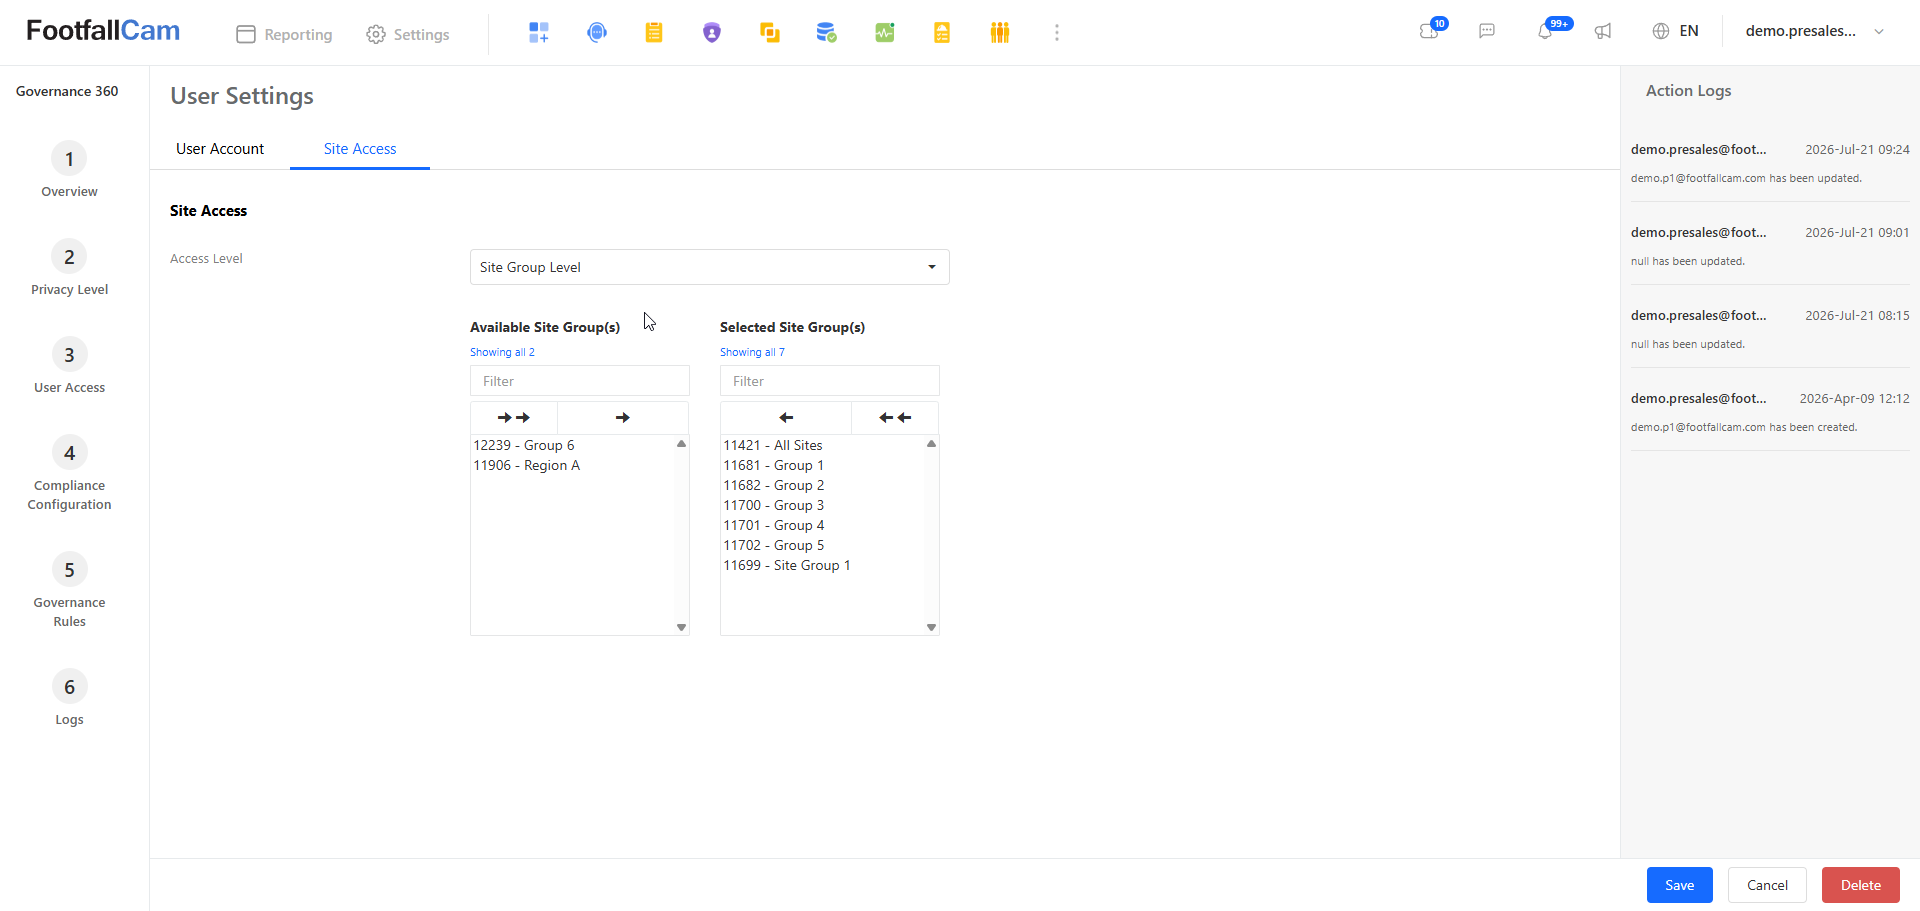
Step 2: Select the required Access Level.
Access can be configured according to the required level, such as Site Level or Site Group Level.
When Site Group Level is selected, the page displays:
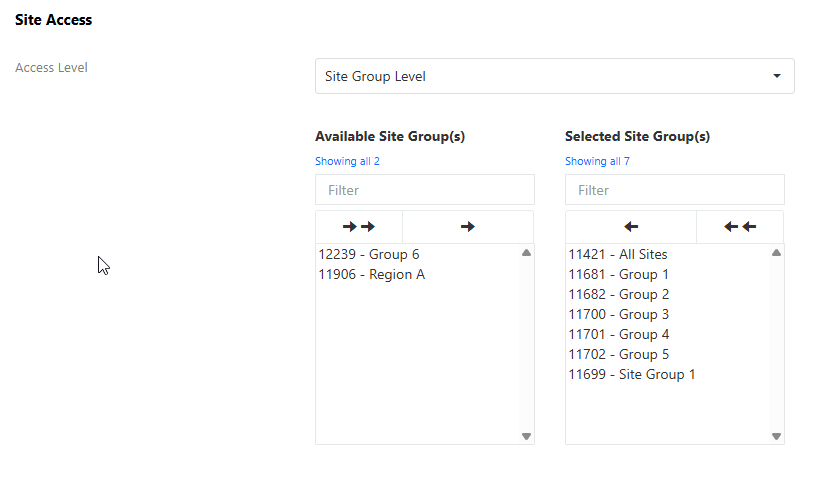
- Available Site Group(s) - Site groups that have not been assigned to the user.
- Selected Site Group(s) - Site groups that the user currently has permission to access.
Step 3: Move the required site groups from Available Site Group(s) to Selected Site Group(s) using the arrow controls.
Only the sites or site groups assigned under the selected access list will be available to the user based on their access configuration.
Step 4: Click Save to apply the changes.
3.4 User Action Logs
The Action Logs panel on the right-hand side records changes made to the user configuration.
The log provides an audit trail for activities such as user creation and updates to user account or site access settings. This allows administrators to review when changes were made and which account performed the change.
3.5 User Group
The User Group section allows administrators to manage groups of users and define the permissions available to users assigned to each group.
Step 1: Navigate to Governance 360 > User Access > User Group.
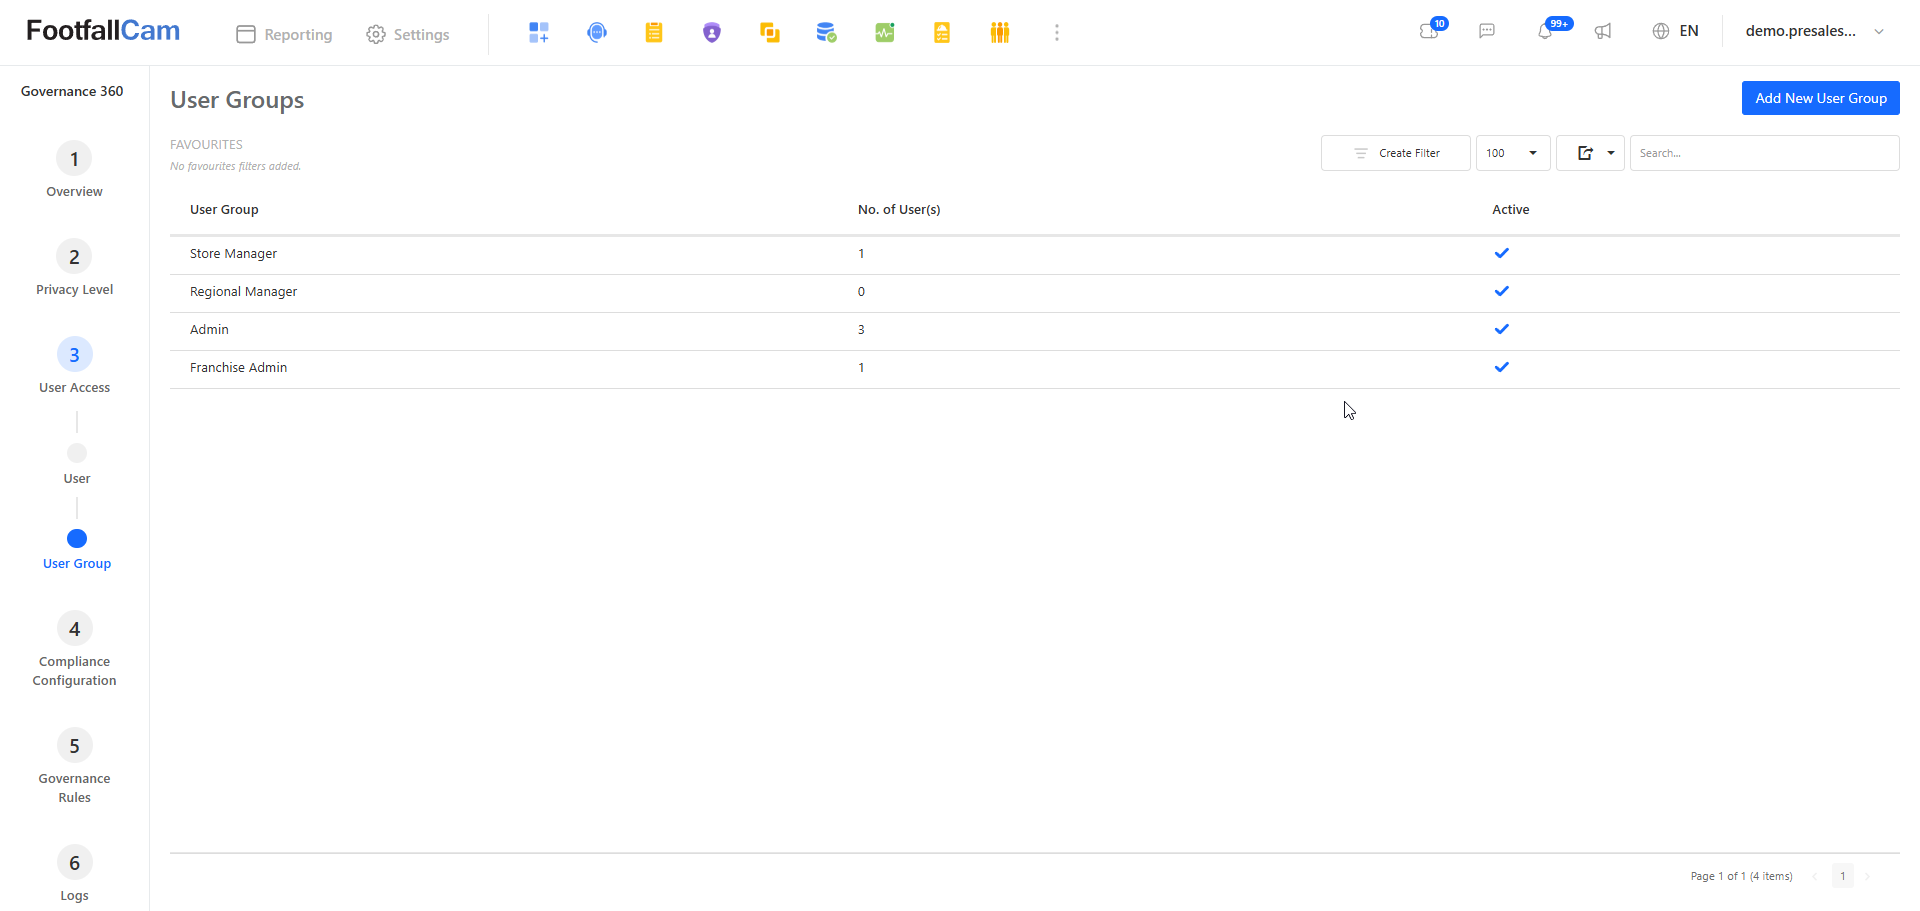
The User Groups page displays the user groups configured for the company, including:
- User Group - The name of the user group.
- No. of User(s) - The number of users currently assigned to the group.
- Active - Indicates whether the user group is currently active.
To create a new user group, click Add New User Group.
To modify an existing user group, click the required user group from the list.
3.6 User Group Settings
After selecting a user group, the User Group Settings page will be displayed.
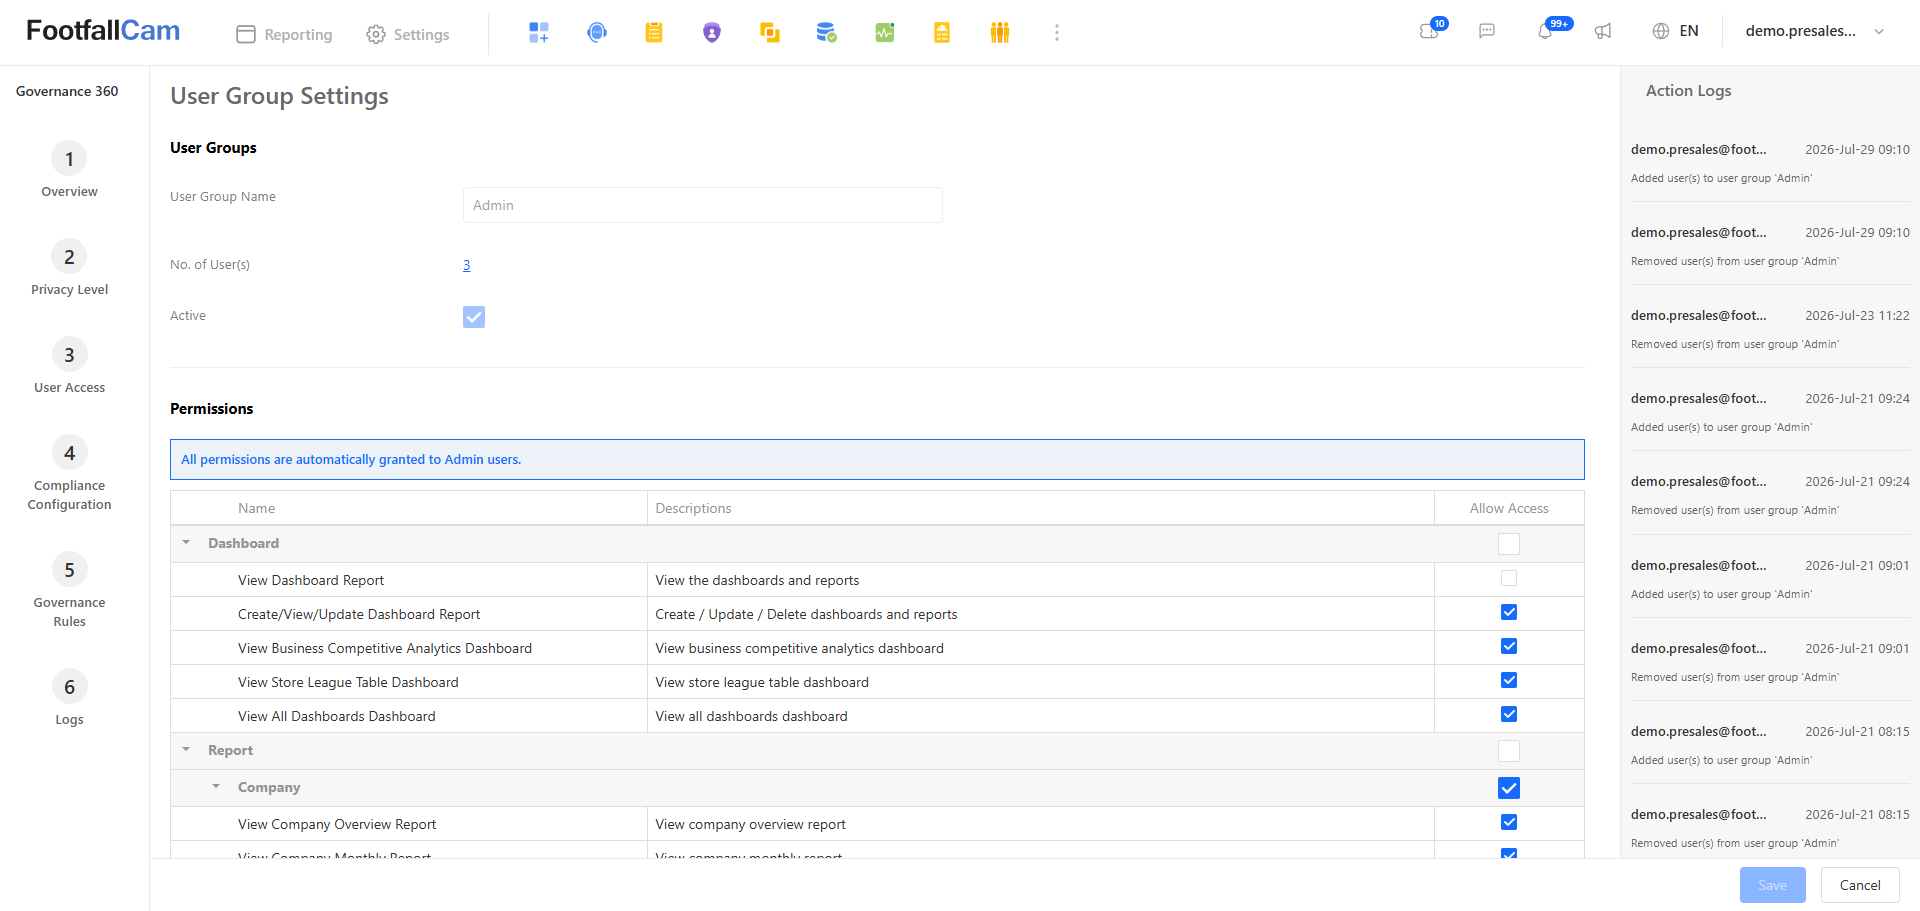
The following settings can be configured:
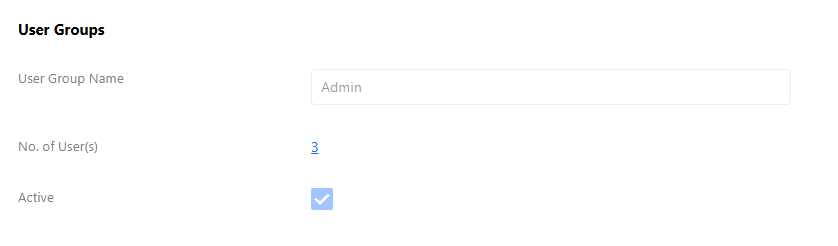
- User Group Name - Allows the name of the user group to be changed.
- No. of User(s) - Displays the number of users currently assigned to the user group.
- Active - Determines whether the user group is active or inactive.
After making the required changes, click Save to apply them.
3.7 User Group Permissions
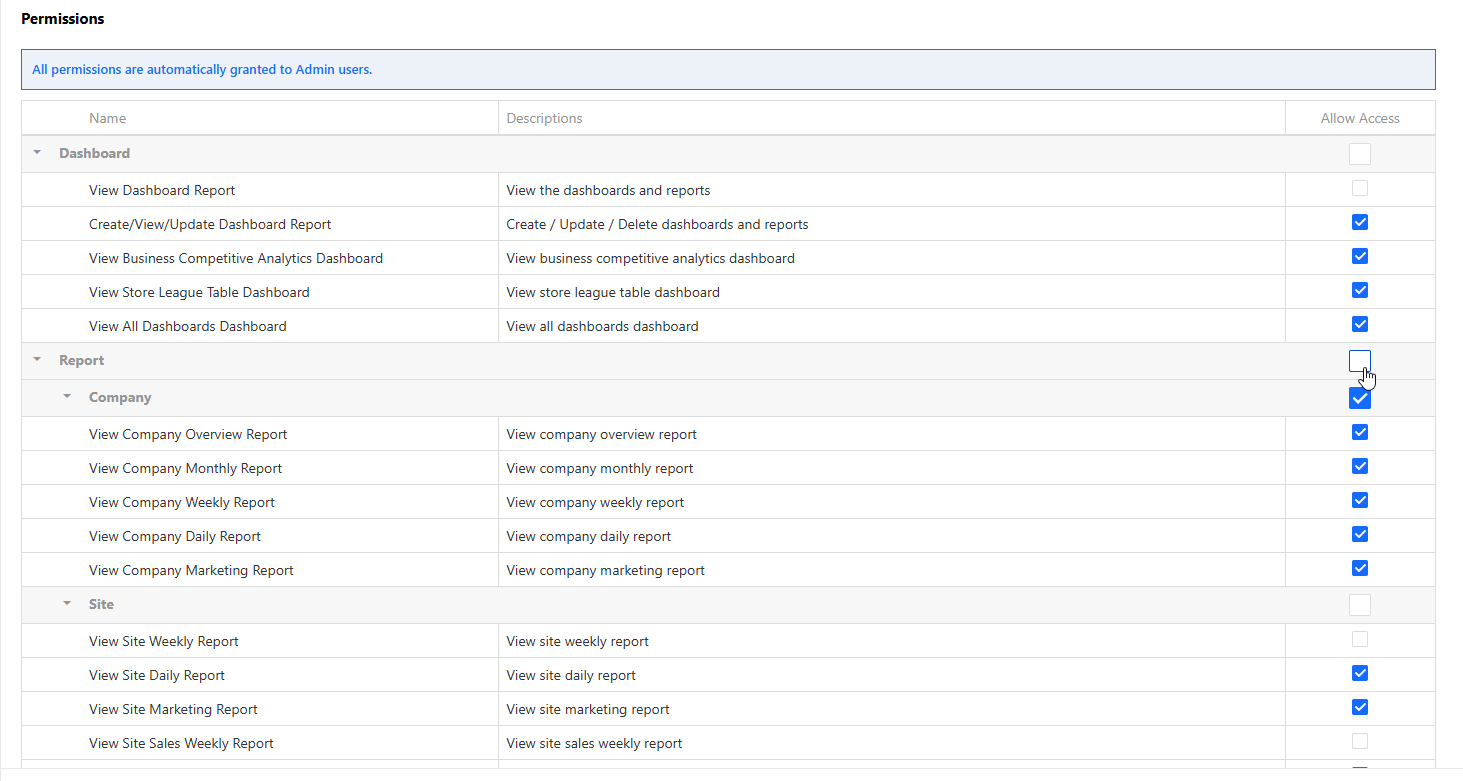
The Permissions section determines which functions and pages users within the selected user group are allowed to access.
Permissions are organised by different modules and functions, such as Dashboard, Report, and other available system features.
To configure permissions:
Step 1: Locate the required permission from the permissions list.
Step 2: Tick the checkbox under Allow Access to grant the permission to users within this user group.
Step 3: Untick the checkbox if the user group should not have access to that function.
Step 4: Click Save to apply the permission changes.
All users assigned to the user group will follow the access permissions configured for that group.
4. Compliance Configuration
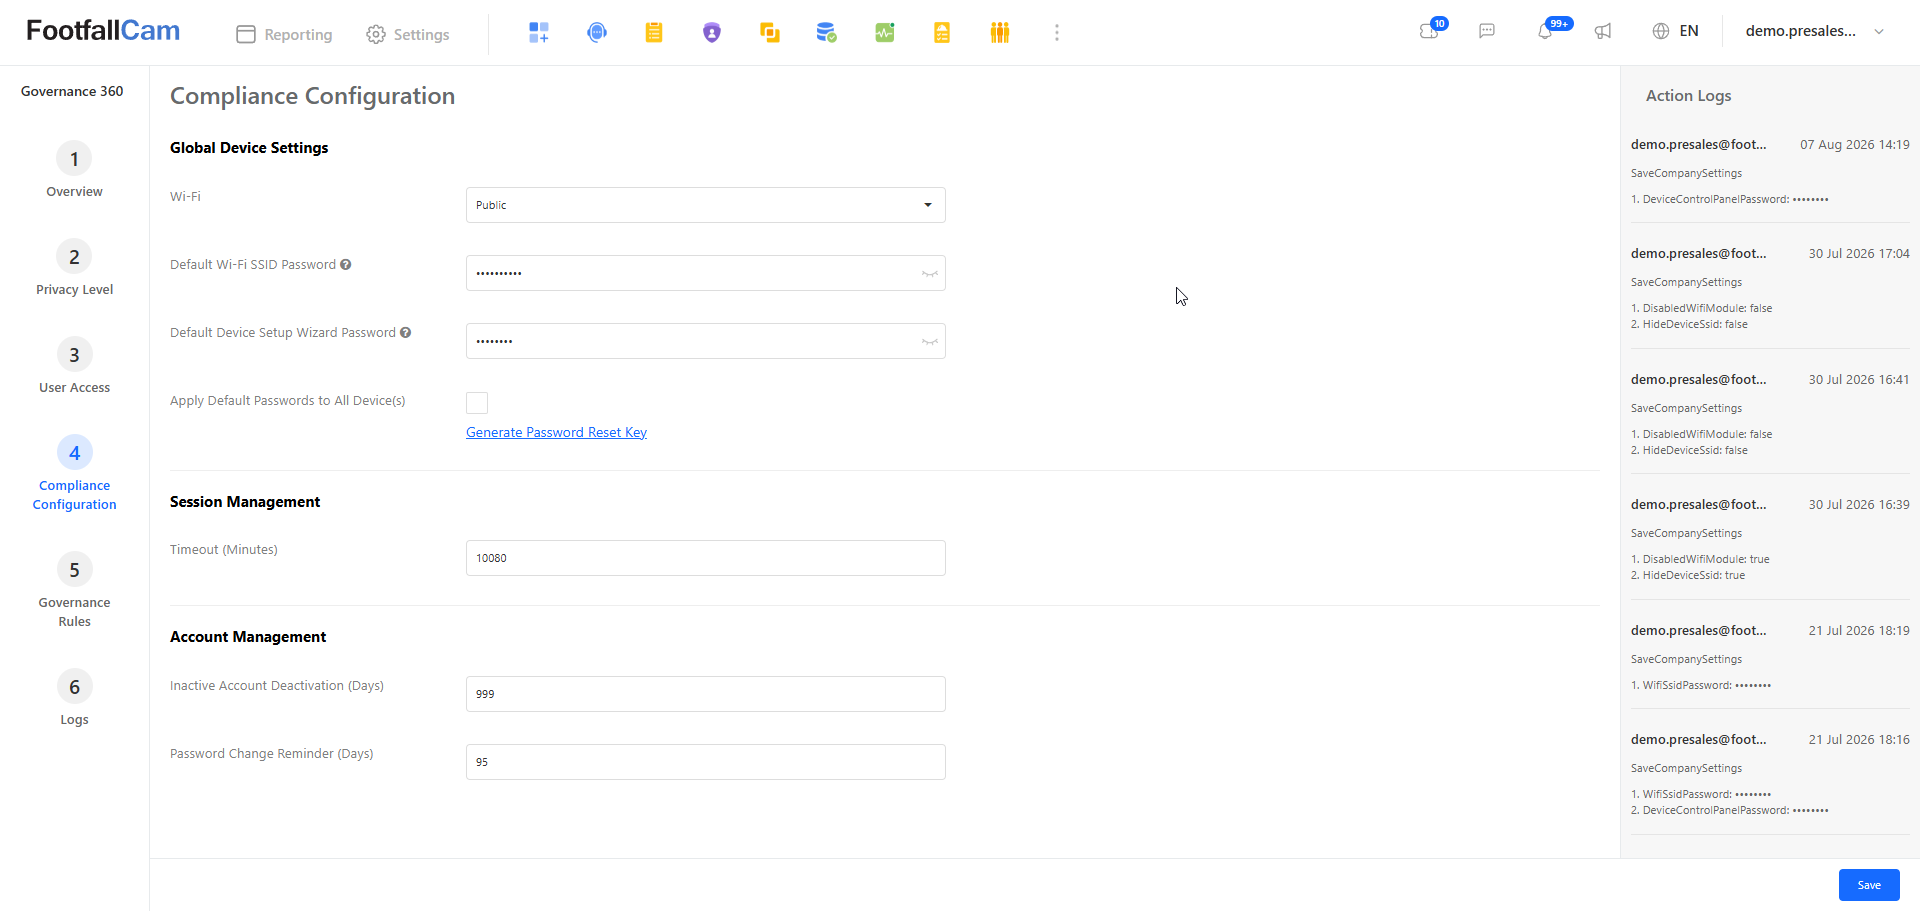
The Compliance Configuration page allows administrators to configure company-wide security and compliance settings, including device passwords, session timeout, inactive account handling, and password change reminders.
Step 1: Navigate to Governance 360 > Compliance Configuration.
4.1 Global Device Settings
The Global Device Settings section is used to manage the default security configuration applied to FootfallCam devices.
The following settings are available:
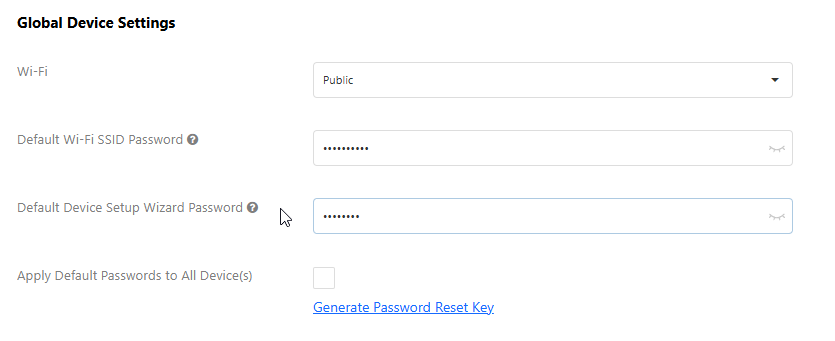
- Wi-Fi - Configures the Wi-Fi setting used for the devices.
- Default Wi-Fi SSID Password - Sets the default Wi-Fi password used by the devices.
- Default Device Setup Wizard Password - Sets the default password used to access the device setup interface.
- Apply Default Passwords to All Device(s) - Applies the configured default passwords to the company's devices.
- Generate Password Reset Key - Generates a password reset key when a device password reset is required.
After making the required changes, click Save to apply the configuration.
4.2 Session Management
The Session Management section controls how long a user session can remain active.

- Timeout (Minutes) - Specifies the session timeout duration in minutes.
When the configured timeout condition is reached, the user may be required to authenticate again before continuing to use the system.
4.3 Account Management
The Account Management section allows administrators to configure account security policies based on user activity and password age.
The following settings can be configured:
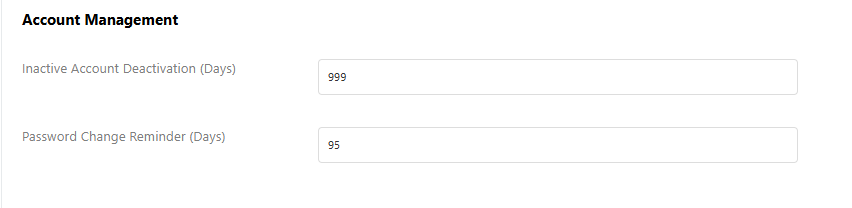
- Inactive Account Deactivation (Days) - Specifies the number of days an account can remain inactive before it is considered for deactivation.
- Password Change Reminder (Days) - Specifies the number of days before the system reminds the user to change their password.
For example, if Password Change Reminder is configured as 95, the password change reminder will follow the configured 95-day period.
4.4 Compliance Configuration Action Logs
The Action Logs panel on the right-hand side records changes made to the Compliance Configuration.
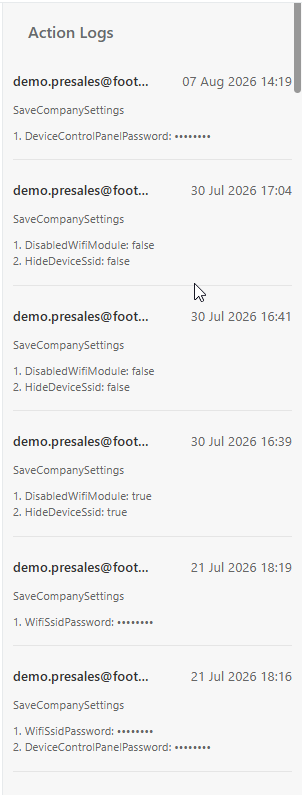
Each action log displays the account that performed the change together with the date, time, and changed configuration, where applicable.
5. Governance Rules
The Governance Rules page provides a record of governance-related rules that have been created and processed by the system.
These rules are commonly generated when certain governance or device settings are changed, such as the device password or Wi-Fi password. The page allows administrators to check whether the requested change has been successfully delivered to the corresponding device.
Step 1: Navigate to Governance 360 > Governance Rules.
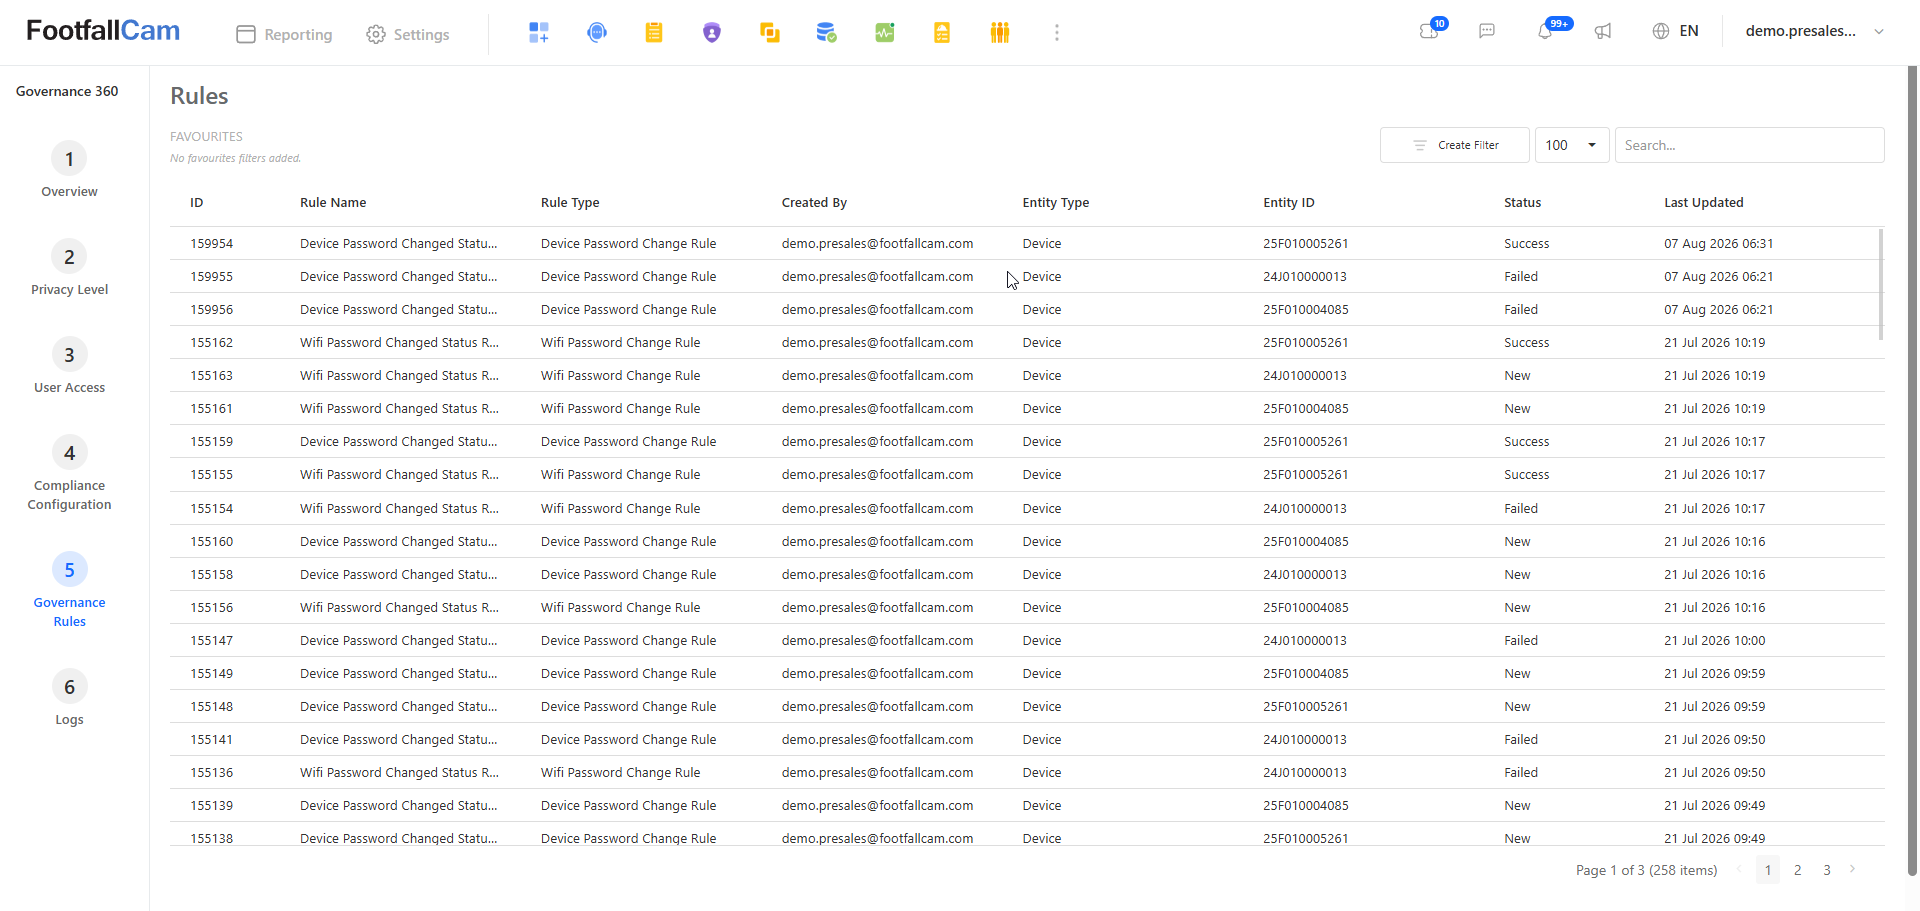
The Rules page displays the following information:
- ID - The unique ID of the rule.
- Rule Name - The name of the generated rule.
- Rule Type - Indicates the type of governance rule, such as Device Password Change Rule or WiFi Password Change Rule.
- Created By - Shows the user who initiated the change.
- Entity Type - Indicates the type of entity affected by the rule, such as a device.
- Entity ID - The identifier of the affected entity.
- Status - Shows the current processing status of the rule.
- Last Updated - Displays the latest date and time when the rule status was updated.
5.1 Rule Status
When a governance-related setting is changed, a corresponding rule can be created to deliver the change to the device.
For example, when the Device Setup Wizard Password or Wi-Fi Password is changed from the Compliance Configuration page, the corresponding password change rule can be displayed on this page.
The Status column can be used to verify the result of the change.
Administrators can use this page to confirm whether configuration changes have been successfully applied to the required devices.
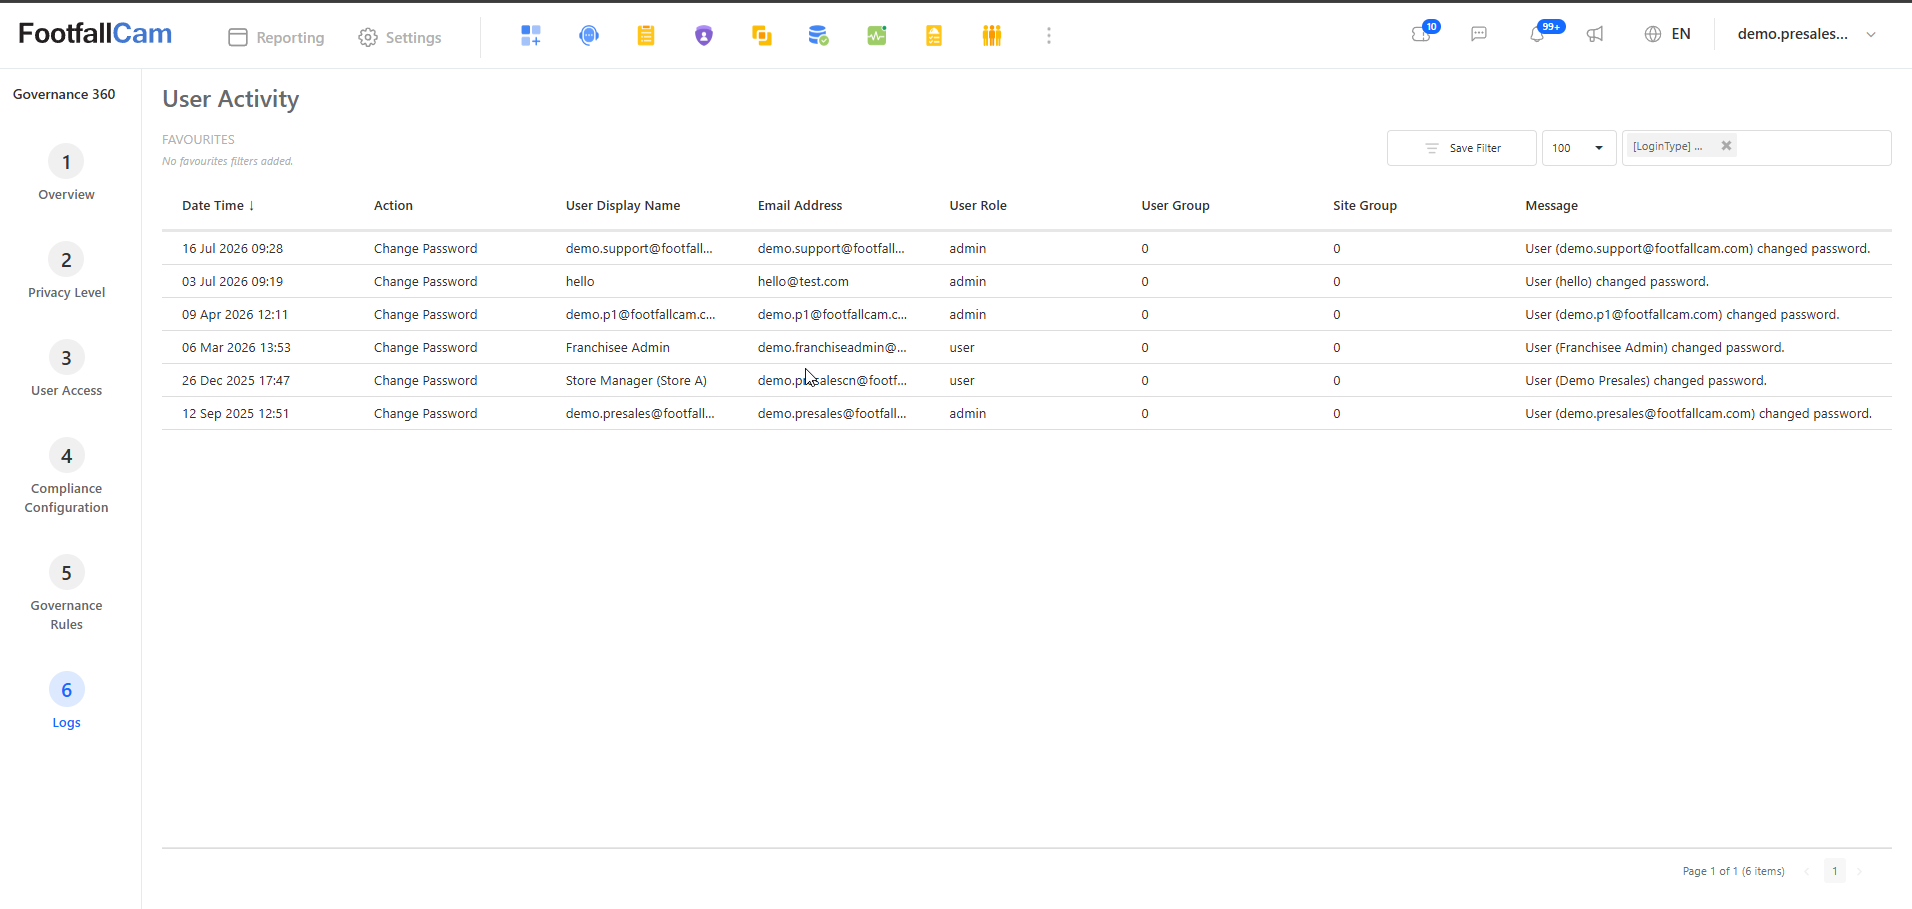
6. Logs
The Logs page provides a centralised record of user activities performed within the FootfallCam system. It allows administrators to review user actions for auditing, security monitoring, and account activity tracking.
Step 1: Navigate to Governance 360 > Logs.
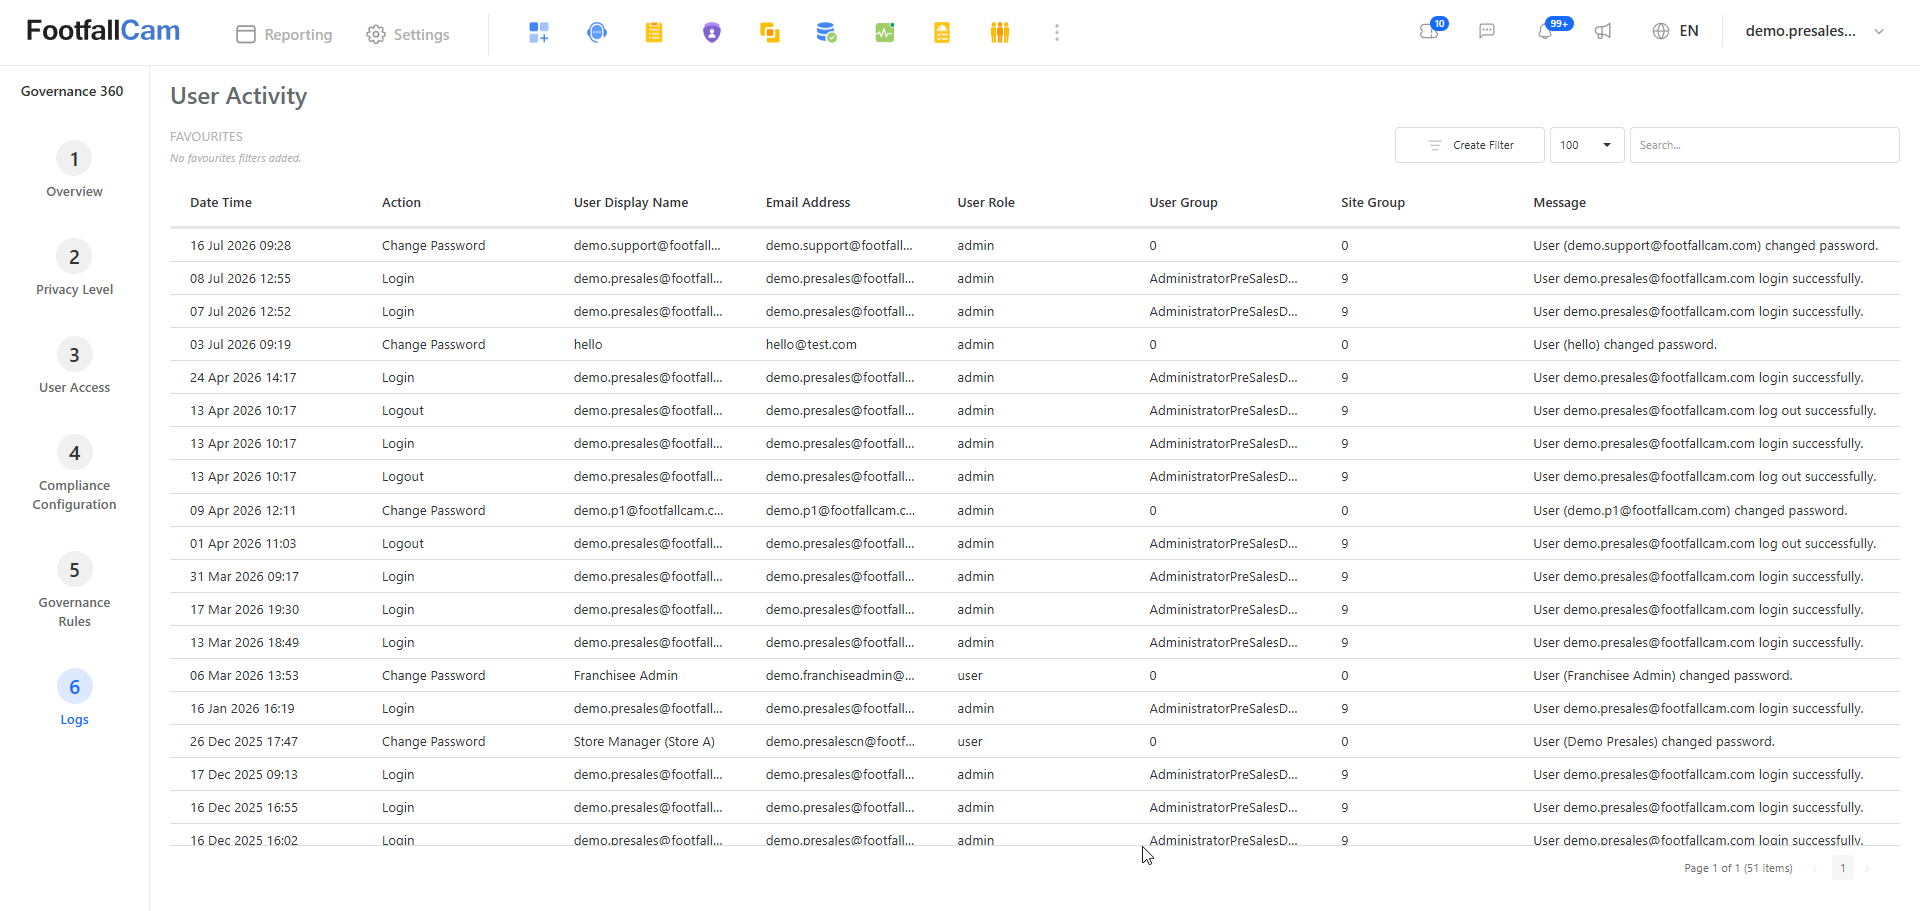
The User Activity page displays the following information:
- Date Time - Shows the date and time when the activity occurred.
- Action - Indicates the type of action performed by the user.
- User Display Name - Displays the name of the user who performed the action.
- Email Address - Shows the email address associated with the user account.
- User Role - Displays the role assigned to the user.
- User Group - Shows the user group associated with the user.
- Site Group - Displays the related site group information, where applicable.
- Message - Provides additional details about the activity that was performed.
The Message column provides further information about each action, helping administrators identify which user performed the activity and what action was completed.
Administrators can also use the available filter and search functions to locate specific user activity records more easily.
This page provides a complete audit trail of user-related activities and can be used to review account access and important user actions within the system.
6.1 Filtering User Activity
The User Activity page also provides a filtering function to help administrators quickly locate specific activity records.
Step 1: Click Create Filter at the top of the User Activity page.
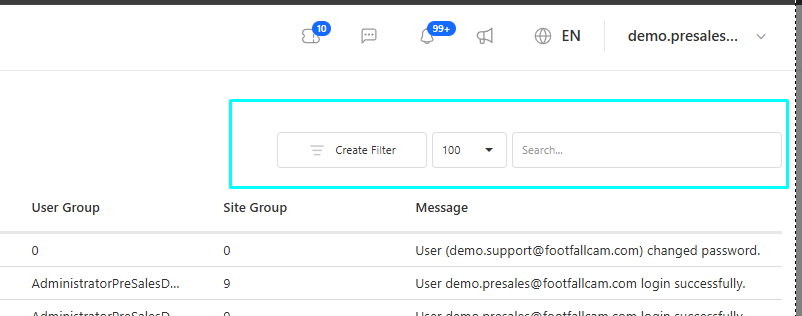
The Filter Builder window will be displayed.
Step 2: Select the field that you want to filter by.
For example, to view only password change activities:
- Select Action as the field.
- Select Equals as the condition.
- Select Change Password as the value.
The filter will appear as:
Action → Equals → Change Password
Step 3: Click OK to apply the filter.
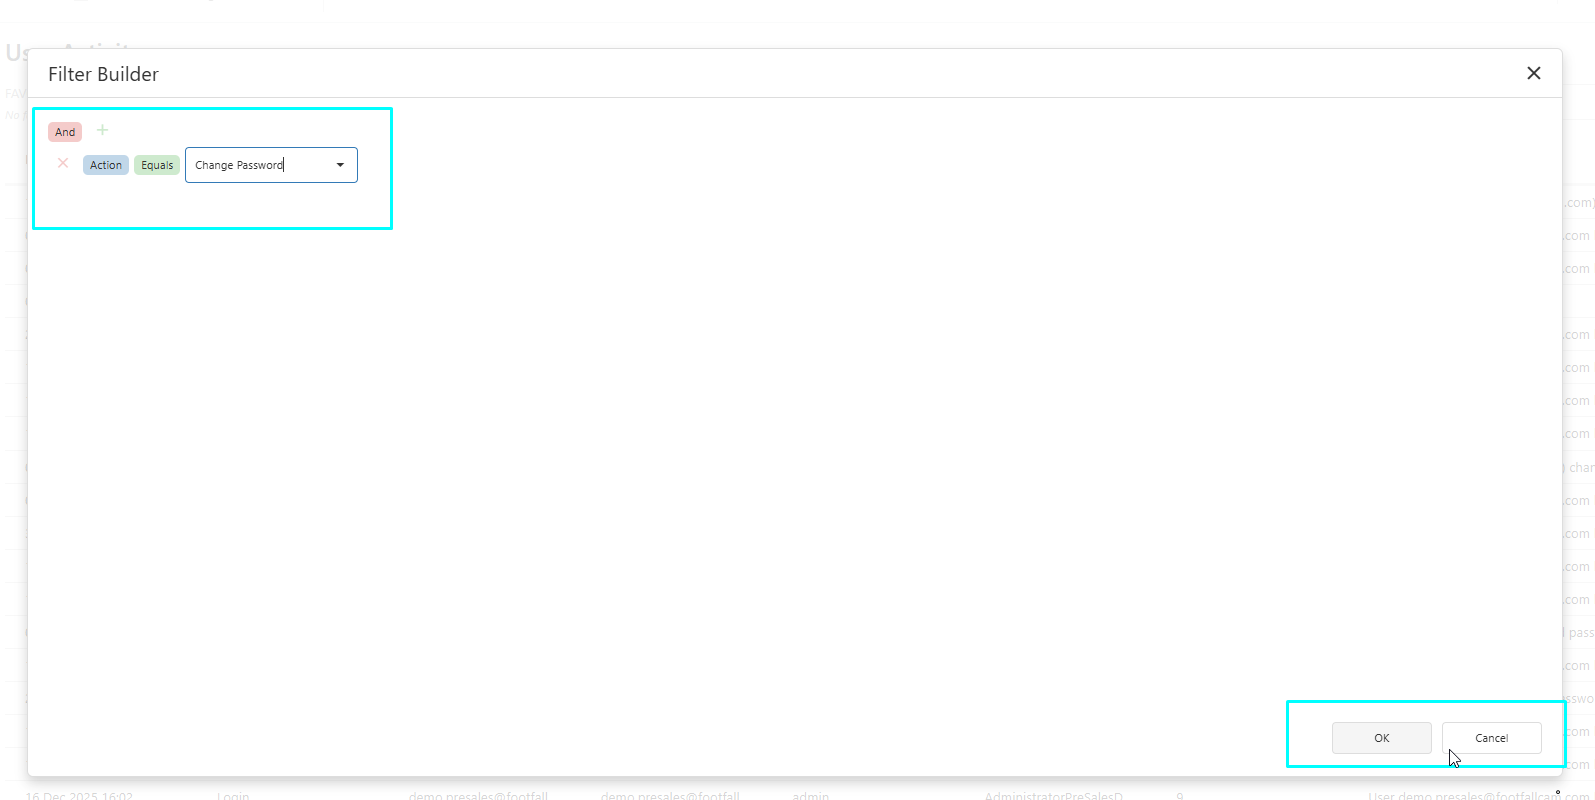
The User Activity list will then display only the records that match the selected condition.
Additional filter conditions can also be added using the + button when more specific filtering is required. This allows administrators to narrow down the activity records based on multiple criteria.
To remove a filter condition, click the × icon beside the condition.
The filtering function is useful when reviewing specific activities such as Login, Logout, or Change Password, especially when a large number of user activity records are available.