


Overview
Conventional FTP Data Retrieval
| Method | FTP |
| Minutely/ Hourly | Raw Data/ Per Minute Data |
| Number of File Sent |
Based on number of counters installed, one file per counter on daily basis |
|
Data Retrieving Time |
2.30am according to Clients' time zone |
Disadvantages of using conventional method:
- Relatively hard to maintain
- No visibility on FTP success rate to to Client server
- Raw data are not aggregated. Self aggregation and comparison are required. Raw files not combined to branch levels if one of the counters is offline, it would result in lower branch level traffic
- No visibility on whether late data will be re included next day
- Data Integrity: Inaccurate data especially when one offline counter affects the overall accuracy of counting, in terms of sales conversion, visitor counts etc. No visibility if data retrieved is partially completed or fully completed, if it is clean data with no offline
counters and no unverified data
Proposed Solution:
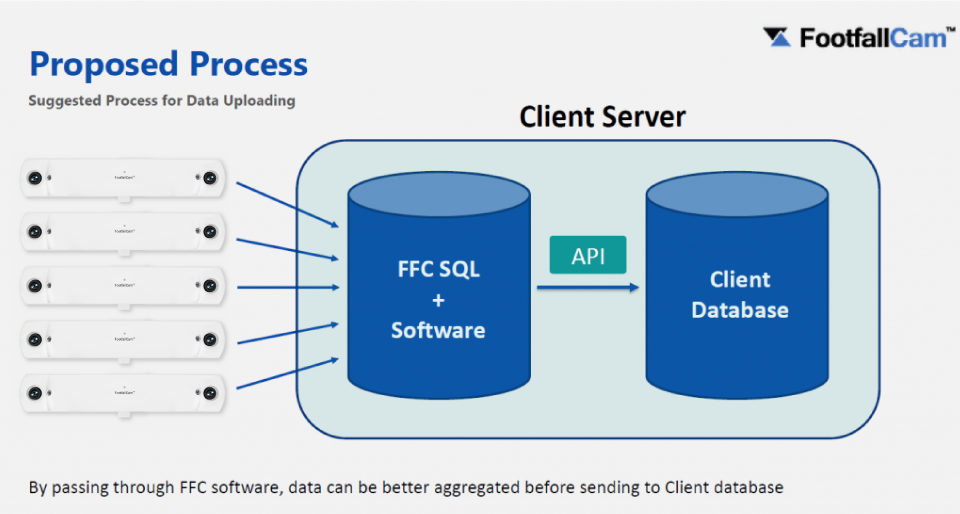
- Ensure the data collected is fully verified
- Ensure the branch level data collected has no missing data due to one of the counter offline
- Ensure the data is fully uploaded to the server and get the complete set to compare with sales
conversion
Integration with Incumbent People Counter
User may choose to migrate historical data from incumbent device into FootfallCam Analytic Manager The process will take up to a week to generate reports based on the historical data.
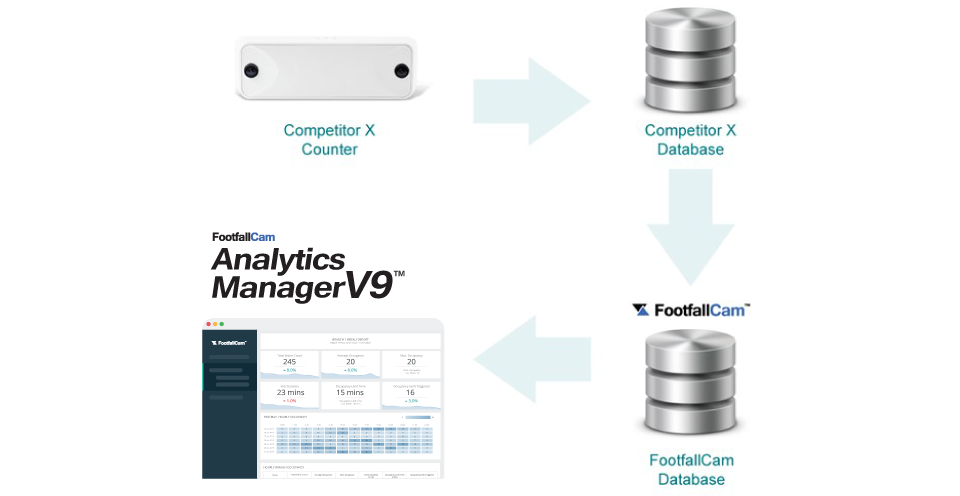
However, this function is currently not available for public release. If you would like to migrate your data from your existing people counter, please email to FootfallCam Sales Team.
Data Retrieve
FootfallCam is a fully embedded software module, intended for any environment where store footfall counting is required. Business intelligence (BI) system extracts and analyses footfall data (from FootfallCam central server) together with ePOS data or staff labour hours (from retailer's ePOS system or staff management system) to produce management report for corporate strategic planning. By default, user able to obtain footfall data directly from counter or server via several types of methods which are listed as below:
Retrieve Data via API from device
STEP 1 - Generate URL: http://[insert Internal IP]/cgi-bin/access_token.cgi?username=[insert Username] &password=[insert Password]
Video link on how to generate access token : https://youtu.be/emDf1yAZhPk
| Item | Description |
| Internal IP | Retrieve the Internal IP.
(Info: For more information on Internal IP, please refer to Section 6.2.) |
| Username | admin
(Info: Case sensitive.) |
| Password | (Info: Same password used to login to Counter Setup Wizard, therefore it is counter-dependent. NOT the password used to login to counter Wi-Fi) |
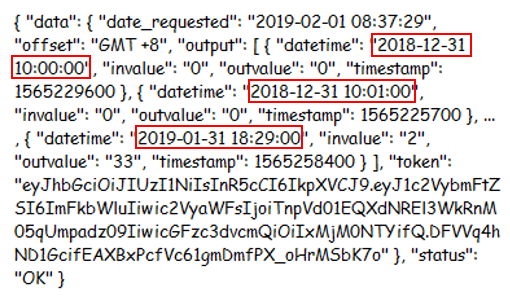
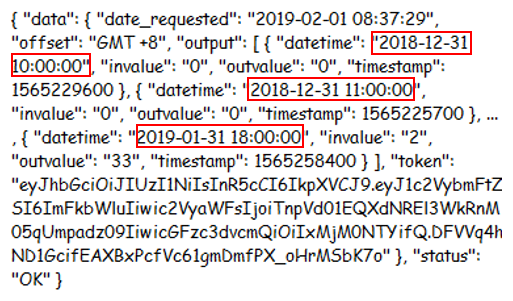
STEP 2 - Run the URL and access token received will be shown as below.
| URL | Output |
| http://192.168.2.123/cgi-bin/access_token.cgi?username=admin&password=[password] | 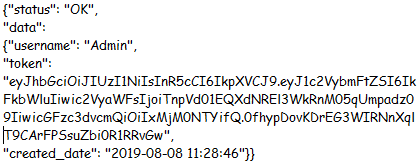 |
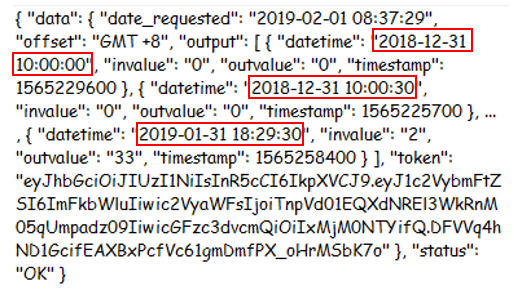
STEP 3 - Retrieve data using access token received. Generate URL with the selected parameter listed as below: http://[insert Internal IP]/cgi-bin/apiCount_cgi?data_type=[insert Data Type]&data_format=[insert Data Format]&resolution_min=[insert Resolution Minutes]&date_start=[insert Date Start]&date_end=[insert Date End]&time_start=[insert Time Start]&time_end= [insert Time End]&access_token=[insert Token]
| Parameter | Description | Value | Sample |
| Data Type | Type of the data. | json, xml | data_type=xml |
| Data Format | Format of the data. | hour, minute, second | data_format=second |
| Resolution Minutes | The minutes data's resolution. | 1, 5, 10, 15, 30, 60 | resolution_min=15 |
| Resolution Second | The second data's resolution. | 1, 5, 10, 15, 30, 60 | resolution_sec=1 |
| Date Start | Start date of the data. | YYYYMMDD | date_start=20181231 |
| Date End | End date of the data. | YYYYMMDD | date_end=20190131 |
| Time Start | To set the start time range of the API | HHmmss | time_start=103000 |
| Time End | To set the end time range of the API | HHmmss | time_end=223300 |
Retrieve Data via API From Analytic Manager
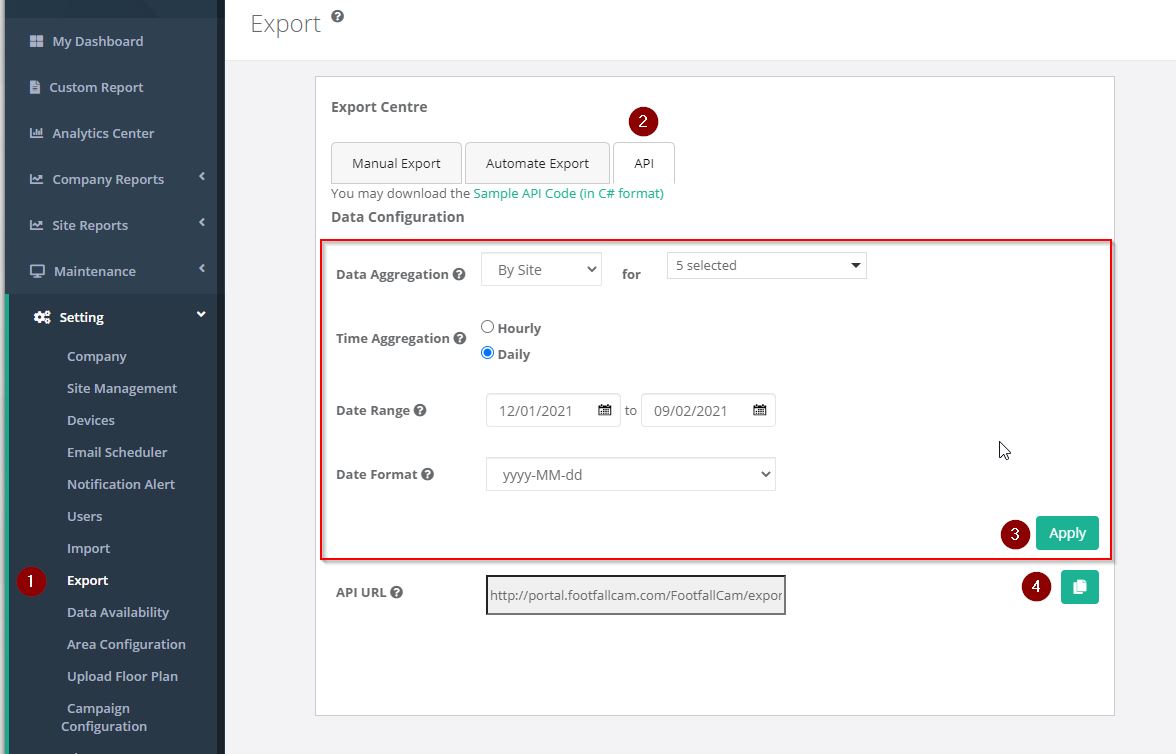
STEP 1 - Login Analytic manager and navigate to export page from left side navigation bar Setting > Export
STEP 2 - Select API tab
STEP 3 - Select desired export options for each fields and click Apply
| Item | Description |
| Data Aggregation | Select types of data (Counter level or Site level) to be exported. It will then further populate the drop down list by counters or by sites. |
| Time Aggregation | Select hourly or daily aggregated data to be exported |
| Date Range | Start and end date of data to be exported. May manually adjust 'fromdate' and 'todate' in generated URL for easier integration. |
| Date Format | Date format used in CSV/Excel/TXT export file |
STEP 4 - Click Copy button to copy the URL for exporting data based on selected fields. Some parameters may adjust manually in URL (e.g: 'fromdate' and 'todate').
Retrieve Live Data via WebSocket
WebSocket Client
With this module, counting data is able to be sent to your websocket server as it happens. Please consult your IT Technician if it is possible to set up a websocket server to receive our live counting data.
For this to be set up, there are several requirements:
Setting up the Websocket Module
|
Requirement |
|
|
Websocket Server Address |
Data MUST be acknowledged with OK upon receiving them, otherwise, FootfallCam counter will assume the sending has failed and keep re-sending the same data. |
|
Basic Authentication (Optional) |
Username and Password |
In your Counter's Control Panel, navigate to the Settings tab and scroll down to find 'Websocket Module'.
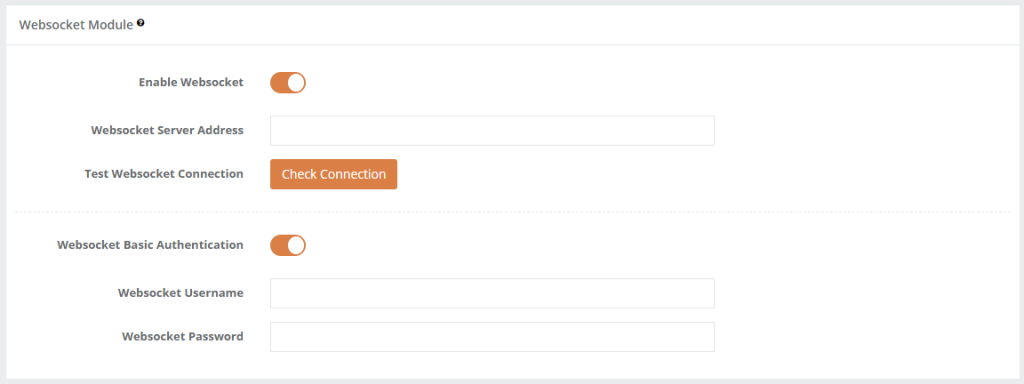
Once enabled, you can fill in your Websocket Address in the field provided. If Basic Authentication is enabled in your Server, you may toggle the option and fill in the details. Otherwise, this option is optional.
Every time the setting is changed, Check Connection must be clicked before saving it to allow the Counter to test the connection.
- The Websocket Server should receive a JSON test data with the topic 'generic-test-topic'.
- The Websocket Server must return "OK".
Websocket Module: Data Explanation
|
Parameter |
Description |
Value |
|
Topic |
Name of the payload which IN / OUT data will send to server. |
ffc-eventrawdata |
|
CameraSerial |
Unique ID. (Info: You may obtain the CameraSerial by getting the Chipset Code from Home page.) |
00000000xxxxxxxx |
|
EventStartUTCTime |
Start of Event in UTC Timezone. |
YYYY-MM-DD HH:MM:SS |
|
EventEndUTCTime |
End of Event in UTC Timezone. |
YYYY-MM-DD HH:MM:SS |
|
EventStartTime |
Event Start Time in Linux Timestamp |
YYYY-MM-DD HH:MM:SS |
|
EventEndTime |
Event End Time in Linux Timestamp |
YYYY-MM-DD HH:MM:SS |
|
EventStartLocalTime |
Event Start in Local Time. |
YYYY-MM-DD HH:MM:SS |
|
EventEndLocalTime |
Event End in Local Time. |
YYYY-MM-DD HH:MM:SS |
|
UploadedUTCDateTime |
UTC Time of when the Data is published to be sent. |
YYYY-MM-DD HH:MM:SS |
|
UploadedLocalDateTime |
Local Time of when the Data is published to be sent. |
YYYY-MM-DD HH:MM:SS |
|
MetricId |
To indicates kind of event triggered such as Value IN or Value Out. |
1 = ValueIN 2 = ValueOut |
|
PeopleTypeId |
To indicate which kind of people were detected. |
1 = Visitor 2 = Staff |
|
Roild |
Temporarily ONLY for Internal Use. |
N / A |
|
PeopleId |
To indicate the people are being tracked. Example, multiple people will be indicate with different IDs. |
numeric |
| Sample 1 - Value IN Data |
| {'Topic': 'ffc-eventrawdata', 'Data': {'EventStartUTCTime': '2020-06-17 03:16:41', 'EventEndLocalTime': '2020-06-17 11:16:41', 'EventStartTime': 1592363801, 'MetricId': 1, 'RoiId': 1, 'CameraSerial': '000000006afce315', 'PeopleId': 1, 'EventEndUTCTime': '2020-06-17 03:16:41', 'UploadedLocalDateTime': '2020-06-17 11:16:45', 'EventEndTime': 1592363801, 'EventStartLocalTime': '2020-06-17 11:16:41', 'UploadedUTCDateTime': '2020-06-17 03:16:45', 'PeopleTypeId': 1}} |
| Sample 2 - Value OUT Data |
| {'Topic': 'ffc-eventrawdata', 'Data': {'EventStartUTCTime': '2020-06-17 03:20:18', 'EventEndLocalTime': '2020-06-17 11:20:18', 'EventStartTime': 1592364018, 'MetricId': 2, 'RoiId': 1, 'CameraSerial': '000000006afce315', 'PeopleId': 1, 'EventEndUTCTime': '2020-06-17 03:20:18', 'UploadedLocalDateTime': '2020-06-17 11:20:21', 'EventEndTime': 1592364018, 'EventStartLocalTime': '2020-06-17 11:20:18', 'UploadedUTCDateTime': '2020-06-17 03:20:21', 'PeopleTypeId': 1}} |
Retrieve Data via Data Integration Tool
Download Link (Supports Windows 64-bit devices only)
Build/Send Query
STEP 1 - Select the API Type (Authentication/Hourly Data/Minutes Data/Seconds Data/Most Recent 60 Seconds Data).
STEP 2 - Fill in required fields accordingly.
STEP 3 - Click the Copy icon to copy Query, or the Send Query button to send Request.
Copy Code Snippets
STEP 1 - Select the API Type (Authentication/Hourly Data/Minutes Data/Seconds Data/Most Recent 60 Seconds Data).
STEP 2 - Fill in required fields accordingly.
STEP 3 - Select Language.
STEP 4 - Click the Copy icon to copy Code Snippet.
Link Counter to Local WebSocket Server
STEP 1 - Click the Copy icon to copy Local WebSocket Address.
STEP 2 - Navigate to Counter Setup Wizard of the counter that you wish to test WebSocket connection in your web browser.
STEP 3 - Navigate to IT Settings page, then to WebSocket Module under Advanced IT Settings section.
STEP 4 - Toggle WebSocket to "ON".
STEP 5 - Paste into WebSocket Server Address text input.
STEP 6 - Click Test Connection button.
STEP 7 - Click Save button.
STEP 8 - You should be seeing IN/OUT data (Including test connection) displaying in Response in Data Integration Tool app.
Retrieve Data via FTP
FTP directly from counter
| Time of Output | Once per day |
| Minimum Resolution | Once per 1 minute |
| Data Presentation | By Counter level |
- Access to Portal -> Left Navigation Bar -> Settings -> Company page on the menu bar on the left
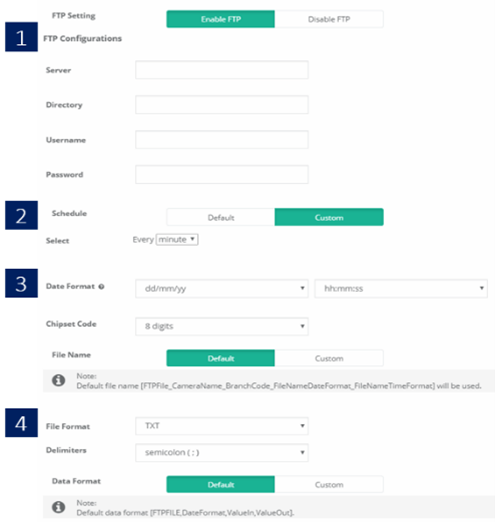
- Scroll to the Direct Export from Counter section in the newly landed page
- Click on the option of Enable FTP.
- Fill in the required details:
| Item | Description |
| 1. FTP configurations | FTP account details |
| 2. Schedule | How often should the data be exported |
| 3. Date Format | The date format that will appear on the data |
| 4. File name | Name of the exported file |
| 5. File format | Format of the exported file |
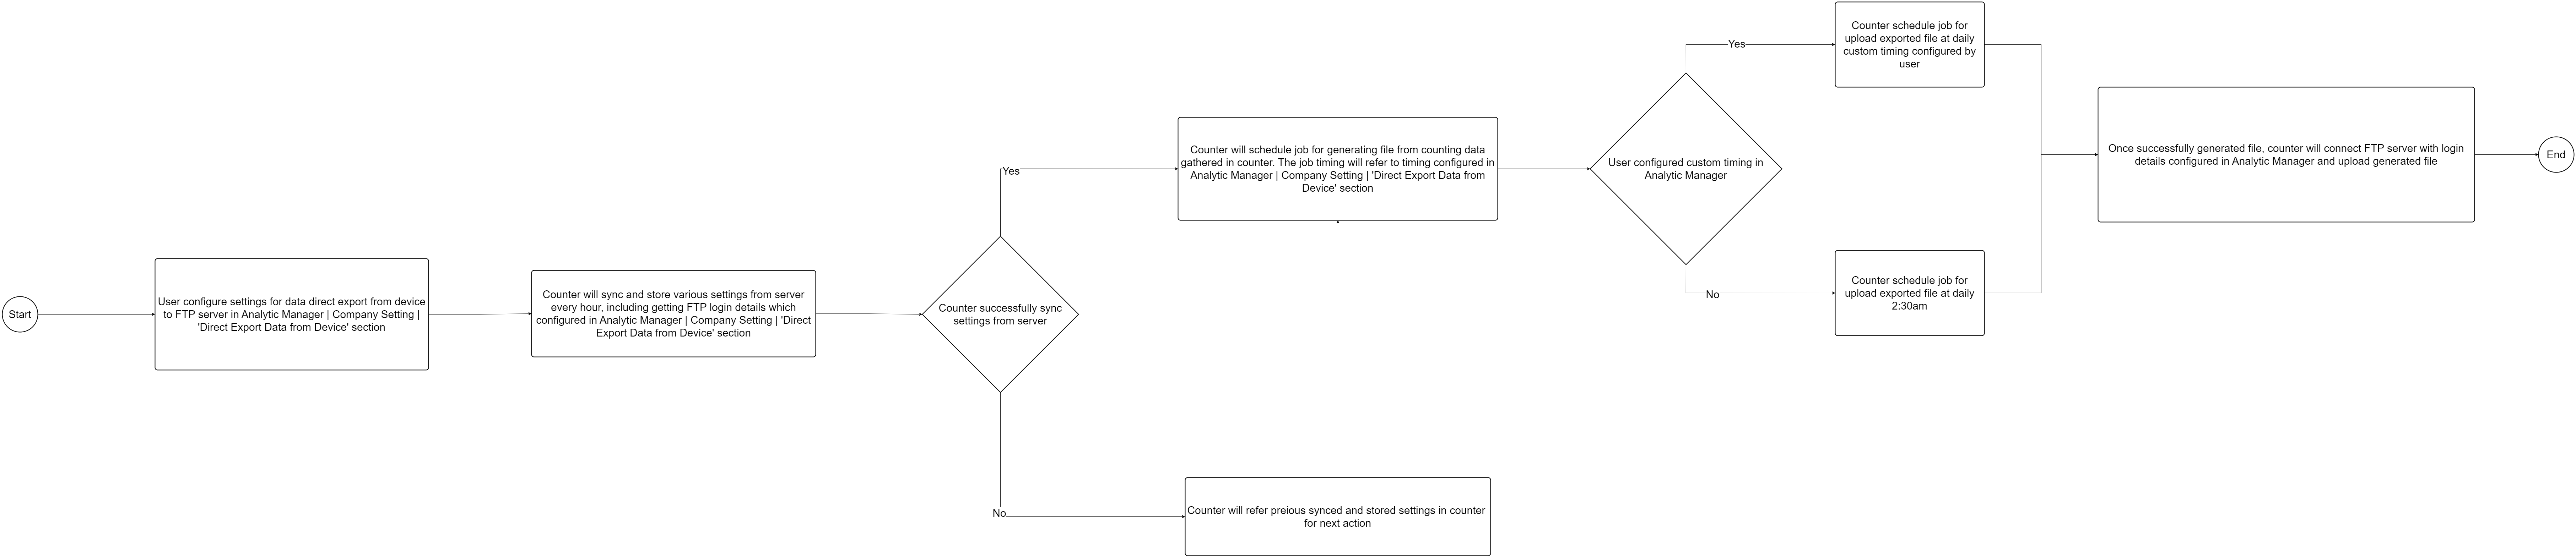
Overall process flow of FTP directly from counter
FTP push from Server
| Time of Output | Daily of Weekly |
| Minimum Resolution | 1 hour |
| Data Presentation | By Branch level |
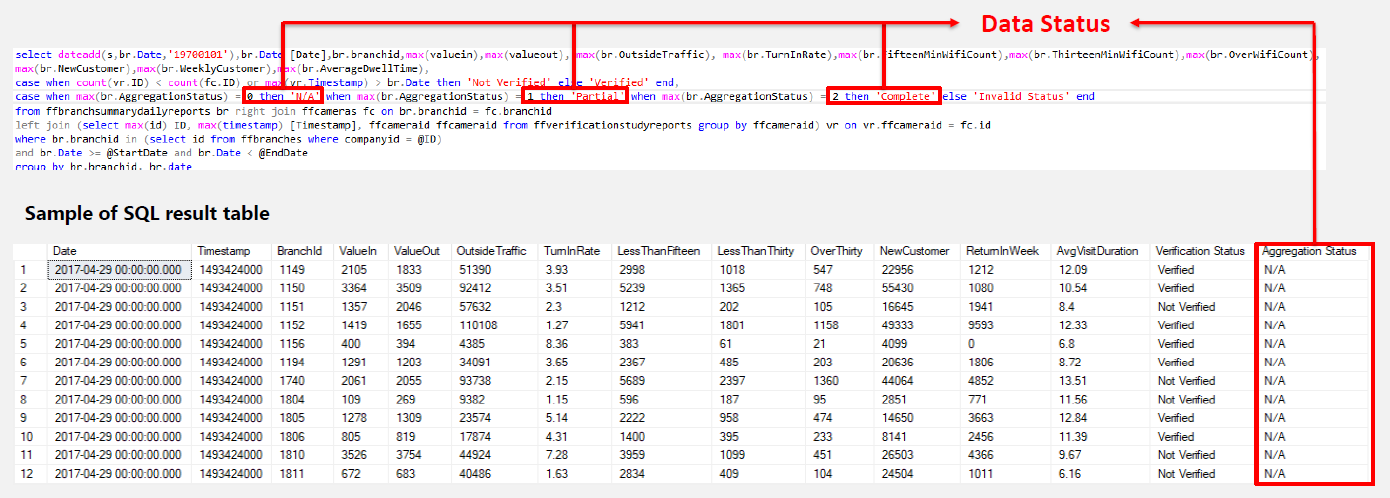
| Types of Data | IN and OUT values, Outside Traffic, Turn In Rate, Verification and Aggregation Status |
| Output format | .xlsx or .csv format |
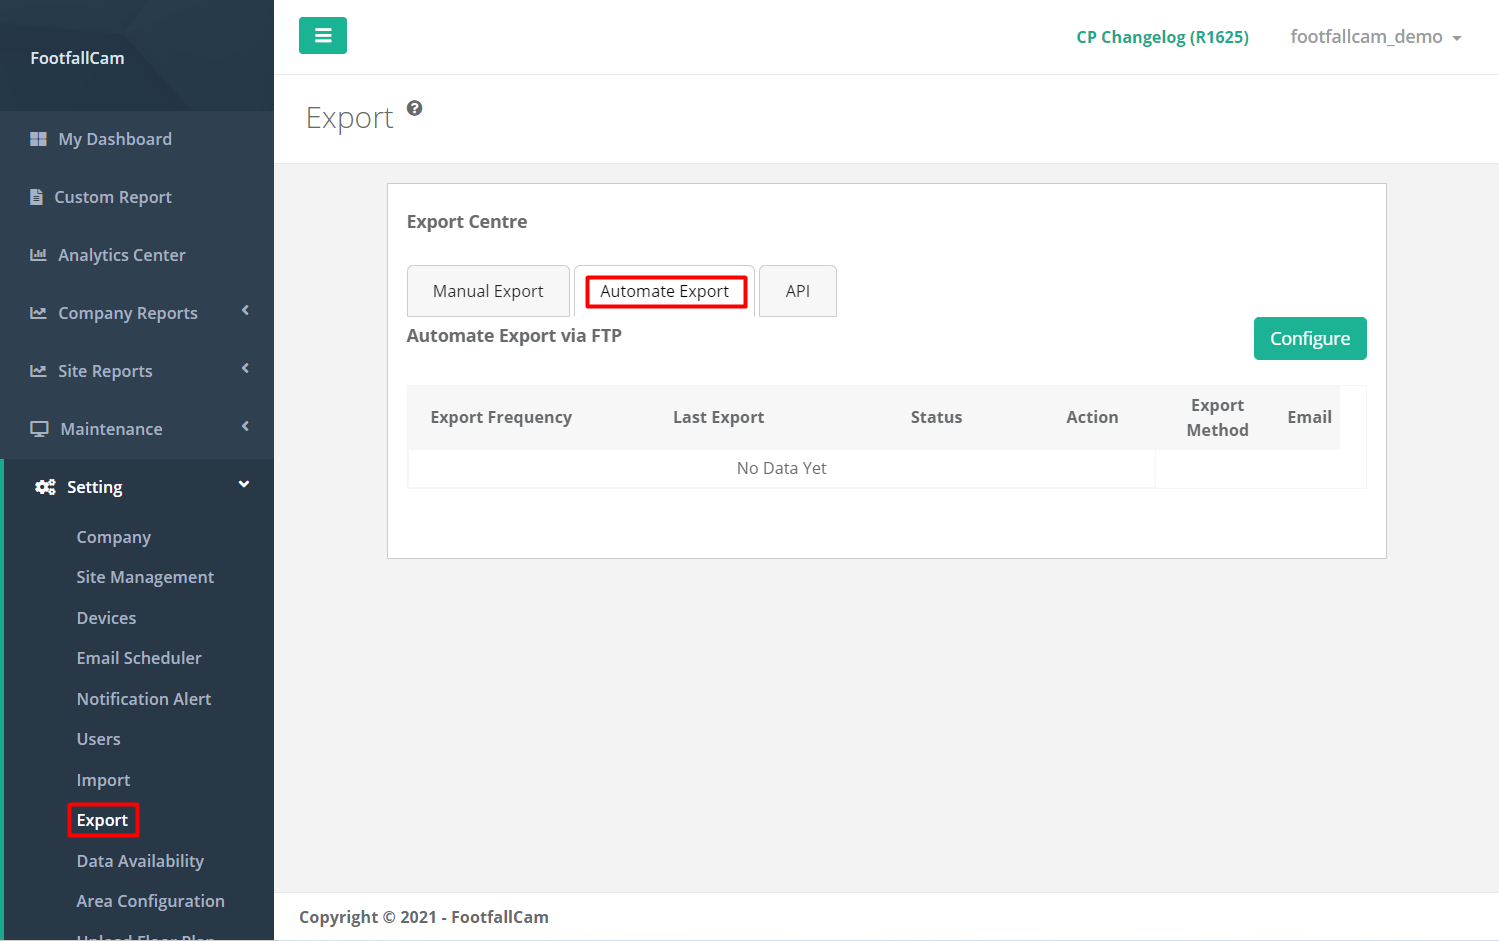
- Select Export Centre on the menu bar on the left
- Click on the tab Automate Export
- Click on Configure to create a new FTP schedule
- Fill in the details as required
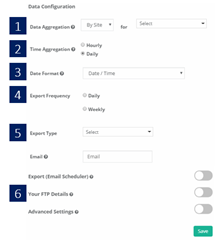
|
Item |
Description |
|
1. Data aggregation |
Level of data to export and which site should be exported |
|
2. Time aggregation |
Time frame of the data to be exported |
|
3. Date format |
Format of data that will be shown in the export file |
|
4. Export frequency |
Frequency of the export schedule |
|
5. Export type |
Select the file format to be exported |
|
6. FTP details |
Input your FTP account details |
Retrieve Data via MQTT
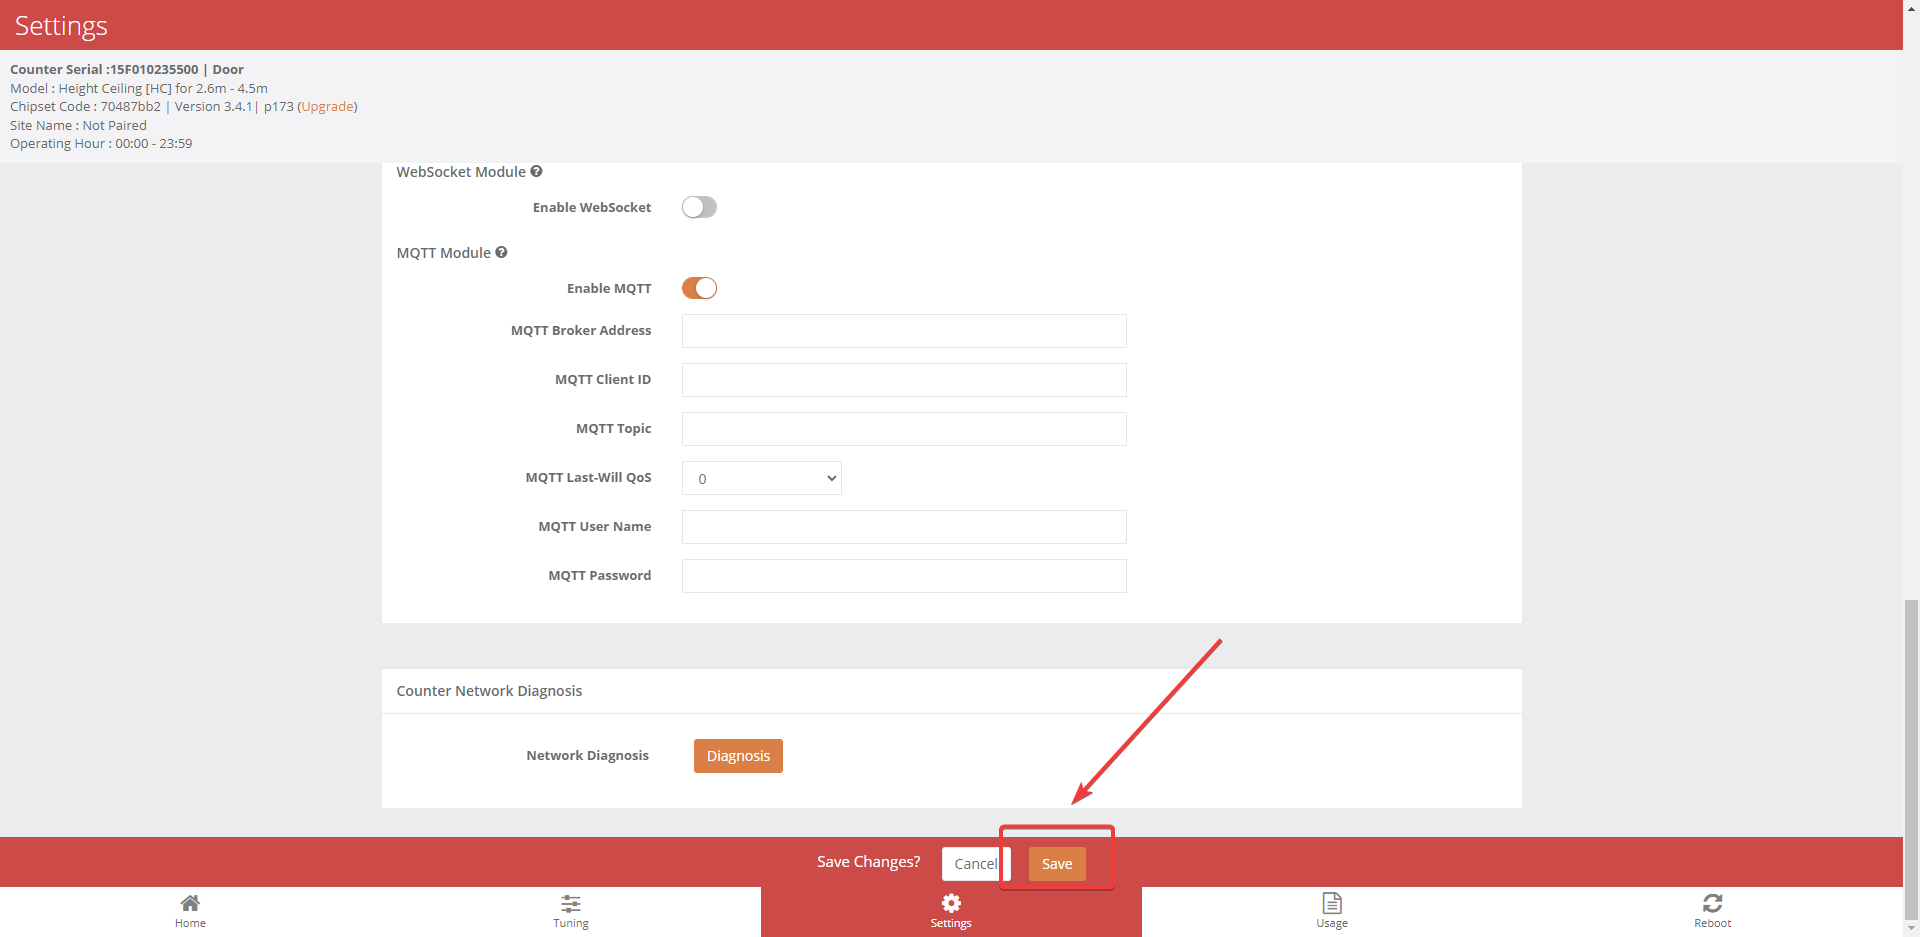
Settings up MQTT through counter setup wizard
STEP 1 - Once logged in into device, on home page click on settings to head to settings page.

STEP 2 - On Settings page. Open up Advanced IT Settings dropdown.

STEP 3 - Head Towards MQTT Module and click on Enable MQTT.

STEP 4 - Fill up necessary field and click 'Save' on Save Changes below.
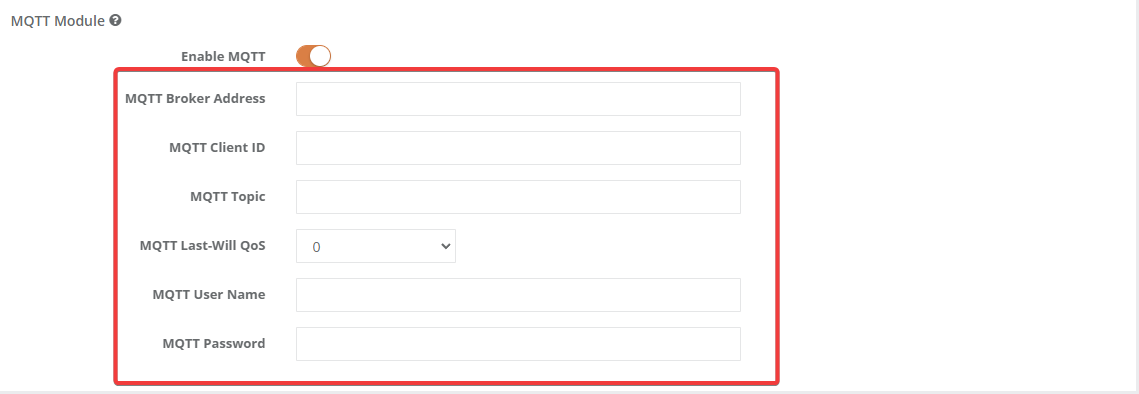
Example Configuration
| MQTT Broker Address |
mqtt://broker.hivemq.com:1883 or mqtt://your.broker.server.com:1883 |
|
MQTT Client ID |
client_123 #default is ChipSerial of device |
| MQTT Topic | your/topic #default setting is /status/{ChipSerial} |
| MQTT Last Will QoS |
0 #send and forget (currently only support this QoS) |
| MQTT User Name | #requires basic authentication to establish connection |
| MQTT Password | #requires basic authentication to establish connection |
| Sample 1 - Occupancy Data |
|
{
"RoiId": 1,
"CombineObjectTypeId": 1,
"ObjectCount": 0, # 1 for Occupied and 0 for None
"Timestamp": 1672889540, #UTCtime
"LocalTime": "2023-01-05 11:32:20",
"UTCTime": "2023-01-05 03:32:20",
"OccupancyTypeId": 1,
"ObjectCountUnit": 1,
"CameraSerial": "100000008c76409d"
}
|
| Sample 2 - Counting Data |
|
{
"CombineObjectTypeId": 11,
"EventEndLocalTime": "2022-11-25 04:47:49",
"EventEndTime": 1669351669,
"EventEndUTCTime": "2022-11-25 04:47:49",
"EventStartLocalTime": "2022-11-25 04:47:49",
"EventStartTime": 1669351669,
"EventStartUTCTime": "2022-11-25 04:47:49",
"MetricId": 2,
"PeopleId": 1,
"PeopleTypeId": 1,
"RoiId": 1,
"CameraSerial": "000000007b77a260"
}
|
Retrieve Data via Bacnet
STEP 1 - Connect FFC device to Bacnet Router.
STEP 2 - Connect Computer to same network as FFC device.
STEP 3 - Configure FFC device's ip address through counter setup wizard.
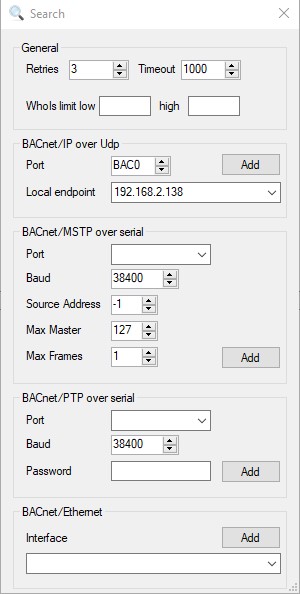
STEP 4 - Connect computer/master device to Bacnet network with BAC0 protocol and Port 47808.
Example Setting to connect using YABE software
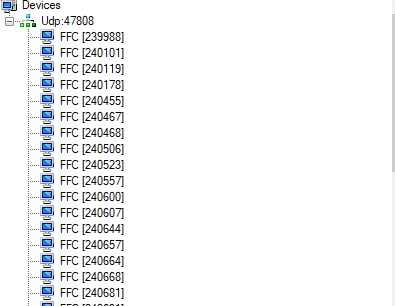
STEP 5 - Get data from device's properties with device's name FFC and device's ID with last six digits of company serial.
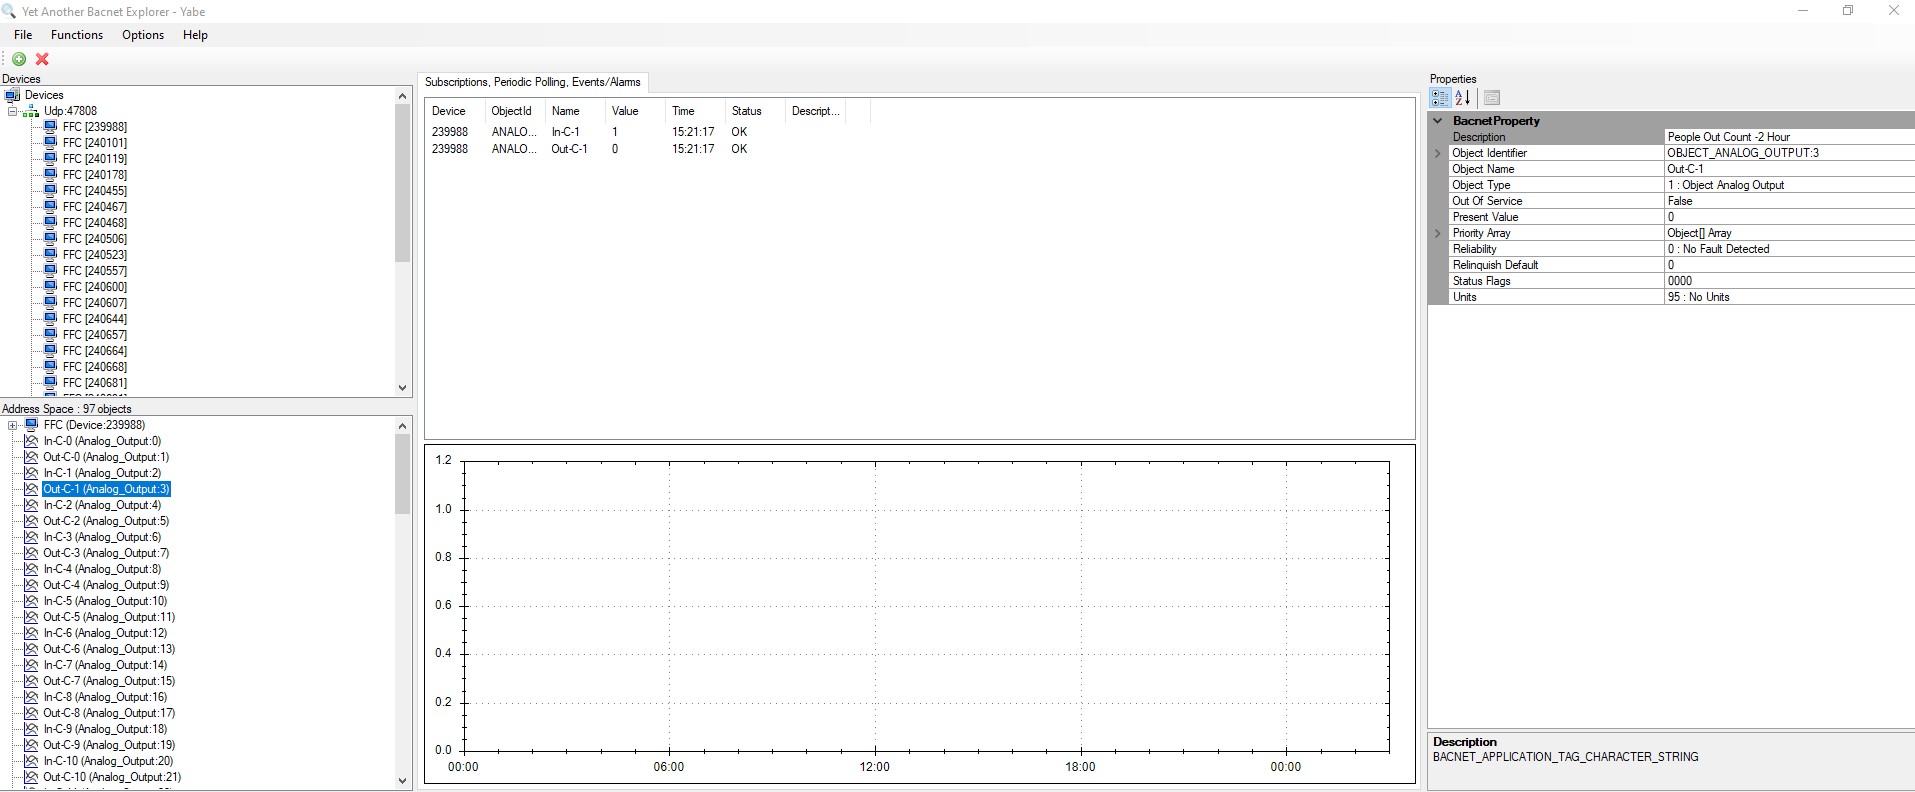
Example display of connected device using Bacnet
After the device connected to Bacnet network, the counting data were inside properties. And there are two type of data which is In-C-X and Out-C-X. In-C-X and Out-C-X which represented In count and Out count, and X represented current hour - X hours. There are total 96 data which represent last 48 hours in and out count for the devices.
Retrieve Data via SQL
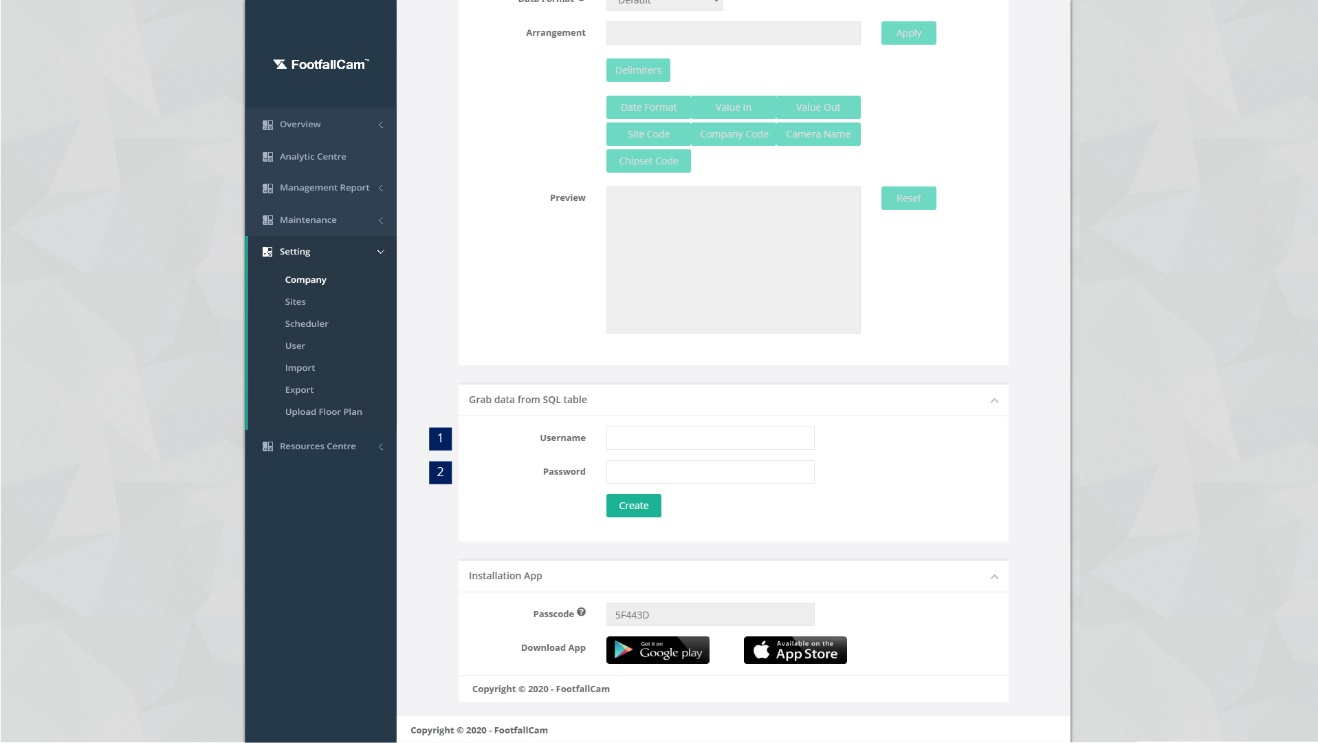
STEP 1 - Click on Setting > Company to access the Control Panel Setting page.
STEP 2 - Navigate to section Grab Data from SQL Table.
STEP 3 - Complete the process by entering all the required fields and click on Create button.
| Item | Description |
| 1. Username | Username used to access FootfallCam Analytic Manager V9™. |
| 2. Password | Password used to access FootfallCam Database Server. |
Example updated on 2021-02-25:
| Analytic Manager UserName | Analytic Manager Password | SQL Server UserName | SQL Server Password |
| abc | 123 | xyz | 789 |
| Old approach : Select * from functionName ('abc', '123'); Exec functionName ('abc', '123'); |
|||
| New approach : Select * from functionName ('abc', '789'); Exec functionName ('abc', '789'); |
|||
Note: Password '789' is only example password. For security concern, it's encourage user to set a complicated pattern set.
| Sample 1 - How to get Counter List | |
| Description | To retrieve counter list and site info include ID, CameraName, IP, Port, Serial. |
| Function Name | GetCounterByBranch |
| Data Params | Username [nvarchar]; Password [nvarchar]; Branchid[bigint] |
| Sample SQL | SELECT * FROM GetCounterByBranch('username', 'password', 37); |
| Sample Result |  |
| Sample 2 - How to get Site List | |
| Description | To retrieve site list and site info include BranchCode, BranchName, Region, City, Country, StoreType, Latitude, Longitude and Floorsize. |
| Function Name | GetBranchList |
| Data Params | Username [nvarchar]; Password [nvarchar] |
| Sample SQL | SELECT * FROM GetBranchList('username','password'); |
| Sample Result | 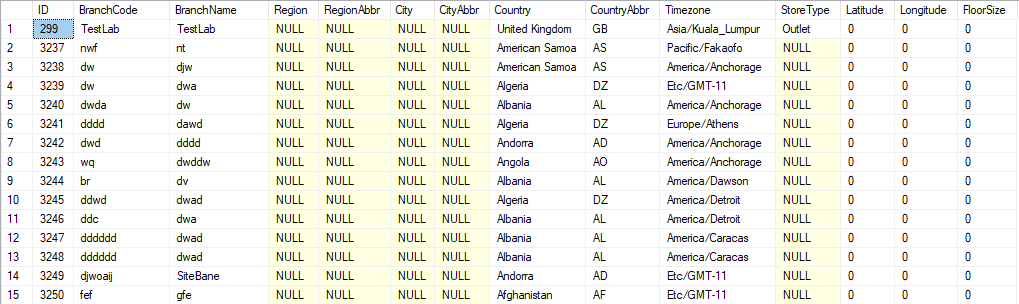 |
| Sample 3 - How to get Hourly Counting data by Site | |
| Description | To retrieve site hourly counting data include Branchid, ValueIn, ValueOut, OutsideTraffic, TurnInRate. |
| Function Name | GetBranchHourly |
| Data Params | Username [nvarchar]; Password [nvarchar]; BranchCode [bigint]; StartDate [datetime]; EndDate [datetime] |
| Sample SQL | SELECT * FROM GetBranchHourly('username', 'password', -1, '20150320', '20150321'); |
| Note | -1 refer to the company which means all site(s). |
| Sample Result | 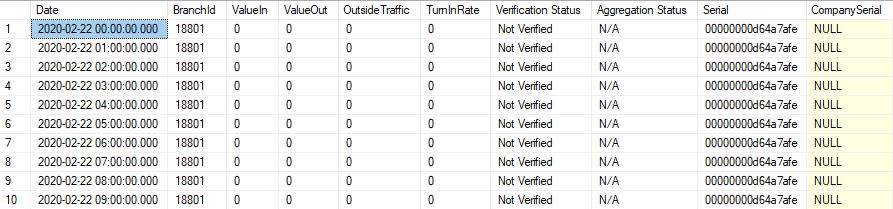 |
| Sample 4 - How to get Daily Counting data by Site | |
| Description | To retrieve site daily counting data include Branchid, ValueIn, ValueOut, OutsideTraffic, TurnInRate. |
| Function Name | GetBranchHourly |
| Data Params | Username [nvarchar]; Password [nvarchar]; BranchCode [bigint]; StartDate [datetime]; EndDate [datetime] |
| Sample SQL | SELECT * FROM GetBranchDailySummary('username', 'password', 410, '20140120', '20140121'); |
| Note | -1 refer to the company which means all site(s). |
| Sample Result | 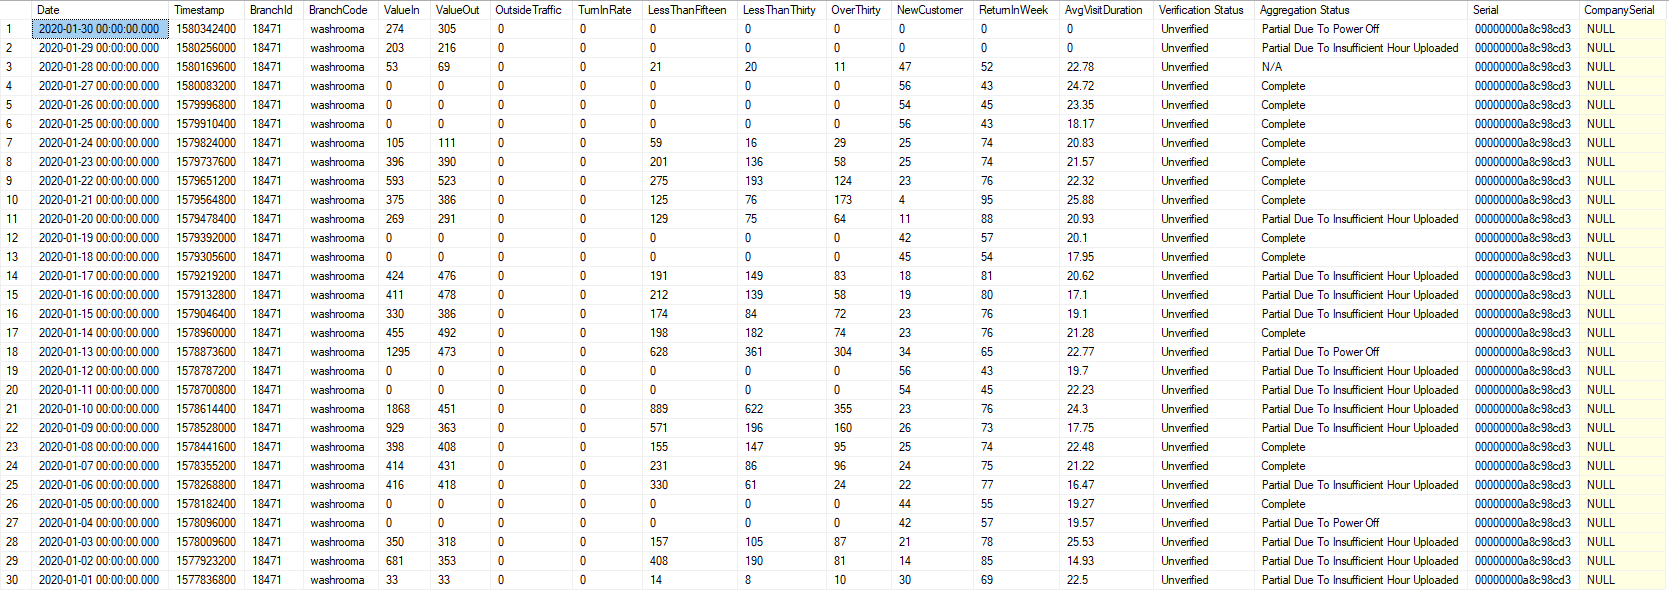 |
| Sample 5 - How to get Area List | |
| Description | To retrieve area list and area info include BranchId, BranchName, AreaId, AreaName, CameraId, CounterName, CompanySerial, CounterChipsetCode, LineName and Direction |
| Function Name | GetAreaConfiguration |
| Data Params | Username [nvarchar]; Password[ nvarchar]; BranchID [nvarchar] |
| Sample SQL | select * from GetAreaConfiguration('Username', 'Password', -1) |
| Note | -1 which means all site(s) in the company. |
| Sample Result |  |
| Sample 6 - How to get Hourly Counting data by Area | |
| Description | To retrieve area hourly counting data include AreaId, AreaName, ValueDateTime, ValueIn, ValueOut |
| Function Name | GetAreaHourly |
| Data Params | UserName [nvarchar]; Password [nvarchar]; AreaID [nvarchar]; StartDate [datetime]; EndDate [datetime] |
| Sample SQL | select * from GetAreaHourly('Username', 'Password', -1, '2021-01-13 00:00:00.000','2021-01-14 00:00:00.000') |
| Note | -1 which means all area(s) in the company. |
| Sample Result | 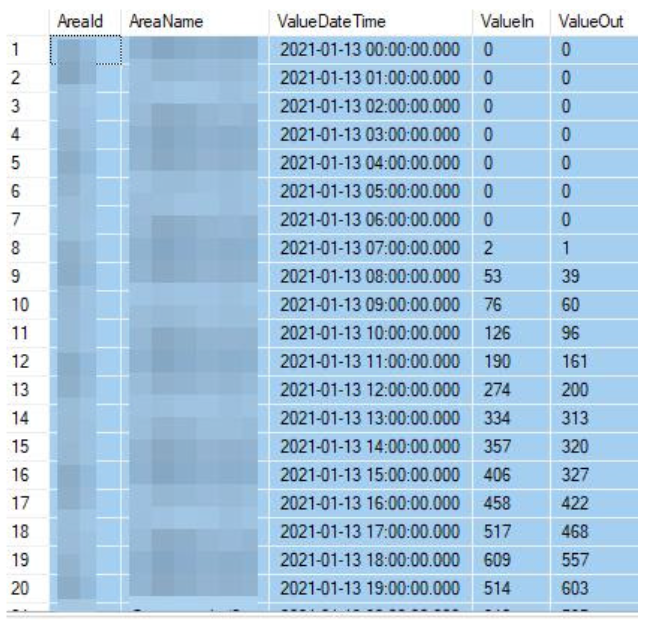 |
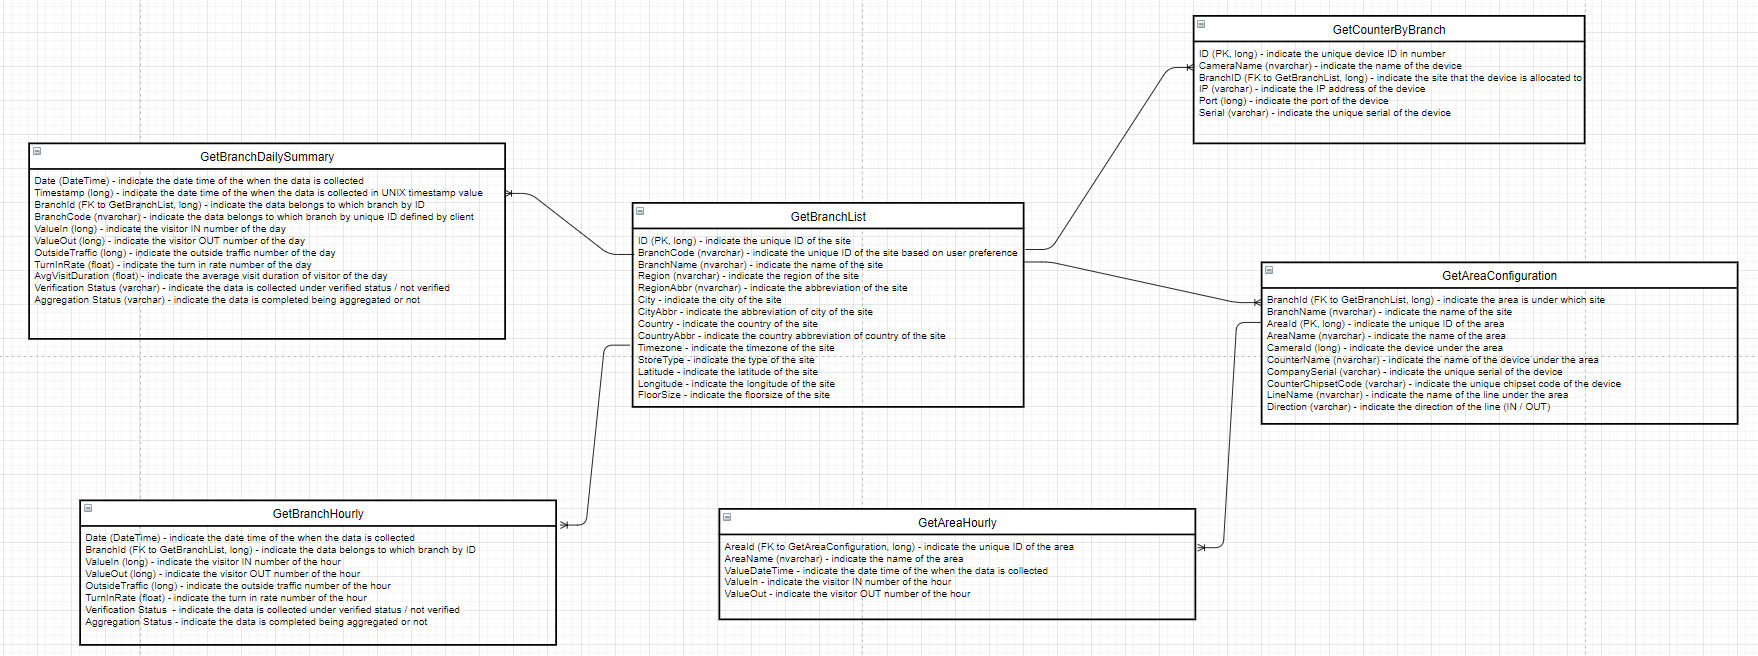
Schema
Retrieve Data via PostgreSQL
| Sample 1 - How to get Site Group Daily Data by Site Group | |
| Description | To retrieve site group daily data by site group. |
| Function Name | sitegroup_footfallcounting_day |
| Sample SQL | SELECT Time, FC01_1_SUM, FC02_1_SUM, SiteGroupName FROM sitegroup_footfallcounting_day WHERE SiteGroupId = 'xxx' AND Time BETWEEN '2023-09-21' and '2023-09-26'; |
| Sample Result | 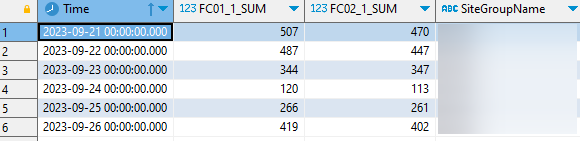 |
| Sample 2 - How to get Site Group Hourly Data by Site Group | |
| Description | To retrieve site group hourly data by site group. |
| Function Name | sitegroup_footfallcounting_hour |
| Sample SQL | SELECT Time, FC01_1_SUM, FC02_1_SUM, SiteGroupName FROM sitegroup_footfallcounting_hour WHERE SiteGroupId = 'xxx' AND Time BETWEEN '2023-09-21 00:00:00' and '2023-09-26 16:00:00'; |
| Sample Result | 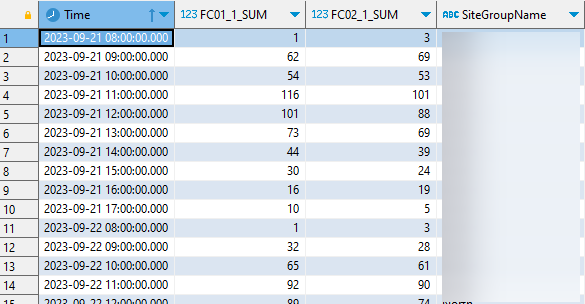 |
| Sample 3 - How to get Site Daily Data by Site Group | |
| Description | To retrieve site daily data by site group. |
| Function Name | sitegroup_footfallcounting_day |
| Sample SQL | SELECT Time, FC01_1_SUM, FC02_1_SUM, BranchName FROM sitegroup_footfallcounting_day WHERE SiteGroupId = 'xxx' AND Time BETWEEN '2023-09-21' and '2023-09-26'; |
| Sample Result | 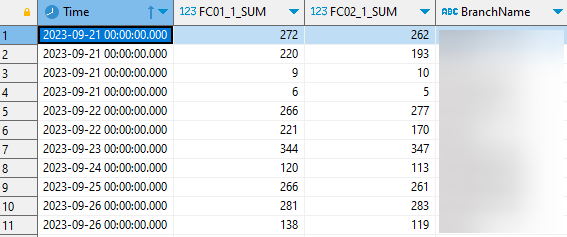 |
| Sample 4 - How to get Site Hourly Data by Site Group | |
| Description | To retrieve site hourly data by site group. |
| Function Name | sitegroup_footfallcounting_hour |
| Sample SQL | SELECT Time, FC01_1_SUM, FC02_1_SUM, BranchName FROM sitegroup_footfallcounting_hour WHERE SiteGroupId = 'xxx' AND Time BETWEEN '2023-09-21 00:00:00' and '2023-09-26 16:00:00'; |
| Sample Result | 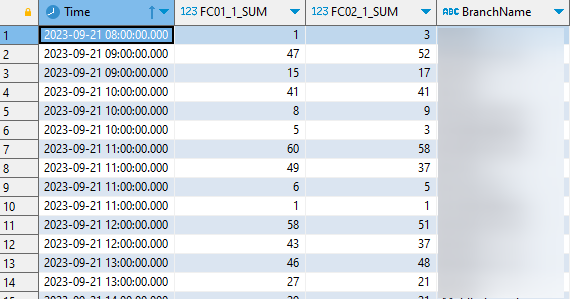 |
Retrieve Data by Manual Export Function
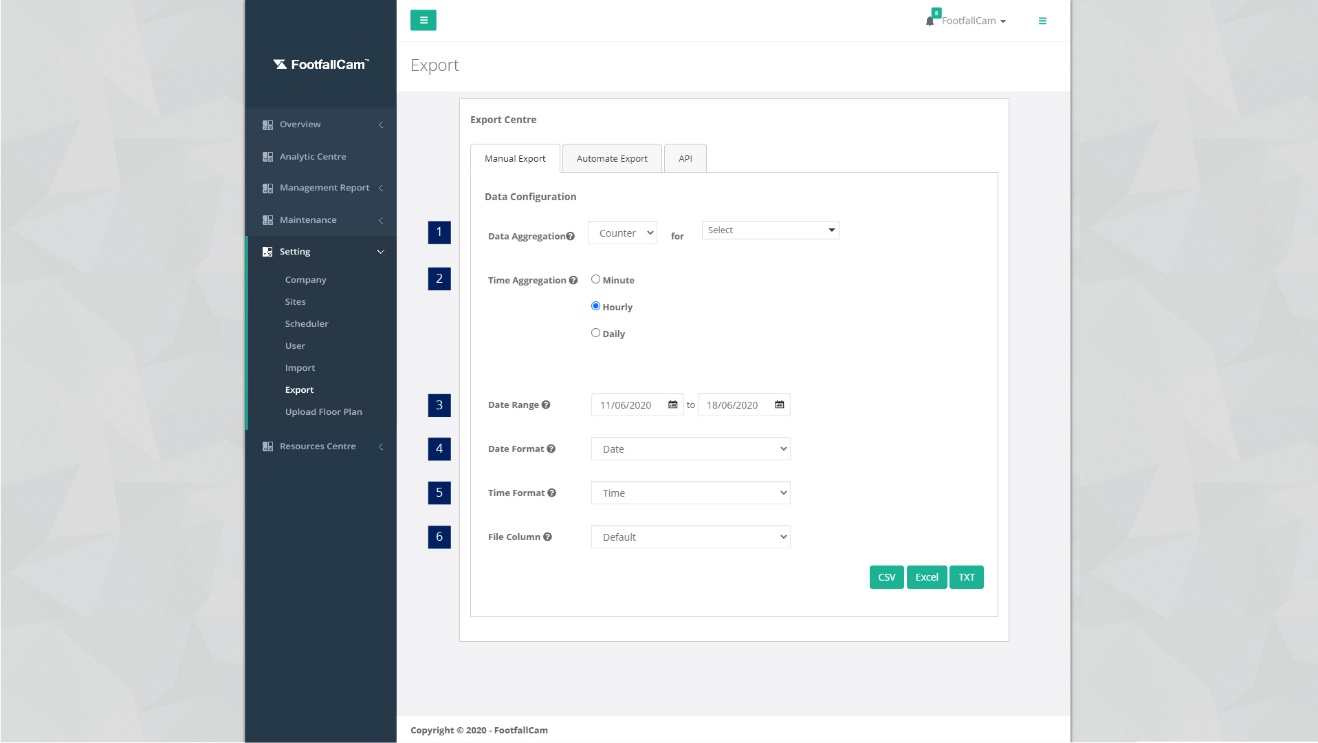
STEP 1 - Click on Setting > Export to access the Export page.
STEP 2 - Click on Manual Export tab to access the Manual Export tab.
STEP 3 - Complete the process by entering all the required fields and click on CSV / Excel / TXT button.
| Item | Description |
| 1. Data Aggregation | Select the site / counter. |
| 2. Time Aggregation | Select the length of data. |
| 3. Date Range | Select the start date and end date. |
| 4. Date Format | Select the format of the date. |
| 5. Time Format | Select the format of the time. |
| 6. File Column | Arrangement of column in download file. (Info: User able to re-organize the data column if user selected custom mode.) |
Different Metrics are available for a different combination of Data Aggregation and Time Aggregation.
- Data Aggregation: Site
Time Aggregation: Hourly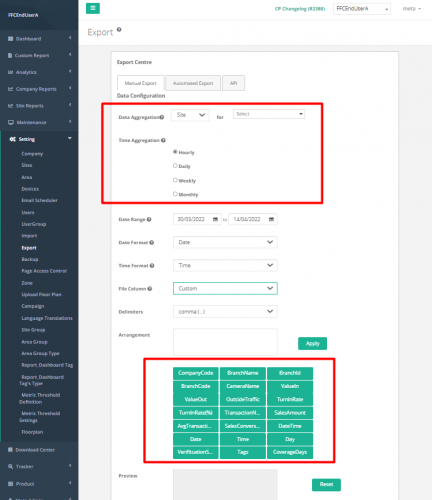
- Data Aggregation: Site
Time Aggregation: Daily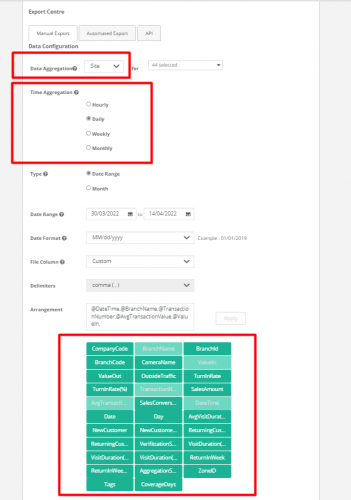


Retrieve Data by Auto Scheduled on Web Portal
Data can be schedule to auto generate and export to your email according to the frequency set. Below are the steps to configure the automated export setting.
STEP 1 - Click on Setting > Export to access the Export page.
STEP 2 - Click on Automate Export tab to access the Manual Export tab.
STEP 3 - Click on Configure button to access Configure Automate Export Setting page.
STEP 4 - Complete the process by entering all the required fields and click on Save button.
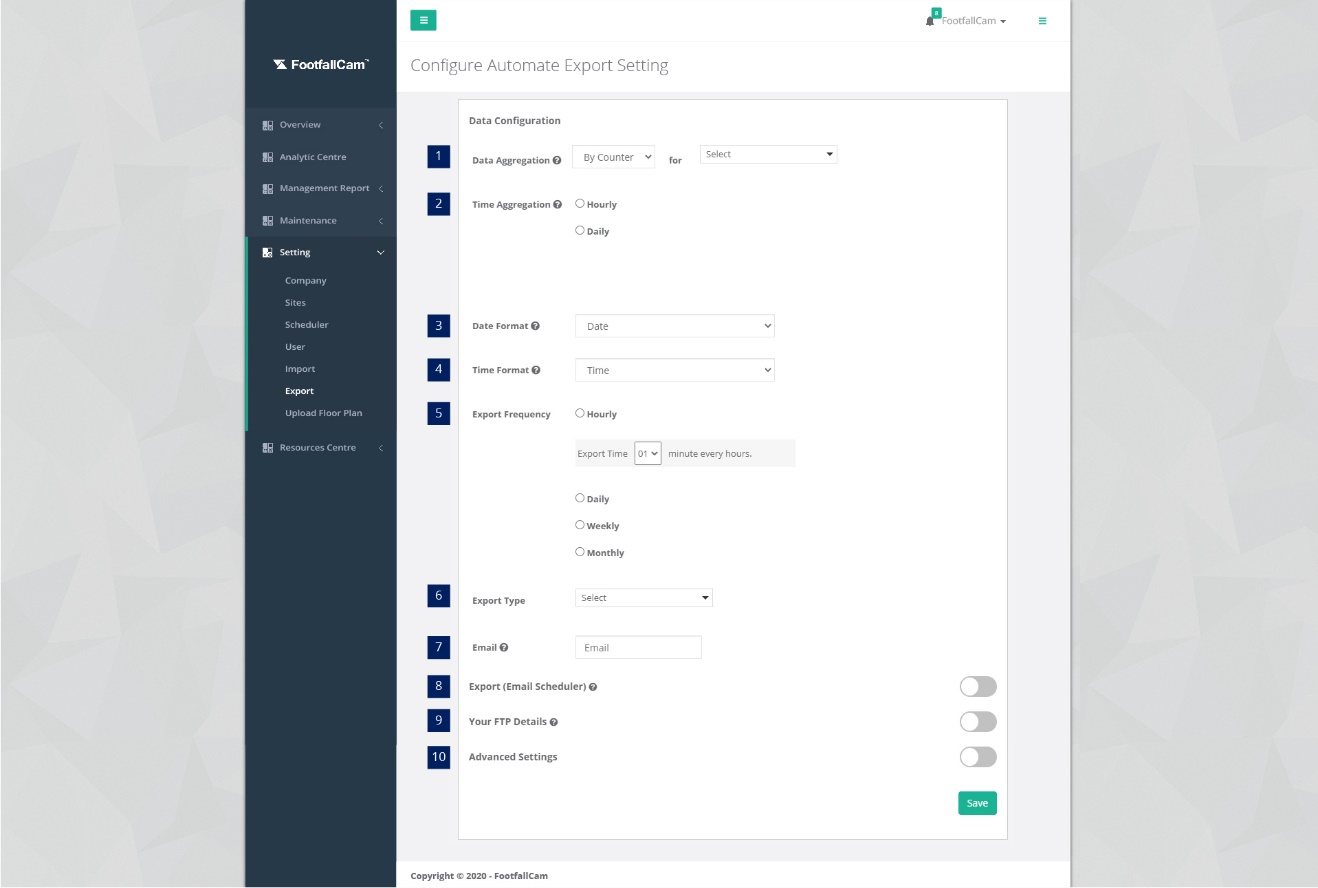
| Item | Description |
| 1. Data Aggregation | Select the site / counter. |
| 2. Time Aggregation | Select the length of data. |
| 3. Date Format | Select the format of the date. |
| 4. Time Format | Select the format of the time. |
| 5. Export Frequency | Select the export frequency. |
| 6. Export Type | Select the export format type. (Info: There are 3 export type: Excel , CSV , TXT) |
| 7. Email | Email address (Info: Notification will be sent to this email if the automated export is failed.) |
| 8. Export (Email scheduler) | Active schedule for export data email. |
| 9. Your FTP Details | FTP details to receive exported file. |
| 10. Advance Setting | Advance setting that included Encryption Mode and Connection Ty[e. |
Power BI Integration
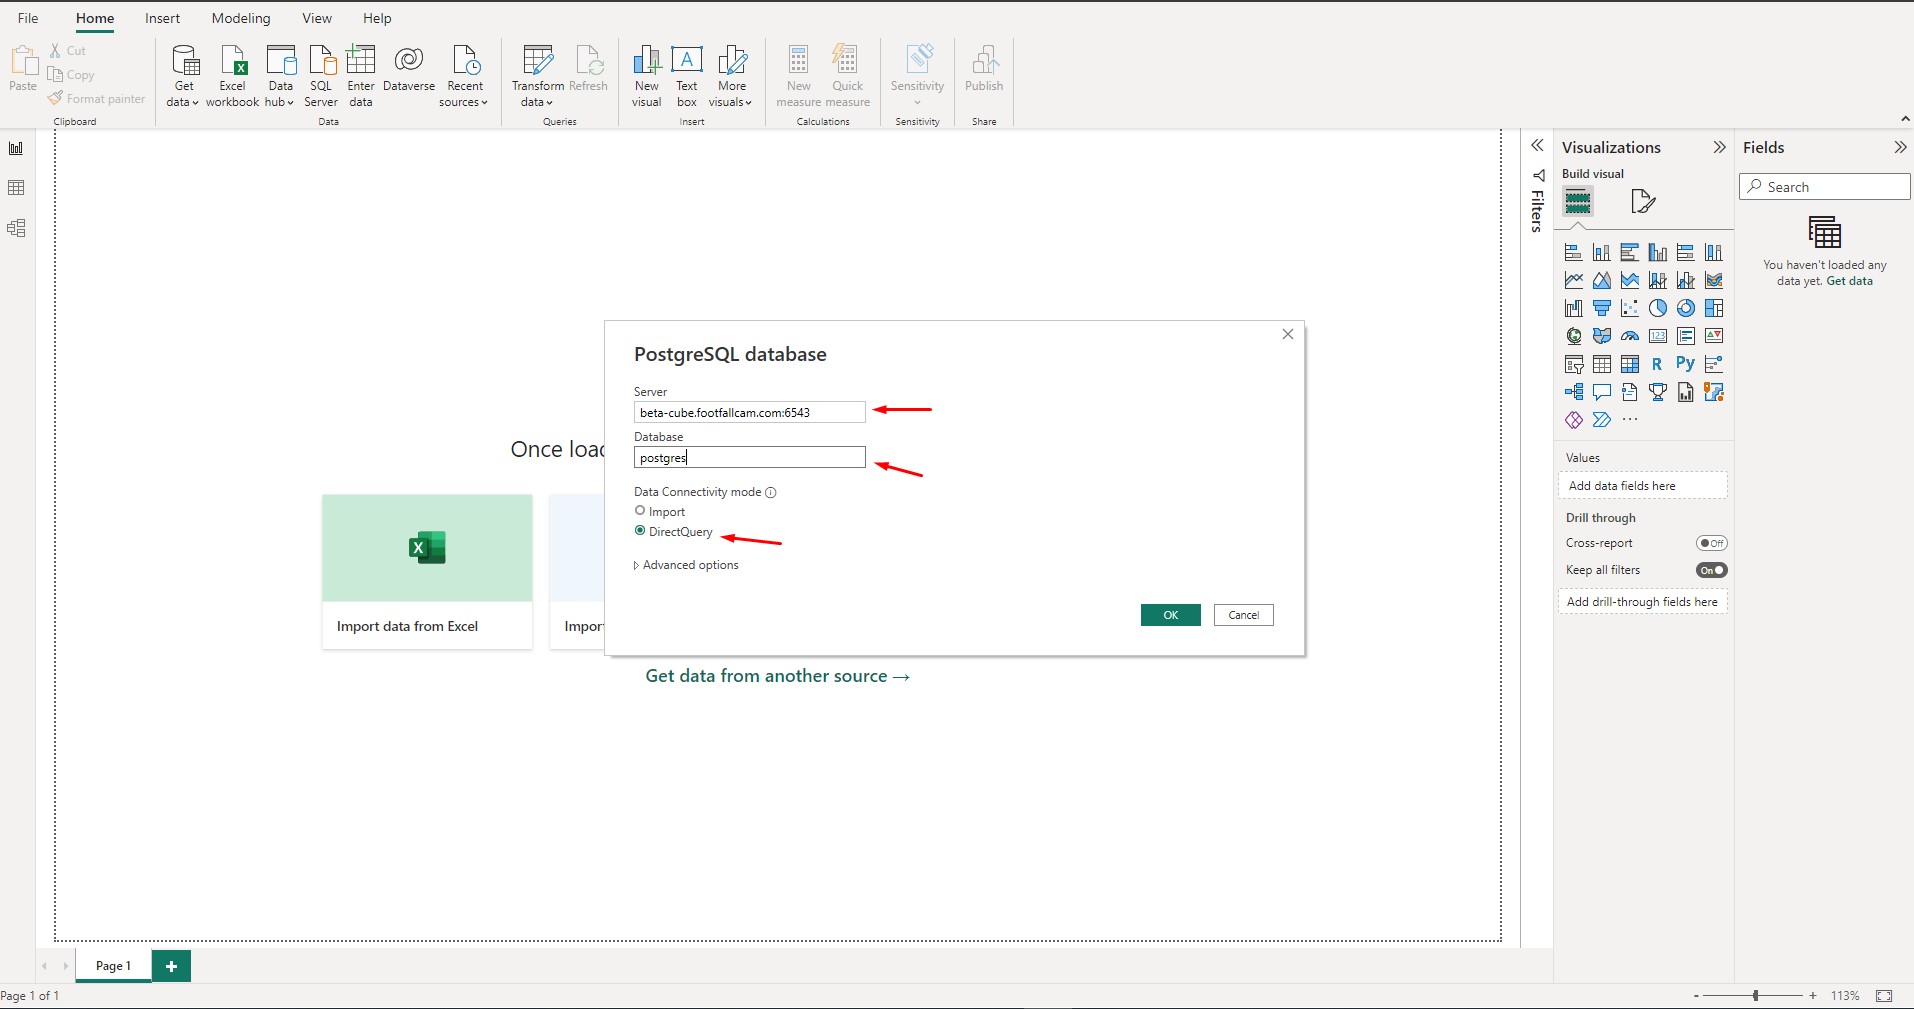
- Open Power BI and navigate to Get Data => Database => PostgreSQL database.
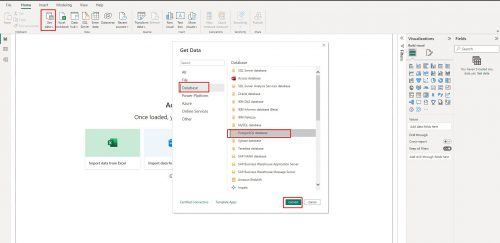
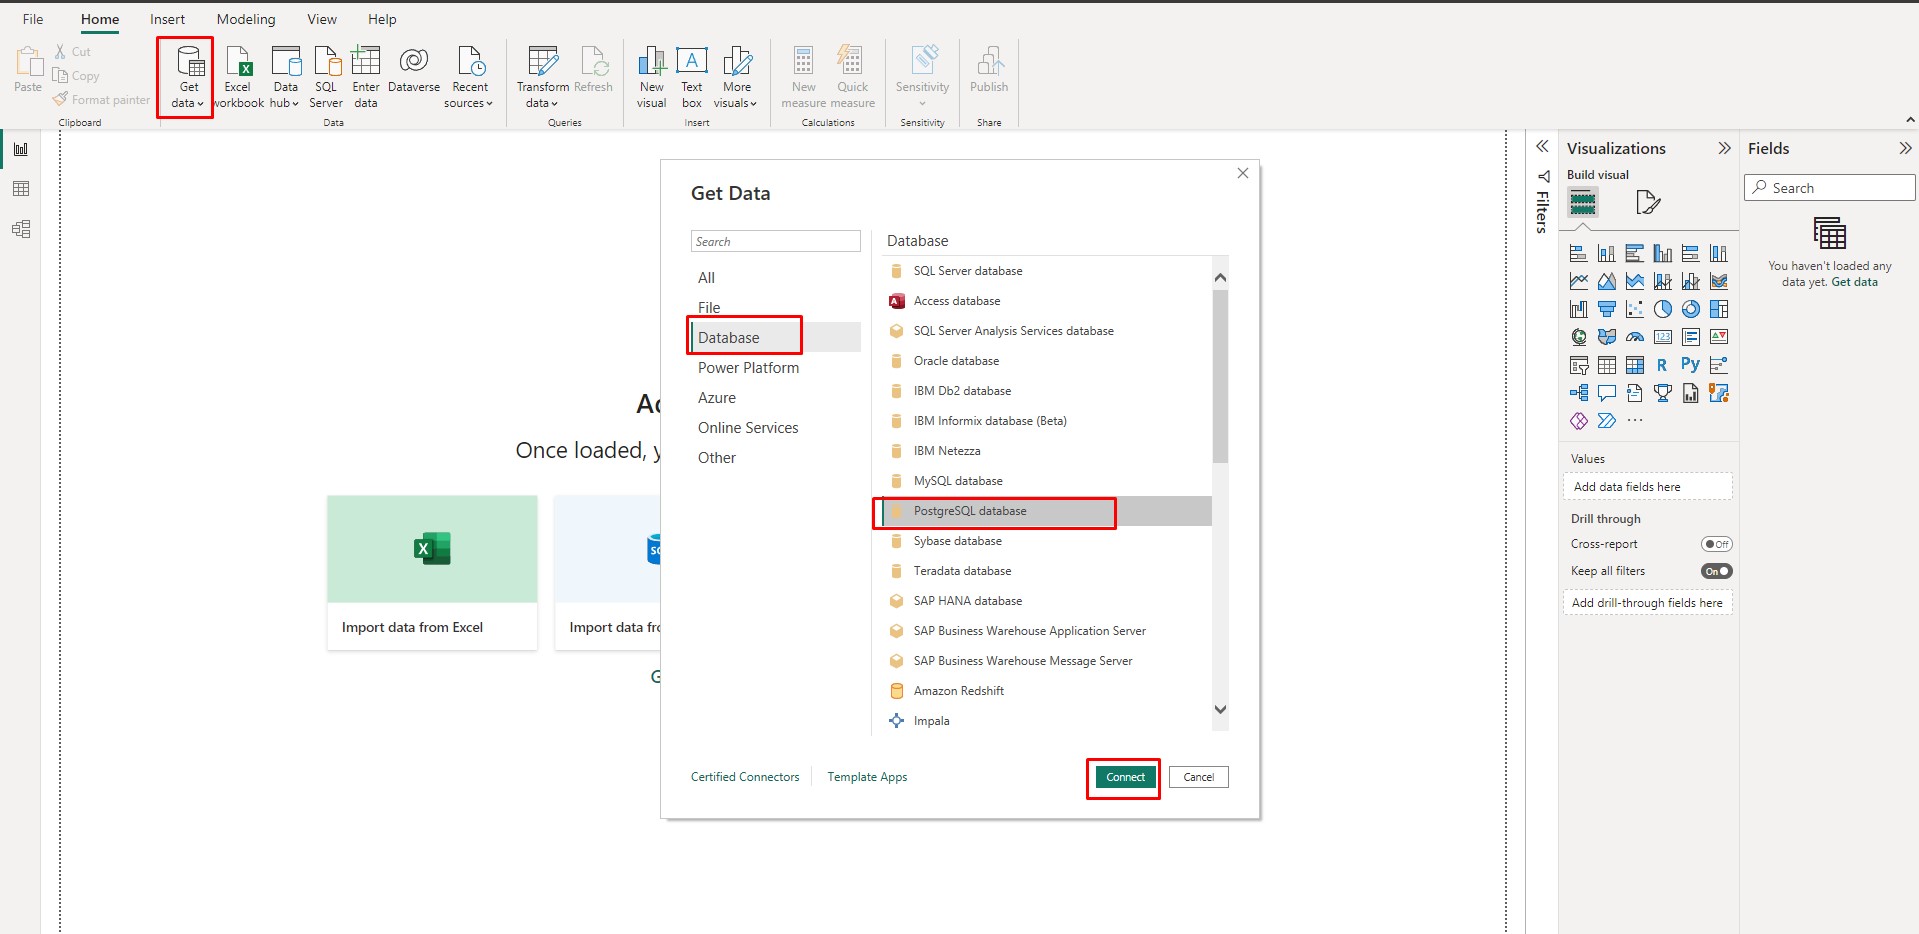
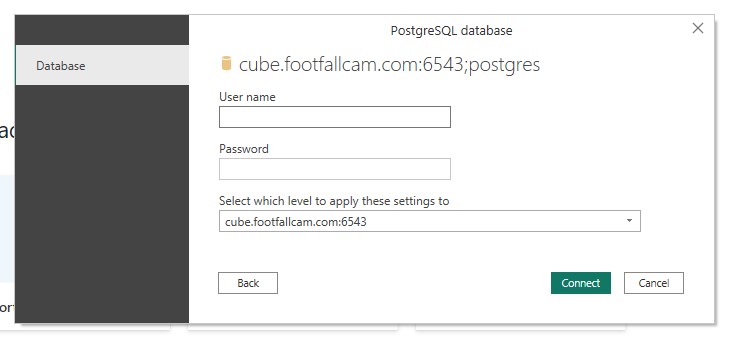
- Then you will be redirected to PostgreSQL login page. Fill in the details below:-
- Server : beta-cube.footfallcam.com:6543
- Database : postgres
- Data connectivity mode : DirectQuery
- Then click ok, and you will be directed to the user login page
- Please contact FootfallCam Support via Support Portal to request for user credential.
Sales Data Integration

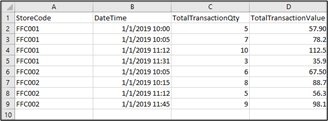
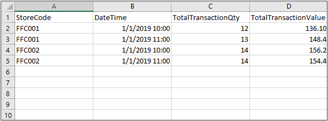
Prepare Import Sales File
The requirements MUST adhered to the imported file are listed as below:
|
Item |
Description |
|
File Format |
Comma-separated values (.csv) |
|
1. StoreCode |
StoreCode must match with Site Code in FootfallCam Analytic Manager V9™. (Info: For more information on Site Code, please refer to Section 4.5 Manage Site Detail.) |
|
2. DateTime |
The format of DateTime must be DD-MM-YYYY hh:mm. |
|
3. TotalTransactionQty |
TotalTransactionQty is the number of transactions made by customer and the format must be Whole Number and without any special character. |
|
4. TotalTransactionValue |
TotalTransactionValue is the amount of payment received and the format must be Numeric up to 2 decimal places and without any special character. |
The TotalTransactionQty and TotalTransactionValue can be aggregated in hour according to the sample as below:
| Before Aggregation | After Aggregation [Optional] |
 |
 |
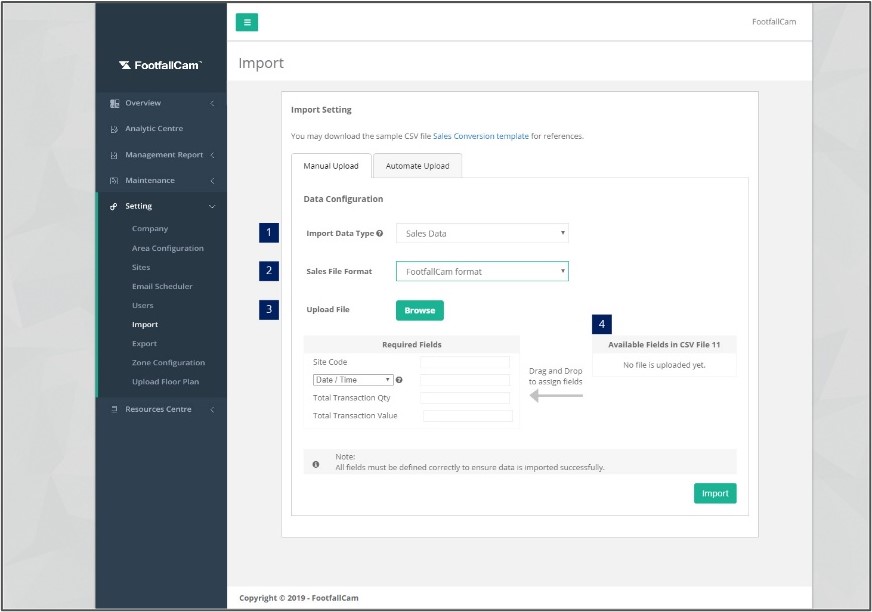
Import Sales File Option
|
Option 1 - Manual Import |
||||||||||
 |
||||||||||
|
STEP 1 - Click on Setting > Import to access the Import page. STEP 2 - Click on Manual Upload tab to access the Manual Upload tab. STEP 3 - Complete the process by entering all the required fields and click on Import button.
|
|
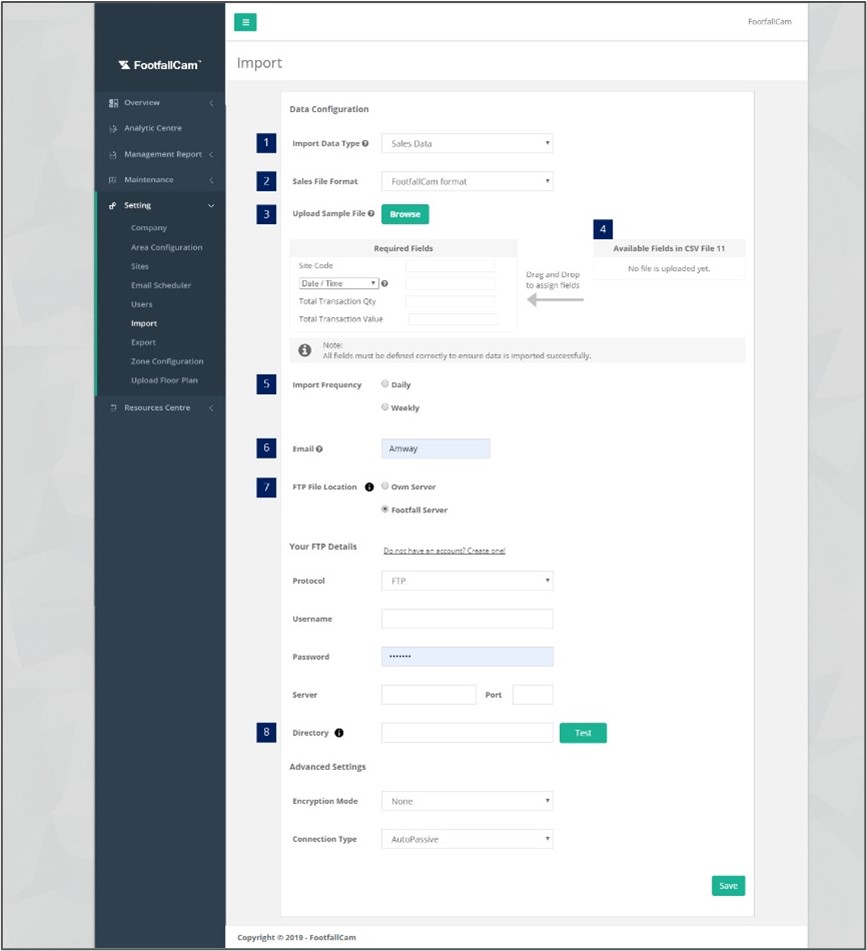
Option 2 - Automate Import |
||||||||||||||||||
 |
||||||||||||||||||
|
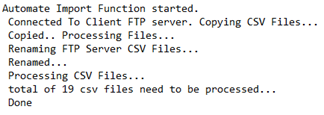
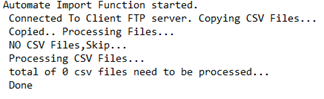
STEP 1 - Click on Setting > Import to access the Import page. STEP 2 - Click on Automate Upload tab to access the Automate Upload tab. STEP 3 - Click on Configure to access the Configure Automate Import Setting page. STEP 4 - Complete the process by entering all the required fields and click on Test button to ensure the process run successfully. STEP 5 - Click on Save button to complete the process.
|
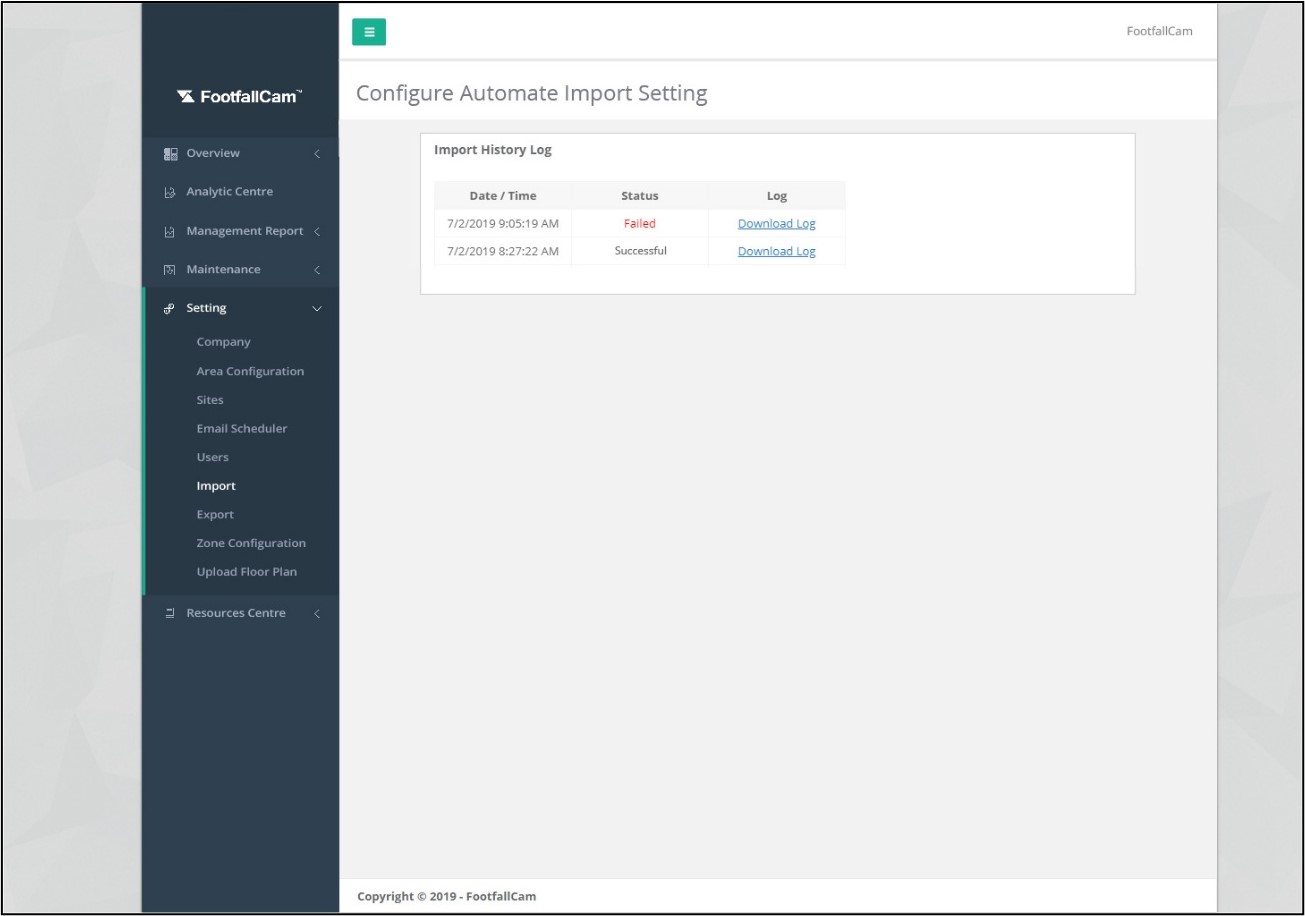
Import Sales File History
STEP 1 - Click on Setting > Import to access the Import page.
STEP 2 - Click on Automate Upload tab to access the Automate Upload tab.
STEP 3 - Select the Import Data Type to manage and click on Edit.
STEP 4 - Navigate to Import History Log at the bottom of the page.
STEP 5 - Click on Download Log to view the import status in details.
|
Import Successfully |
Import Failed |
 |
 |
Custom Sales Data Import
Please fill in this form and send back to use with the sufficient information. Our technical person will get back to you on the next step on the integration.
FAQ
Question 1: How would you ensure that the API is secured?
- SQL Server API will need to be accessed through user name and password
- Password is being stored as encrypted string that can only be decrypted with the key that holds inside the SQL Server and the key is being hidden from user
- REST API call to retrieve data will also need to be called with encrypted access token
- The owner of the server can opt for firewall blocking and IP whitelisting for SQL Server to further enhance the security of the server
- Default port will not be used to prevent hijack from hackers
Question 2: How would FootfallCam deal with the huge traffic of API requests and responses?
Traffic handling is performed by Microsoft SQL Server there is no additional handling from FootfallCam. But the database script that FootfallCam provides for data pulling (API) is already fine-tuned to prevent bottleneck.